Monday, January 25, 2016

Beaver Wars in Ohio playtest: Turn 2

Eight players gathered on a cold, January morning to refight the clashes that, centuries ago, could have occurred not from from where we sat. The Beaver Wars in Ohio simulates the late 17th and early 18th century struggles between Native American tribes for dominance over hunting and trapping lands in what is now Ohio and surrounding states. A local pizzeria graciously donates their side room to us every three weeks or so, and we reciprocate by enjoying a post-game lunch of pizza, subs, or salads.

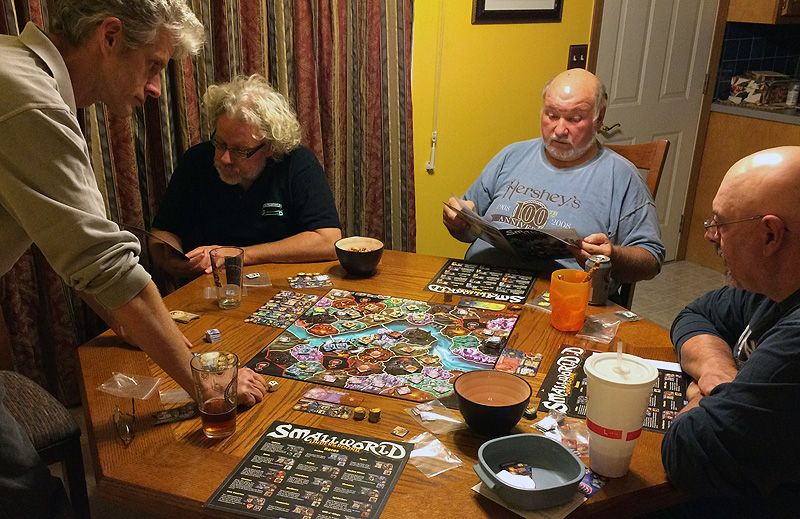
The campaign for Song of Drums and Tomahawks rules uses strategic card play to determine a player order and the number of beaver pelts each side obtains that turn. Tribes also fight a skirmish with an opposing tribe each turn. The battles are rolled from a list of 18 that will come included in the campaign rules. Triumphs over opponents, scenario victory points, and beaver pelts will determine the campaign victor. We are playtesting not only the campaign rules for balance and fairness, but also the scenarios to make sure they are enjoyable, present interesting tactical challenges, and are not one-sided.
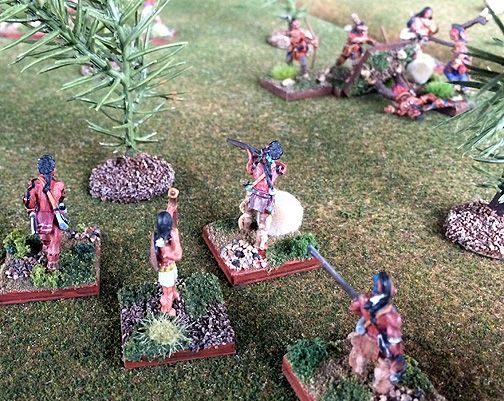
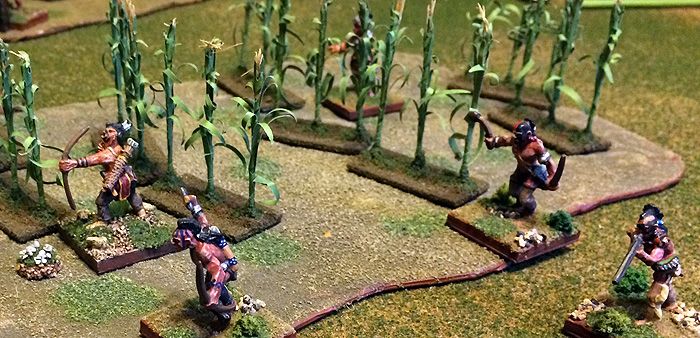
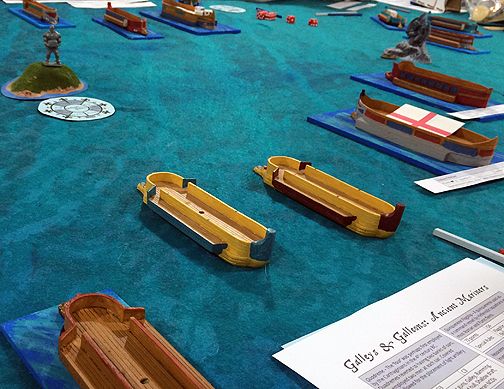
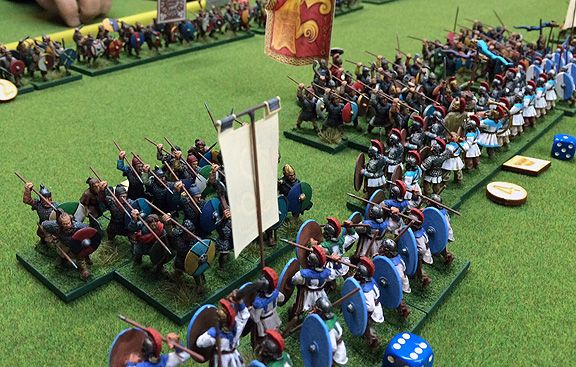
My Erie traders prepare to move out and engage the Seneca who had stolen items from our trading bundles at the European fort
This turn's clashes included a rum-induced brawl between opposing Seneca and Erie trading groups inside the walls of a European fort (entitled, "Who's a Thief?"), a Shawnee ambush of a Mohawk traders portaging their goods past a rapids ("Attack at the Portage"), and angry Kickapoo villagers chasing down a band of raiders from the Neutral tribe -- who'd seized captives while the men were off hunting ("Rescue the Captives"). And finally, Miami warriors lay in wait for a Susquehannock trading party escorting pack horses along a forest path ("Ambush the Traders").

The players' forces tend to improve after each turn. Although they are given the same basic campaign army points to buy their force for each battle, they are given a number of free upgrades depending upon their progress in two categories. The first category, beaver pelts collected, determines how many matchlocks they receive to replace their bows (which come standard). The second category is Scenario Victory Points. Their accumulated total throughout the campaign allows them to purchase Traits from the Song of Drums and Tomahawks rules for specific figures in the force. These can include Marksman (+1 to shooting), Strong (+1 to melee), Primitive Weapons (think Chingachgook's club in The Last of the Mohicans), Sprinter, Steadfast, and so on.
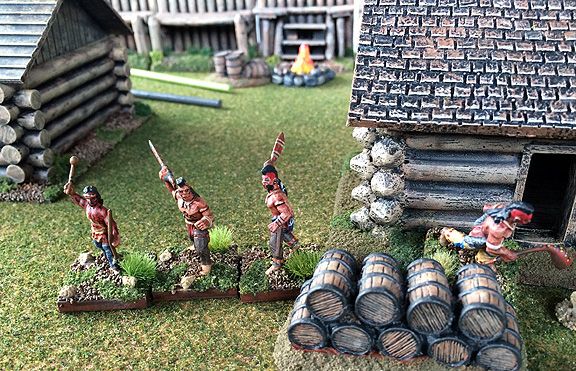
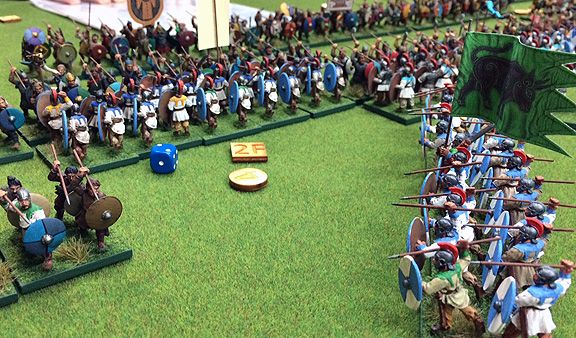
The enemy Seneca boldly advance out between two log cabins, stung by our accusations against them of theft
I am playing the Erie tribe in this playtest. Our skirmish for this campaign matched us up against a party of thieving Seneca that had stolen goods from our bundles inside the European fort (of course, they were making the same claims against us!). I decided to give one of my two matchlock swaps to my Leader since he has a higher combat score. The other matchlock went to a Warrior. I was at the lowest level in Scenario Victory Points (dead last, I must confess), so I received only two points of upgrades. I decided to spend both to make my Leader a Marksman. With a higher Combat score than rank and file Warriors or Youths, I figured he could be fairly lethal. As it turned out, my leader slew three Seneca all by himself, but then I'm getting ahead of my story...!

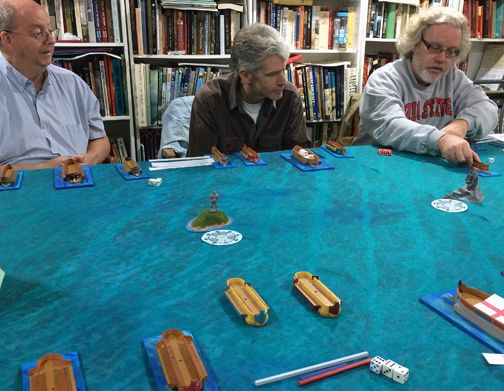
My opponent set up the wooden stockade walls and log buildings that made up our battlefield. It would be fought wholly within the confines of a French trading post. He also placed various piles of firewood and stacks of barrels throughout the open areas to provide cover. I placed my campfire and bundles in one corner, and my opponent placed his in the opposite one. The battle opened with us advancing cautiously, using the cover of the buildings, barrels, and woodpiles.  I kept my two youths to the rear of my force, thinking to send them on an end run to loot the Seneca bundles once our forces joined. My bow-armed warriors led the way, the two Indians with firearms close behind.
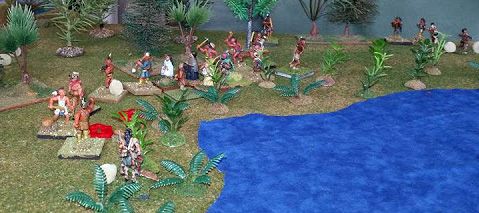
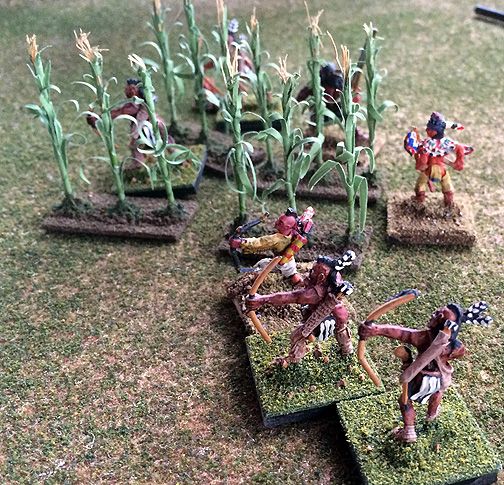
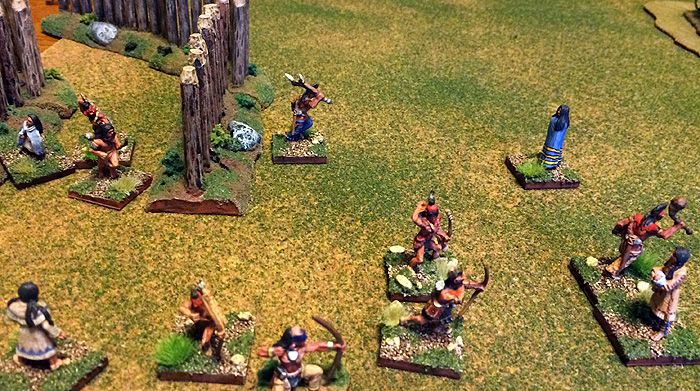
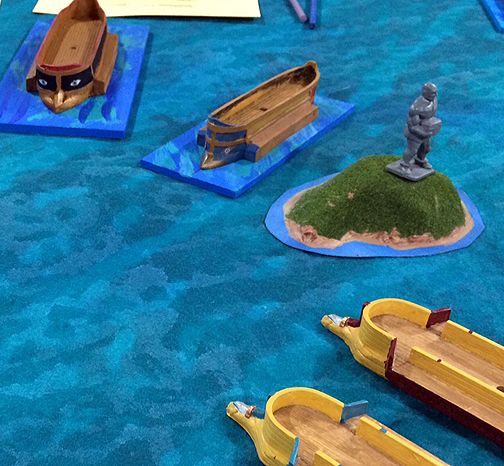
A Kickapoo blocking force and pursuit force catch the Neutral raiders on a forest path along the lakeshore
My chief and his companion with the matchlock found a good firing position behind a stack of firewood, and blazed away at the Seneca. When one of the enemy with matchlock darted forward and shot down one of my Warriors, he was charged in turn and dispatched with a tomahawk. Both of us were proving rather deadly, and our losses began to mount. I was happy that we were killing as many foes as the we were losing ourselves. I thought the battle was won when we forced him to make his first morale tests upon losing over 50% of his force. The Senecas withdrew only a short distance, though, forcing us to go get them to drive them off.

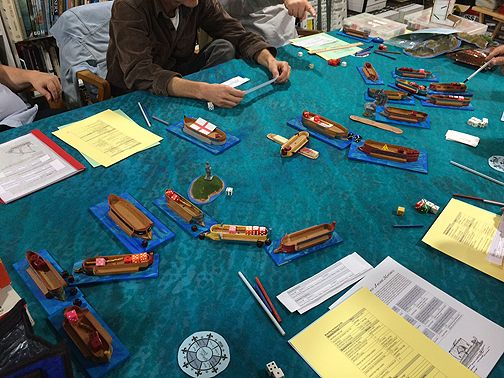
A turning point came when two of my warriors darted up to attack two Seneca sheltering along the corner of a cabin. My opponent rolled a "6" in both battles, which knocked my braves down, leaving them vulnerable to be finished off on his turn. Both died, and our numbers dropped below 50%, forcing us to give ground back to near our original position. The last few rounds were tightly contested, but I had only my chief and two Youths left, while the Seneca had their leader and three warriors. It wasn't long before only my chief was left, who knew the fight was lost, and escaped over the walls of the fort.

My own game was so gripping that I really did not have much of a chance to watch the others. Keith Finn, the player controlling the Neutrals tribe, has written up a good account of his attempt to evade pursuit by angry Kickapoo villagers who were seeking to recapture the captives he'd taken. Check that account out on Keith's website here: Orca Finn's Basement

Otherwise, the Susquehannock were able to blow by the Miami ambush and win the turn's most overwhelming Major Victory. This enabled them to take the campaign lead on total points in the three categories we are competing over. The turn's other ambush, a Shawnee attack on a Mohawk hunting party at a portage site, was as big of a success as the Miami one was a failure. All of the Mohawk ended up fleeing the battlefield, giving the Shawnee their second victory of the campaign (and second place on total points).

After two turns of play, here is the Leaderboard in total victory points:
Tribe
Place
Victory Points
Susquehannock
1st
20.5 points
Shawnee
2nd
17.5 points
Neutrals
3rd
17 points
Mohawk
4th
16 points
Seneca
5th
12 points
Kickapoo
6th
11 points
Miami
7th
8.5 points
Erie
8th
5.5 points

If you're curious, here are the leaders in the three individual categories, as well:
PRESTIGE POINTS (Major Victory = 3 points, Minor Victory = 2 points, Minor Defeat = 1 point)
Tribe
Prestige Points (PPs)
Shawnee
5
Neutrals
4
Seneca
4
Susquehannock
4
Mohawk
3
Miami
2
Kickapoo
1
Erie
1

BEAVER PELTS
Tribe
Beaver Pelts
Mohawk
15
Susquehannock
13
Kickapoo
11
Erie
7
Miami
7
Neutrals
7
Shawnee
7
Seneca
5

SCENARIO VICTORY POINTS
Tribe
Scenario Victory Points (SVPs)
Neutrals
31
Susquehannock
31
Shawnee
29
Seneca
23
Mohawk
16
Kickapoo
15
Miami
15
Erie
13


Tuesday, December 29, 2015

Beaver Wars in Ohio playtest: Turn 1

It has been more months than I'd hoped, but the Beaver Wars in Ohio are being re-fought once more. The Beaver Wars were a series of conflicts fought in the late 1600s and early 1700s between Native American tribes over hunting and trapping lands. The campaign seeks to recreate that struggle in the Ohio Valley, the area of my home state. At the close of the first phase of our playtest, I'd re-tooled the rules to make them simpler. I also changed or eliminated the mechanics I didn't like, and worked to head off tendencies I was seeing that I saw would create trouble. I listened to playtester feedback and incorporated some new ideas.
Gaming The Beaver Wars at a pizza shop in Central Ohio -- where some of the action historically took place!
The newer, simplifield Beaver Wars rules were sent out to my batch of playtesters (mostly new to get a wider variety feedback) to read over, and we started up an 8-player campaign the day after Christmas. This campaign would cover the earlier of the three phases of the Beaver Wars (the last one covered the middle phase). The tribes participating would be the Seneca and Mohawk from the Iroquois Confederacy, along with their traditional enemies the Erie and Susquehannock. The dubiously-named Neutral tribe would participate, along with Ohio native tribes the Miami, Shawnee, and Kickapoo.
My Erie tribesmen move up to attack the much better-led Mohawk hunters
Strategic orders went by the wayside. No longer would players have to choose between "Invade," "Raid," etc., in this campaign. Instead, players have a series of cards that they play which characterize their actions between two poles. One extreme is almost total mobilization for war, while the other extreme is almost total dispersal to hunt and trap. This effects not only how many beaver pelts they obtain (one of the campaign objectives), but also the order that players select their tribe's opponent for this turn. The cards chosen by the opponents determine which chart they will roll on to see which scenario they will play in their battle. The Beaver Wars in Ohio campaign rules will contain 18 scenarios, complete with maps, terrain layout, special scenario rules, deployment, and scenario victory conditions. For those that are less interested in refighting this fascinating conflict, the scenarios will also hopefully provide a lure for purchase the set.
Angry villagers from the Neutral tribe advance through the fields to stop the Shawnee horse thieves
 In my first turn, most of the tribes leaned towards the hunting and trapping end of the spectrum. The less aggressive stance means they obtain more beaver pelts as a result of the turn. This raises their level on a chart which determines how many figures on their battlefield roster may be armed with firearms as opposed to bow. All tribes receive pelts, but the difference between the tribe that chooses the most warlike stance and that the chooses the most hunting-focused actions is fairly significant. There are bonus to the player who chooses warpath, but I filed this observation away as possibly in need of tweaking.
Shawnee warriors and youths escape into the woods with their stolen horseflesh!
 The players produced four battles on turn one. That is another change from the first version of the campaign. Under these rules, every player who shows up fights a battle (unless there is an odd number, when the least aggressive becomes the odd-man-out). I didn't like how we would sometimes have 6 players show up, only to have two people fight battles and the other four relegated to watching, or playing something else. So, eight players meant eight battles.
A bloody running fight developed between rival Kickapoo and Miami hunting parties
 As insurance against players who had something come up and prevent them from attending, I am playing as the eight player, this time around. If I have an odd number, I will be the one who doesn't play -- not one of my players. This will probably disappoint the players if it happens, as I am renowned for my horrible dice rolling, making me an attractive target! Incidentally, we are meeting at a local pizza shop which has a side room available. We arrived the day after Christmas and moved the tables around to suit our needs. Not only do they have good food, making a tasty lunch a bonus, they have free soda refills.
Seneca raiders advance through Susquehannock cornfields intent on captives and scalps!
My scenario that my Erie tribe rolled up was "Trapper's End." I had captured a Mohawk trapper and was holding him as bait to lure in the Mohawk trapping party. That was about all that worked in my plan. My dice rolling was true to form, and every time I closed with the enemy, my activation rolls would go south. Meanwhile, the Mohawk player was cautious, kept his forces together, and overwhelmed my unsupported attacks on his firing line he'd set up. I kept at him, though, and had a couple successes, but soon my forces dropped below half and we were running from the battlefield. I ended up with a Major Defeat, the Mohawk with the turn's only Major Victory.
A Seneca youth knocks out a Susquehannock woman in the fields...has the young man found his bride?
Next to me, the Shawnee had sent a raiding party to steal horses from a Neutral village. Yes, there really was a tribe called the Neutrals in America (so-named for their not taking sides in the bitter fight between the Iroquois and Huron confederacies). Otherwise, they were every bit as aggressive as other Indian tribes. The Shawnee deploy in or near their enemy's corral, and quickly began shuttling horses towards the woods on the opposite corner of the board -- their objective being to exit there. Keith had a hard time marshaling his braves, who show up on board in small bits, but nevertheless advanced bravely into the village cornfields to contest this thievery. What followed was a close, hard-fought battle that actually ended up with both sides equal in Scenario Victory Points (SVPs). The tie-breaker that I came up with gave Joe and his Shawnee the Minor Victory, but both earned Prestige Points (PPs) for their battlefield valor and success.
Susquehannock women and children pound towards the gates and safety while their men boil out of the palisade entrance to defend them
Our third battle saw a Kickapoo hunting party being pursued by a much larger Miami one. The Kickapoo goal is to run the gauntlet of a blocking force of Miami before overwhelming numbers show up behind them. I saw the least of this game, but I heard it was the most bloody of the turn. Both eschewed shooting and waded into hand-to-hand combat. The Miami warleader had to balance bringing up reinforcements with leading his men to engage and cut off the retreat path of his enemy. Once the Kickapoo fell below half strength, they scattered and soon ran off-table, giving the Miami a Minor Victory. The Kickapoo caused enough casualties to ensure the Miami remembered the engagement, though.
The wargame rules we are using -- written by yours truly!
The final battle was one of my favorite scenarios I'd written for the campaign: "Bring Them in Safely." The Seneca were raiding a Susquehannock village and surprise them, meaning that some of the tribe's women and children were still in the fields outside their stockade. Their goal is for them to scurry back through the entrance before being taken captive by the Seneca raiders. The Susquehannock defenders arrive in three batches over the first three turns, meaning they have to balance caution with boldness to save their women. Some of the Susquehannock women proved they needed no help, as one cut down a Seneca youth who sprinted ahead of the rest of his Iroquois brethren. The Seneca soon had more than half of the women and children in their clutches, but they proved hard to hold onto, and wriggled free more than once. Arrows flew and matchlocks boomed between the opposing forces, and a warriors fell. In the end, the Seneca held only two captives. A fatal shot by one of their warriors armed with a matchlock felled the Susquehannock leader, though. This caused the defenders to retreat back inside their stockade. The Seneca were content to carry home four scalps and two captives, and withdrew, as well.

Everyone enjoyed their battles, and I took notes on suggestions they made to scenarios and the rules. I made a couple minor tweaks immediately, but the bulk of what the players suggested were simply clarifications or suggestions to their scenarios. It is my intention that we should playtest each scenario 2-3 times over the course of the campaign.  We are meeting again Jan. 23rd, so if you enjoyed this report, you can look forward to more tribal warfare beneath the forest canopy soon.

The rules we used are my own Song of Drums and Tomahawks, which are available on both Ganesha Games' website and Wargame Vault. Links are below, if you're interested in picking them up. I hope to finish the playtest by summer, and make the campaign rules available then. They will also contain extensive historical information about the tribes and course of the actual historical conflict.

Mike Demana
www.firstcommandwargames.com

Links to buy Song of Drums and Tomahawks:

"Fortune and glory, kid, fortune and glory..."

The massive board, piles of Fortune coins, and players off vying for artifacts stashed around the world
Our first post-Christmas, Sunday evening gaming sessions saw us trying out a mega board game that Mike S had received. It is Pulp-themed game called, "Fortune and Glory." The obvious reference is an Indiana Jones reply to Short Round in the movie Indiana Jones and the Temple of Doom. This is a big, expensive game with lots and lots of what our friend Zeke calles "fiddly-bits." We were testing out the Basic version, which saw about half of the bits not in use.

As players, each of us takes on the role of a Pulp explorer or personality. Mine was a French, tomb-raiding "scoundrel" named Jacques. Each explorer has a card with his abilities and a figure to be placed on the game board. The card lists your statistics in Fighting, Cunning, Agility, and Lore. These are what you will use to pass various tests, such as traps in tombs, fighting Nazi or other enemies, and figuring your way out of situations like being trapped in a plane with no pilot (or parachute). Your goal in the basic game is to attain 15 Fortune points (17 for Jacques, cause he's a greedy S.O.B.), which are represented by plastic, golden coins in two values. Plastic blue coins represent your "Glory," which you can spend to get equipment, allies (not Jacques, cause he doesn't share his fortune or glory -- because he's greedy), and even to get healed up.
Jacques' card, loaded down with Glory coins and the wounds he suffered to obtain the fabled Gauntlet artifact
On the board, which is a colorful world map divided into areas, are placed 4 artifacts. Our goal was to be the first to reach those artifacts and pass the tests to solve and obtain them. Some artifacts need only 3 tests, others required 5. Each test takes the form of a random Danger card. Often these give you a choice of using your agility to avoid it, cunning to find your way around it, or (like Jacques) wade in and punch and shoot your way through it. Each test you pass earns you "Glory" points. Failing a test, forces you to try to pass the Cliffhanger on the back. If you pass, your turn is over, and you can pick up where you left off next turn. If you fail, you take a certain number of wounds or are even returned to your starting location minus 1d6 fortune, glory, equipment, allies, etc.

Jacques began the game in Alexandria and crossed the Mediterranean on the first turn and arrived in Venice, to find the long-lost magical "Gauntlet of...(um, I forget)".  At the end of any turn where an artifact was obtained by a player, a new one is drawn and randomly placed on the board using the game's cards. It is a clever system, with the first card saying "The Eye of...", "The Heart of...", or other such titles. The second card gives the name, "Pharrah," etc., and the third the location. Jacques was able to punch his way through all five tests, and I snagged my first artifact. The other four players were doing the same, with various degrees of success or failure.

Fortune and Glory is not a quick game, and where the designers get a 90 minute playing time from is a mystery to us. It took us about 3 hours to get to the point where Jacques made a delivery in San Francisco and earned his 17th Fortune point. Of course, I was forced by the other players to make two re-rolls with cards they'd accumulated, but my luck persevered. It was a fun game, and now that we've played it once, I can see it going a bit faster. Also, we now realize the value of equipment, Allies, and other things you can acquire to help you out along the way.

The best thing about it (besides the fact somebody else spent the $90 to get it -- not me...ha, ha!), is that it accommodates a large number of players (8, I think). We rarely have only four players, which so many board games seemed designed around. I can definitely see us playing this again and braving dangers to obtain more Fortune and Glory.

Thursday, December 10, 2015

Women and Children...Definitely not First!

25mm Old Glory Indian villagers - the one on the left is probably my favorite of the batch
 I think this batch of seven 25mm miniatures broke the record for sitting on my desk, half-painted. A complete lack of motivation kept them there, as weeks rolled by into months. It is not that the figures themselves were unattractive, uninspiring, or difficult to paint. The six Indian women and one child wore deerskin dresses or the occasional cloth blanket. They had not equipment to speak of and were relatively cleanly cast miniatures -- especially for Old Glory. It is just that the "painting bug" -- as I used to call it -- had fled into some hidden spot.

I rallied a week ago, though, and was able to polish them off this week. With the restart of the Beaver Wars campaign playtest looming, I would possibly need Indian civilians soon. So, it was good old deadline pressure that drove me, doubtless. Far more reliable than the bite of any shy painting bug, it seems needing to get something done for a project is what motivates me most consistently. I know that I used to treasure my hours of painting miniatures because of the therapeutic relaxation that it provided. Am I losing this? I hope not.
I used brighter colors on the cloth blankets and more faded, dull ones on the fringed, deerskin dresses
Anyway, I had been on the lookout for suitable Native American civilians for a couple years before my friend Mike happened across these. He was looking at Old Glory's 25mm catalog online when he noticed they made a package of Plains Indians villagers. Mike had noticed they looked very similar to depictions of villagers of Eastern Woodland Indians we'd seen. Now, if you're familiar with Old Glory, you know their figures come in large packages -- 30 figures, in this case. Mike decided he didn't need 30 and offered to split the bag with me. We'd divvied them up at Cincycon earlier this Spring. These seven were the first I had prepped and begun painting for the tabletop. My motivation had stalled when their skin and the basecoat on their deerskin dresses had been applied.

I'm not the biggest fan of Old Glory. Their greatest selling point is their very reasonable pricing. However, these poses weren't bad, for the most part. Some were actually very nice. So, they were fun to paint up once I got my mojo back. For their deerskin outfits, I used a variety of medium brown to light tan shades. I applied a lighter tone to each as a dry brush, and then added accents and pattern decorations in dull reds and faded blues. The cloth blankets were done in much brighter colors -- all with a patterned border or series of stripes. Once again, I referred to my copy of The Narrative Art of Robert Griffing: The Journey Continues. It is my indispensable tome for what Eastern Woodland Indians looked like. 
Several generations of Indian villagers depicted...the little girl looks remarkably self-possessed!
I really like how they turned out. I think the patterns and decorations on their dresses really make them pop and appear realistic. As strange as it may seem, I was actually inspired to paint up the rest of my allotment of the figures. When you think how long they sat unpainted on my desk, that's all the more remarkable. Need won out, though, and instead a batch of Footsore Miniatures Skraelings won out, and sit primed and next in line. My playtest group may be much larger for this second go-around of the Beaver Wars. So, I'm figuring I'll need more Indians who aren't armed with a musket, and instead hold bows or hand weapons, as theses do.

Still, the women and children may be next. A few of my scenarios for the campaign require civilians. So, I DO need them...right?


Friday, December 4, 2015

Ramming our way through Galleys & Galleons

Our opponents, Tom, Joel, and Allen, bickered and laughed their way through the game that ended with a hard-fought victory for them
 It is always seemed to me that there were two types of ancient naval rules sets. One is overly simplistic and provides unrealistic results. The other is too detailed, and takes too much time to learn the nuances for a game we don't play all that often. So, when Galleys & Galleons came out earlier this year, I immediately lumped it in my mind in the former category. We had played many of the "Song of Blades" engine games, and I didn't see how its activation system would adapt.
Our side's fleet rows towards the enemy
Our group of six were pleasantly surprised by the feel that G&G gave us. We were playing an Ancient naval game (Greeks vs. Persians? There were no historical specifics in our scenario. Suffice to say, there would be three four types of weapons in our game: Ramming, catapults, "chaser guns" -- lighter catapults, and archery. Nothing really rang wrong, except maybe how archery could cause so much damage when ships got really close. G&G does not differentiate between physical damage to a ship and casualties to a ship's crew.
Two of my quadiremes use Colossus Island to lie in wait for a larger enemy quinquireme and trireme
Those familiar with the activation mechanic of "Song of" games will be interested to see how it is handled in this game. The smaller, faster and more nimble ships have the better quality, while the larger, slower galleys will find it a little harder to activate. Flagships give a +1 like leaders do in other iterations of Ganesha rules. All in all, we weren't overly bothered by the rolling to activate ships, and the possibility of "crapping out" and losing your turn -- which I managed to do several times over a crucial span.
The battle becomes a mess of rammed and entangled ships
One of the more clever mechanics is how damage is handled. Each ship can take damage to a certain level, then become crippled. Once crippled, there is a chance that they will sink or surrender if fighting a boarding action. There is even more elegance and depth to the damage a ship takes -- particular when it attempts to activate on subsequent turns. We all thought it was a clever effect.
We kept track of damage with dark red dice and pretzels (oars that have been sheared away)...the black dice indicate grappled ships...pink dice a crew that has been boarded and has surrendered
We will definitely give G&G another try. Some of the players expressed the opinion that we may have found a simple system that provides realistic results. Either way, it was a fun way to spend several hours, ramming our way through a new rules set.

Monday, November 23, 2015

Rumble in post-Roman Britain

Steve, on the left, watches as the battlelines clash. Joel, Allen, and Keith -- our Saxon enemies -- let loose the dogs of war!
 Steve had a hankering to do a Dark Ages battle and get a chance to field all those 28mm Late Roman/Briton and Germanic troops he'd been collecting. He decided to use Might of Arms, despite the fact most of our recent games had been using Hail Caesar. He said he'd always liked the way the rules played, and wanted to see how they worked for a game he had in mind.
My command huddles in shield wall as we watch the Saxon hordes close from across the battlefield
The scenario was a Romano-British force plugging a valley to stop a force of Saxon raiders from returning home. Meanwhile, the Romano-British cavalry are attempting to circle around behind the Saxons and catch them in a hammer and anvil. The Saxons need to break through. Steve deployed the troops for us and they stretched completely across the 8' wide board. Hub-to-hub infantry would clash -- no maneuver! In addition, there was zero terrain. This was the proverbial billiard table. We were to envision steep hill on either flank blocking each side. I like to rib Steve about his scenarios like this, but I think this was more to test out how the rules worked for Dark Ages and less a final scenario for a convention.
Our army commander exhorts the troops in front of him as the first line of Saxons smash into our shieldwall
We had three Mikes in attendance, so decided to put all three of us on the same side. That way, we could claim Mike either won or lost the battle for us, and leave people wondering which. The Mikes would be the Romano-Brits, and I drew the left flank command of 4 infantry units -- one of nobles, there ordinary. Across from us was a wall of Saxon wedges and infantry units eager to close. Since time was on our side, I counseled my co-commanders to form shield wall and sit tight. Let them come to us. The longer we hold out, the better chance the cavalry would arrive and secure victory for us.
The initial clash had grim moments for Allen and Keith, as both were to lose their commanders fighting in the front rank
That seemed to set the tone -- at least on my flank. I stayed in shield wall as much as possible, excepting my one reserve unit, which danced this way and that in anticipation of filling the hole for whichever of my units would break first. I did not follow up victories, forcing the Saxons to wait a turn to charge back in to me. The rules meant our shield walls blunted their charges, so it did not matter who charged into combat.
Spears and swords thud on shields all up and down the battleline, and fatigue begins to pile up
I was faced off against Joel, while Allen was in the middle and Keith on the far flank. All three Saxon generals fought in the front rank -- urged on by Steve who said that was the way they would do it. Early on, both Allen and Keith's generals rolled the inevitable "1" on a d6 and died. Since generals count towards the five unit losses required before having to pass Army Morale checks, the Saxons were in trouble in a hurry. When they reached 5, we were still sitting at one lost unit (one of mine). As sole remaining commander, Joel proceeded to roll excellent Army Morale checks -- passing on three consecutive turns (one of which as a 5 or less on 2d6!). 
Many of the Saxons could fight in wedge formation, which was canceled out (for the most part) by our shield wall
Our losses continued to mount, and soon we needed to check, as well. I had lost my general, accounting for 40% of our required losses (no surprise...ha, ha!). However, Joel was down to needing a 3 or less because of the losses inflicted over and above the check point of five. Luckily for us, Joel failed his check and the Romano-Brits were victorious. The Saxons broke and ran back down the valley, where they would be met and ridden down by the thundering hooves of the cavalry.
The Saxons broke through our lines in one point (yes, sigh, it was mine), but our reserves immediately plugged the gap and soon drove them back, sealing the breach
I liked some of the mechanics of the game. It is less dice-intensive than Hail Caesar. The morale checks are important, but are rolled with 2d6 (one of my favorite dice combinations). One thing I noticed upon reflection is that with a single 1d6 combat roll to add to the tactical factors and combat modifiers, there isn't a lot of granularity of die rolls. The most you can outroll your opponent is by 5 pips. That may mean units who are at a disadvantage cannot win a battle mathematically. However, this is compensated by the morale check stage. Once units become "worn," they begin taking their 2d6 morale checks. Units with more damage test before lesser bloodied ones. Thus, the disadvantaged unit could pass its checks while the winning unit fails its checks. So, once you start to slide in a combat, it is not a mathematical certainty.

I would definitely be willing to play Might of Arms again. We thought of some other slight modifications to combat to try, as well. I really didn't see how maneuver worked, as we all simply marched forward. There was a little wheeling and turning among the reserves, but no real chance to see how the movement system worked. I told Steve I'd like to see a more open battlefield next time, with terrain and units having to do something besides march forward and roll dice for combat.

Either way, it was good to get Ancients out on the battlefield, again. Plus, Dark Ages Britain is one of my favorite time periods. So, anything set in that era is going to catch my interest!


Sunday, November 15, 2015

Old School Naval Wargaming

Allen insisted, so we got down on my living room floor for some old school WW II Naval wargaming
It was a little time warp as we played General Quarters with Allen's 1/2400 scale WW II ships. The rules are a bit dated, but in their day were a "beer and pretzels" set. Now, some of the mechanics seem a bit cumbersome -- especially firing torpedoes. It gets harder each year to get down on the floor and move those ships...and even harder to get back up!

Allen cooked up a convoy raid scenario with a British force (Joel and Mike S) trying to jump a lightly-escorted merchant ship convoy (Steve), before the Italian surface elements can steam to the rescue (Tom and Mike D).

Both Steve and Mike S had deadly shooting in the first half of the game. Steve sunk two of Mike's destroyers with torpedoes. When Tom and I steamed into combat, Joel also entered. We traded shots back and forth, with the British getting the worst of it. Eventually, they decided to break off contact, as their cruisers were getting pounded. So, we decided to call it a victory for the Italian navy.

Hopefully, next time we get out the tiny ships, we'll be playing a different rules system...ha, ha!

Thursday, October 15, 2015

It's a Small World after all...

Sunday night board game at my place
This game probably wins the award for longevity in the "one I've been meaning to pick up..." category. I played it first a number of years ago, and liked it right away. Players control a series of fantasy races who invade and try to stake out as much territory as possible before playing themselves out, losing steam, and going into decline. Lots of player choices -- which race to choose from those available, where to arrive on the board, and how long to keep the race active before letting it go into decline so you can grab another one. Each game can be different because the races are randomly paired up with a special ability each game.

We were playing the Underground version, which Mike S owns. I began the game controlling the "Historian" Will O'Wisps. They get victory points each time another player race goes into decline. Since I took my turn last, I thought that would be a good way to pick up a few extra victory points. Next, I had the "Thieving" Mud-men, which others had shied away from because another race was in control of the muddy areas. As it turns out, their special ability -- to steal one victory point from any player with an active race adjacent to your tokens -- probably won me the game. I also briefly controlled a magic ring that did the exact same thing on one of my turns. I was adjacent to 3 of the other players, which meant they lost two points and I gained two points from each. That is a swing of four in my favor against three of the other four players (we had five total).

In the end, I was surprised I won the game. I never felt on any turn that I collected the most victory points. I guess I collected enough and avoided really low turns. The others accused me of "sand-bagging," by claiming I was losing. However, I could swear two or more players earned more victory points than me every turn. It was as great of a surprise to me that I won as it was to them!

Here's the boardgamegeek link for the game.