Sunday, December 31, 2017

Cubans for Modern Africa

Liberation Miniatures Cubans in 20mm - can you see the cigar in the mouth of the guy second from right?
Each year I create a scenario that I will run at the various conventions to introduce my wargaming rules to the public. Like the second half of last year, I will be featuring my newest rules set Wars of Insurgency. This is a modern skirmish game with each player controlling 3-5 squads of anywhere from one or more vehicles or 3-12 figures (each representing one man). This year's scenario will be called "Smokin' Some Cubans." It will feature an engagement in the between the South African Defense Force (SADF) intervening in Angola on behalf of Jonas Savimbi's UNITA guerrillas. Their opponents will be Angolan and Cuban troops.

I have figures I need for SADF, as well as the Angolan and UNITA African troops. However, I have no Cubans. So, my last miniatures to be painted in 2017 would be 20mm Cubans -- most from Liberation Miniatures. I had a couple packs of Cubans in soft caps, not nearly enough for the size of force that will be fielded. So, I augmented them with some Liberation Miniatures government troops in steel helmets, as well as some of what I believe are World War II troops in helmets, as well.
More 20mm figures that will be used as Cubans - this time Liberation Miniatures government troops
I had intended to paint them exactly like a previous batch, beginning with a light olive drab and then adding a darker OD wash. However, I forgot what I started with as my base color and ended up choosing a darker green. Once they dried, I realized my mistake. However, contrary to my normal procedure, I had painted up 18 figures all at one. Rather than go back and paint over them, I decided to experiment with a new method. I went over the Timberline Green (lighter OD) with an even lighter dry brush of Stonewedge Green. Then, I followed this up with the darker OD -- English Yew Green. I realize these color names mean nothing unless you are using the same Delta Ceramcoat craft paints. I liked the effect these three colors gave. Different than the batch before, but still a shaded olive drab with depth.
More 20mm figures that will be used as Cubans -- these are WW II figures from I honestly don't know where (I take figures out of their packs and put them in ziploc bags, so don't remember...maybe FAA?)
I painted their equipment a variety of lighter and darker colors -- mostly in green hues, but an occasional khaki, as well. I was happy with how these came out. My favorites, of course, are the actual Cubans in soft caps. They have that "Fidel Castro" look to them, so I duplicated the moustache and beard on most of the other figures, as well. The guy with the cigar in his mouth (not sure if you can see it here) was classic.

Incidentally, these are my first experiments taking pictures with the Nikon Digital SLR camera I got for Christmas. I still have a lot to learn about it, but these came out fairly good. I need to figure out the macro setting, though. These are obviously not taken with macro...

Friday, December 22, 2017

New Frostgrave Warband: Raccoons

Splintered Light Miniatures Raccons explore a ruined city
I am steadily fleshing out the warbands of Splintered Light Miniatures animals available to my players in my upcoming Frostgrave: Ghost Archipelago campaign. So far, Badgers, Pine Martens, Bears, and Jungle Rats are ready to seek treasure among the islands of the South Seas. Adding to that list is this Raccoon warband.
Front and rear views of the warband's Heritor and Warden
There is a pretty wide variety of poses and armament in the SLM Raccoon line. Appropriately enough, their clothes are in a "pirate" theme -- with head scarfs sashes, and fancy jackets. I am not sure, though, if there is one obvious commander figure for the Heritor. So, I chose this one, mainly because of his dashing but faded, green waist sash. It seems to make him stand out a bit from the pack. I didn't have a lot of choice, though, for the warden figure -- if I wanted to be strictly accurate. The rules say wardens don't carry a shield or wear armor. So, I picked this guy -- the only one I had unpainted that didn't have a shield -- for the warden. To make him stand out as the warden, I painted up an Iron Wind Metals animal as a raccoon and placed him on the base alongside the warden. I don't think the casting is really of a raccoon, but it is a small, furry creature. Painted up like a raccoon, with the distinctive bandit mask of black on the face and ringed tail, it does the trick.
Raccoon crew checking out some overgrown columns in the ruined city
The crew were also painted in similarly faded, pirate glory. I love the striped stocking caps or head scarfs. They add a lot of character to the figures. I tried to also give them a look of bright colors that have faded with too much exposure to sea and sun. As far as size goes, the SLM raccoons measure about 16mm from sole of foot to tips of heads. They are a bit stocky, though, so they don't look out of place up against the other animals I'll be painting up. They're shorter than the bears and pine martens, but about the same height as the jungle rats.

I'll be taking a short break from the Ghost Archipelago warbands to paint up a batch of 20mm Cubans for my upcoming Wars of Insurgency scenario. I'll be running a game simulating a skirmish during the counterattack by South African and UNITA forces after they had repulsed the Angolan army as part of the larger battle of Cuito Cuanavale.

Monday, December 18, 2017

New Frostgrave Warband: da Bearss!

For my upcoming Frostgrave campaign, I had some warbands that had a few figures already painted. "Da Bearss" (nod to an old Saturday Night Live skit) is one of those. And yes, I am tempted to name the leader "Ditka" -- but I'll leave that up to the player who decides to use this warband! The two figures that I will be using as crew were completed previously as part of a Lead Painters League entry. The others are all new, though.
The Bear warband's Heritor and one of its warriors -- a Ral Partha Grizzly Bear
First up is the Heritor and a Ral Partha 25mm Grizzly Bear. I will use pretty much normal crew stats for the Grizzly, perhaps making him a Specialist hand-to-hand type. I love Ral Partha (or Iron Wind Metals, if you prefer) animals. They are realistic looking and are great size to mix with the Splintered Light Miniatures that will make up my warbands. The Grizzly ("Butkus"?) was easy to paint up. A dark brown base coast was followed up with a Camo Brown dry brush. Khaki highlights were then dry brushed in. I then went back and darkened the legs with black dry brushing. He looks effective and fierce, I think.
I hand-painted the Heritor's shield, though the shield itself is a modification of the figure
I chose this figure as the Heritor, though truthfully, all of the SLM Bear miniatures are impressive looking. I picked him mainly because of his heavier armor. I don't know why, but for these figures I like to do leaders with polished bronze armor -- using some gold paint for highlights. I used steel chainmail, though, to give him an interesting composite mix. The shield is actually a modification of the SLM figure. There is a peg hole in the back where a scabbarded, two-handed sword is supposed to go. I decided I would give him a shield in case the player controlling the warband wanted his Heritor to have more armor.
The Bear warband's Warden -- love the two-handed warhammer!
Next up is the Warden, a bear swinging a seriously impressive two-handed warhammer. I picked him for the warden because they are technically not supposed to wear armor. This figure has only a couple shoulder pieces and an arm brace, so "close enough," I say! I decided to go with a rust color for the bears' eyes in this warband. The original paint job on the other two had black eyes with tiny white points to be light reflecting off, but it looked too maddened and crazed to me. I always Google images of animals before I paint them, and bears' eyes seemed to be this honey brown color in the images I found.
The Warden's familiar - a Ral Partha brown bear that, ahem, barely squeezes onto his base with him
I've also begun placing an animal on the base of the wardens as a "familiar." It will make it easier for players to differentiate the various members of the crew on the tabletop. Since I'm using what Splintered Light Miniatures makes, I don't quite have the variety and choices that a human warband would have! The bear is a Ral Partha 25mm brown bear - quite a bit smaller in size than the grizzly. I painted him up similarly, though. He should probably be a bit darker to be a true brown bear, but I like how he turned out nonetheless. He did j-u-s-t fit onto the base with the Warden.
The warband's crew members -- both were previously painted up and based (though I added the tufts)...love the guy holding aloft he axe - you can almost hear him roar!
Here are the previously painted figures from two separate Lead Painters League entries. One is armored (once again, bronze plate armor) and the other less armored. I was tempted to cut off the axe head of the unarmored one, fashion it into a staff, and make him the warden. But honestly, it is such a freaking cool figure! I love the way he's holding aloft that two-handed axe...you can almost hear him roaring a challenge to his enemies. So, I just couldn't bear (sorry) to mutilate this pose. Both poses are great -- I also love the giant, two-handed morning star. The sculpted, bronze cuirass is pretty cool, too.

These are the tallest SLM figures I own. They measure about 29mm from the soles of the feet to the tips of their ears. They tower over some of the other animal lines -- especially the mice and squirrels. The badgers aren't too much shorter, and their wolverine figures rival them in height, but fall a bit short (as U of M Wolverines tend to do...ha, ha!).  I really like this warband, though -- it is probably my favorite of the ones I've painted.

Saturday, December 9, 2017

SE Asian Jungle Ruins: Staircases, Statues, & Columns

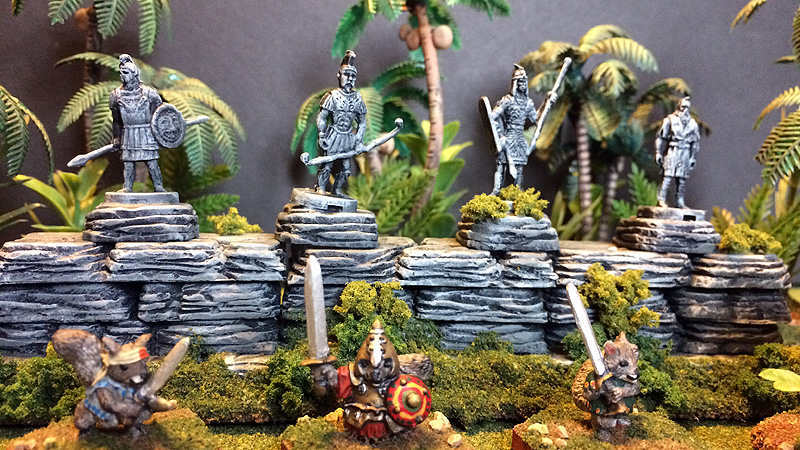
A row of statues of ancient warriors being slowly reclaimed by the jungle
Here are some more jungle ruins I created for my upcoming Furgrave (Frostgrave:Ghost Archipelago) campaign. I'm really happy with how they turned out.  I decided to do some research into what a temple ruin looks like when found in the jungle to get some ideas for small pieces to scatter here and there about the board. I pulled out a book I'd bought long ago about Angkor Wat called, "Angkor: Heart of an Asian Empire" by Bruno Dagens. This small paperback has a wealth of paintings, sketches, and photographs of the Cambodian temple complex when Europeans first stumbled upon it. I grabbed a post-it note, and began to leaf through the pages, writing down notes like, "Lion on pedestal," "Row of warrior statues," "Staircase," "Pools," and "Bridge."

This 1995 book by Bruno Dagens was the inspiration for this batch of terrain

Next, I went through the various boxes and ziploc bags of figures and terrain items, waiting for inspiration to strike. I had the Hirst Arts plaster terrain that my friend Tim had given me earlier this year, which included lots of stone pediments of various sizes and shapes. I got the idea to assemble a staircase out of these. On either side of the staircase, I would have a statue on a pedestal. Looking through my lead animals, I found a pair of Iron Wind Metals 25mm lions. They were rearing and striking out with a paw and looked perfect for the part. I needed to make the steps wide enough that my 1" figure bases could fit on them, so I pulled a bunch of pieces out and decided on three steps. I decided that the jungle had overtaken whatever the staircase led to and would simple glue on foamcore and set various plants into it.

Construction done on the ruined staircase
It took only an evening's work to assemble the staircase, simultaneously doing the other three pieces below. I used Tacky Glue to hold the plaster pieces together, and epoxy for the lions atop their pedestals. I like how building it up with various layers of the pavement pieces gives it a worn and deteriorating look. You can see the blue foam core, which I trimmed to a slop with an X-acto knife behind the statues. Once assembled, I spraypainted the entire piece matte black.
The finished ruined staircase - note the model railroad bushes (pink, red, yellow) glued into the ruins itself before flocking.
Since spray paint never seems to get into all the crevices of plaster or resin terrain, I coated the entire piece with a 50/50 mix of acrylic black paint and water afterwards. It sat out to dry overnight, sinking into all the recesses and shrinkwrapping itself onto the stone cases. This made it easy for the next step, which was dry brushing. First came a medium gray dry brush, then a lighter gray in highlight areas. Then I turned to the foam. I pulled out a handful of wire small trees and shrubs from the model railroad terrain lines out there. I poke a hole in the foam and then filled it with Tacky glue. The wire stems were inserted into there.
Another picture of the staircase - I love the way the lion statues on either side set off this terrain piece!
The ground flocking came next. I painted the areas that would be covered by grass with white glue, sprinkling on Brown medium railroad ballast. This was followed up by a 50/50 glue and water coating on the ballast, which was sprinkled with Woodland Scenic Turf Earth. The next layer was more Woodland Scenics blended green turf. Finally, various pieces of clump foliage were glued to the ruin, in cracks in the pavement, leading up the sides to represent the advance of the jungle, and onto various pieces of stone.
The two rows of warrior statues assembled
I really liked the idea of a row of warrior statues on an extended pedestal -- perhaps used to line a walkway to a temple? However, I had no suitably scaled SE Asian figures (all of my Ancient SE Asian armies were in 15mm). When digging through my various bins of unpainted stuff I found a bag of plastic figures of warriors from different periods from history. I think they belong to a board game called "Mythology," maybe? Even though they weren't technically Asian, I thought they'd look good as statues.
Squirrel adventurers explore a temple complex guarded by a row of warrior statues
Once more I assembled the pedestals using Tim's generously donated Hirst Arts plaster blocks. I decided to go with two rows of 4 statues. I would base them as two separate pieces so I could either have them facing each other in an entrance way, or create one longer walkway. I used the identical method to prime, paint, and flock the two warrior rows. I was really happy with how they turned out. Now, I'm thinking I need to make a row of paving stones to create an overgrown walkway alongside the statues to really make the piece jump out on the tabletop!
This was perhaps the easiest of all four of the pieces to assemble -- the wooden pegs make great columns, I feel!
Finally, I thought of creating some random groups of columns to show portions of temples or buildings peeking through the jungle. I had in my previously purchased boxes a half dozen wide, wooden pegs that look for all the world like fluted columns. I decided to take more of the plastic figures from the Mythology game and place them atop the pedestals on the columns. More Hirst Arts plaster pieces, and some smaller bits atop the columns, and this piece was assembled and ready for painting.
Looming from the jungle, a row of 3 columns marks the location of an overgrown building to be explored
Painting and flocking was done identically as above. I am thinking that it would be neat to have a number of these types of pieces for the tabletop. It would be especially cool to have some pieces with random, tumbled columns, or broken statues on the ground. Definitely food for thought! An added bonus is that I purchased nothing for these pieces -- it was all stuff I had sitting around in my collection, in various drawers or closets.

Wednesday, December 6, 2017

Frostgrave Warband: Badgers!

I feel I am making good progress at getting my Frostgrave project closer to the tabletop and our first game. Tonight I finished up another warband -- Splintered Light Miniatures 28mm Badgers. These are some really nice figures, I feel. Unfortunately, four of them were the same pose. So, I put my skills to the test on making them look different. I think I did a pretty good job at giving them the appearance of variety.
The Badgers' Heritor leader, left, and their spellcasting Warden (and familiar) right
 First up, are the warband's leader (Heritor) and its Warden (spellcasters). The leader is the guy on the left with the giant morning star held over his head. Although the lighting in my photo doesn't show it, his surcoat is a deep purple. I actually snagged this miniature from my friend Keith Finn in a trade because it looked like the perfect leader figure for this warband. Alongside him is my favorite figure of the warband (or should I say figures?). I love this Badger pointing as if he's casting a spell or about to hurl a blast of magical energy towards an enemy. What makes it all the better is the tiny, unclothed badger in a mirror pose. This small badger was a giveaway from David McBridge of SLM, tossed into a purchase I made at a convention. What better figure for a tiny familiar than this one? As soon as I got these figures out in preparation for painting, I thought I had to put the two of them on a combined base. He has magical symbols painted on his lavender tunic, with the largest one on the back (which you can't see in this pic).
A Badger archer and axeman investigate my newly-produced ruins pieces looking for abandoned treasures
One of the modifications I did to the figures was add a bow strapped to the back of one of the Badger Axemen. As you can see in this picture, I did a very medieval looking surcoat over the armor that the figures wore. Some of the armor I painted in bronze mail, the others in steel chain. I gave them a checkered pattern on their surcoat, which I thought turned out fairly well. You probably can't tell from these iPhone images, but there is highlighting in each square, as well. The other badger, in yellow and black, was also slightly modified. I converted his double-bladed axe into a single-bladed one. I know, not the most labor-intensive modification, but it does give him a slightly different appearance. Hopefully, with the different color schemes they'll appear less uniform on the tabletop.
I converted the spearmen on the right from the axemen on the left - I like how it turned out!
Finally, the most fiddly of my conversions -- the spearman. I snipped off his axe and added a spearhead to the top and extended the axe handle to the base. It is every so slightly crooked, but then again, miniature spears made from soft metal often end up that way as wear and tear from using the figures! I like how the slight lean forward of the pose looks as if he's resting on the spear, supporting some of his weight. The red, white, and silver pattern is fairly medieval looking, and I like how it turned out, too. His companion axeman in blue and yellow is the only one of the four axe poses that is completely unmodified.

I'll be offering up this warband to my players to use in my Frostgrave: Ghost Archipelago campaign. I definitely like how these figures look. They are some great examples of Splintered Light Miniatures quality poses and castings. Next up on the painting desk is some more terrain -- scratch-built ruins using the Hirst Arts block that turned out really nice!

Monday, December 4, 2017

Christmas ads for First Command Wargames

I had fun making these up -- Christmas advertisements that we plan to post on Facebook and other places. Hope you enjoy them!