 |
| My friends Gordon and Mike's spectacle colonial game, 55 Days at Peking game at Historicon |
My friends and I loaded up the cars Wednesday morning, and set off on the 7-hour or so drive from Columbus to Lancaster, PA. There were six of us in our two vehicles, and we would meet my friend Jason and his son at the convention hotel. We hit a couple patches of rain, but the weather was actually really nice for the drive over and back. No major traffic slowdowns, no Pennsylvania Turnpike woes -- smooth sailing. We arrived and checked in mid-afternoon, having to make a second trip from the car to bring in all the stuff I was selling in Friday morning's flea market.
 |
| My first game at Historicon 2025 was 'Black Hawk Down - Secure the Crash Site' - a beautiful table! |
After getting our badges (more smooth sailing) and saying hi to a few folks we knew, we decided to head down to Columbia Kettle Works and have a beer to relax. While there, we enjoyed some Mexican food from the attached restaurant when we got hungry. Jason and Graham arrived in town shortly after we did and met us there. Later that evening, we met upstairs at the convention for board games on a spare table. We used a game of
Martian Dice to break us into a "winner's" group of four and a loser's four-person table. That should have been a sign to me how my weekend would go as far as winning or losing games, but I was blissfully unaware. I even won one of the two games of
Kingdomino we played at our table. It would prove to be the only game I won all weekend! We sat around and talked for awhile, then went to bed as most of us had morning games.
 |
| Delta Force operators & the wounded crew atop a rooftop hammering Somalis all game long |
My first game was a Black Hawk Down scenario. The GM had set up a beautiful table, using many
Miniature Building Authority structures, as well as
Acheson Creations, and some 3-D printed ones that I didn't recognize. A nice die cast "Little Bird" helicopter hovered over the table on a tall radio antenna stand, and Super-Six-One, the downed Black Hawk, smoked in one corner. It was already surrounded by a squad of Delta Force, who had pulled the injured crew free at the start of the scenario. On the opposite long table edge, the convoy of Humvees with with several squads on foot were ready to race across the table and secure the crash site (the U.S. orders). In between them, were the hidden squads of Somali militia (one of them mine -- I didn't really care which side I played, so ended up on the militia side).
 |
| The convoy, under orders to secure the crash site of Super-Six-One, moves out under fire |
The GM was using
Ambush Alley rules, which I had played once before. To be honest, I wasn't that impressed with them when I played them the first time. It seems to me a less intuitive set of rules, where you struggle to understand what dice to roll, and the GM's consultation or explanation is needed for just about every action. I've yet to see a concise Quick Reference Sheet (QRS) for players in either game. The GM did say it was a modified version of the rules, so I don't know if I should blame the rules, scenario, or maybe just my own preferences for my disappointment in the game set up on a stunning tabletop.
 |
| My Somalis in position to fire out the window at the U.S. forces as they move by |
So why didn't I like it? The disparity between the militia and the American forces was simply too great to seem in any way realistic. Militia received one attempted action per turn. The Americans essentially had an unlimited number of "reactions" (read: shooting) to every action on the tabletop. Here's an example. Say, a squad of rangers is moving down the street. A Somali squad attempts to shoot at them as a reaction during their move. Each side dices off, looking for successes on their designated number of attack dice (4+). However, the Americans were rolling d8's or d12's (and generally more of them), while the Somali d6's. If they get more successes, the militia fail and do not shoot. And not only that -- they're done for the turn. Meanwhile, the rangers fire first against the Somali militia. The militia can't fire back. Later in that same turn, let's say another Somali unit fires at the same rangers. They dice off, with the U.S. likely beating the Somalis and firing and inflicting casualties first. If a third Somali unit fires at a completely different U.S. unit (not those same rangers), our first unit of rangers can take yet another "reaction" if they're in line of sight. They interdict fire at the Somali unit even thought they're not even the target. If a fourth militia unit fires at yet another U.S. unit (or even the first one), guess what? The rangers fire again!
 |
| The GM points out which of the U.S. players will react first in line as they relentlessly grind us down |
I'm sorry, but that kind of system of unending reactions is simply ludicrous. No unit has its head on a swivel so coolly and calmly to blast away at half a dozen different targets in the chaotic mess that is modern combat. There were even reactions to reactions! A Somali unit tried to do reactive fire from a rooftop at a ranger unit moving past them. A different U.S. unit in line of sight of those Somalis would test reaction, win (of course), and fire first at those Somalis reacting to a different U.S. unit. Note that they were
not in Overwatch. There was no point -- they could "act" instead and also endlessly react to anything they could see. With so many reactions and reactions-to-reactions, you can imagine the GM was clearly overwhelmed. He was beleaguered with constant
"I want to fire here..." and
"I want to react to that..." I can't imagine actually running the game was anything but an exhausting experience for him.
 |
| My Thursday evening game was my friend Jason's Stargate one - here are our alien enemies |
I hate to say it, but the rules seemed to be changing throughout the game, too. First, any unit shot at could fire back, then later Somali units that failed a reaction were "spent" and could do nothing. There were 2-3 turns in a row where all my guys on the table did absolutely nothing. We were given a small half-unit as reinforcements each turn for the U.S. players to blow away, and boy did we need them! Towards the end of the game, the GM was all but throwing reinforcements at us as we were ground down to pulp by the fire and reactive fire of the U.S. troops. I did see him conferencing with his play testers (who had signed up for the game, too), trying to patch up the tears that were quickly becoming apparent in the scenario and game. Of course, if you were a U.S. player, I'm sure it was great fun! You got to shoot 3-4 times or more during a turn and were always doing things. If you were Somali, you spent a lot of time simply watching and removing casualties.
 |
| Stargate troopers unfavorably illuminated by the glare of a setting sun coming in through the window |
So, at the end of my first game, I was 0-1 in Win-Loss, but even more importantly, 0-1 in satisfaction with how the game or scenario was run. Too many players, too complex of a sequence in the rules, and everyone clamoring for the GM's attention to do something. I think he knew I wasn't pleased with how the game was being run, but when he asked for my input, he would cut me off in mid-sentence and pitch his idea on what to tweak to his play testers. I guess I should learn that just because a game is beautiful (which his game definitely was), doesn't mean it always plays well. Note to self:
NEVER play Ambush Alley again...ha, ha!
 |
| My troopers hugging the cover of the temples after grabbing the alien tech on our side of the board |
The game I was most looking forward to play was my friend Jason's Stargate game. Although I was never a fan of the series, his figures and terrain he was preparing for the game looked so cool. I really wanted to play! So, I was hovering online when
Historicon's event registration opened. Jenny and I were able to snap up two of the spots in his Thursday evening game. Unfortunately, he had been placed in one of the hallways (I'm sorry, "foyer") outside of the third floor Heritage Room. I felt bad as the lighting detracted from rather than showing off his terrain. At the start of the game, we had a strong setting sun slanting across the board, throwing shadows. Then, as it it grew dark, it got pretty dim in the foyer. My photos from his game turned out pretty bad and did not do either his figures or terrain justice.
 |
| T'Leek's Gambit - my ultimately failed attempt at breaking the tie and seizing victory from the enemy |
The scenario was a two-sided, four player game. Jenny and I played the Stargate humans and our opponents were the Jaffar (or whatever they are called). Jason uses the
7TV rules which are pretty interesting for the odd event cards which can influence the game in unexpected ways. We were each trying to search for and seize alien technology in the Ancient temple-like structures. After our game, Jason listened to our suggestions and moved the two rows of columns, statues, and structures closer together for his next game. As it was set up for our game, each side advanced, grabbed cover, and snagged the objectives on their side of the table. Then we hunkered down and shot at each other. The only other way to get more victory points was to kill an enemy player's "Star" or "Co-Star." Looking at my my character's abilities and gadget cards (we each chose three from a randomly dealt hand of six), I decided my co-star T'Leek (I think that was his name) would dash up and try to kill my opponent's co-star.
 |
| My Korean team arrives on the board via a boat in Temple of the Dragon, a Silver Bayonet scenario |
Remember back when I mentioned I did not win any of the games I played in (other than that one Kingdomino)? Well, the dice did NOT cooperate with T'Leek's gambit. The opposing player rolled four straight 6's on a d6 to save all of the wounds that I put on his guy. Frustrated, T'Leek played his "Disguise" gadget and dashed back to our lines. My opponent was emboldened by his successes, and sent his star after T'Leek. The dice were determined to see me lose, though, and my co-star was soon lying dead. Victory went to the enemy aliens by the 2 points they got for killing T'Leek. I quizzed Jason after the game about how he balanced the forces. It seemed to me that the enemy's special abilities were way more useful than ours. One of their stars had the ability to return any casualty to the table on the turn after it is killed. Since the very necessary "plot points" -- which you use to move troops and reinforce die rolls -- are determined by your number of troops, we were on the wrong end of a steadily increasing disadvantage. Still, it was a tight game on my half of the field. Had I not been frustrated by the die rolls, we could easily have won. Jenny said she got walloped on her half of the table, but had still been able to snag her objectives and withdraw to the stargate.
 |
| After our tardy arrival, we encounter a Qilinn (Ki-rin?), which we persuade to join our side |
I much, much more enjoyed Jason's quiet, four player game over the chaos of Mogadishu in the morning. I don't think a player should ever have to clamor for their turn to do something in a game. Every game should have a turn sequence that is clear and makes sense. Otherwise, it is too easy for the boisterous, outspoken players to take over a game from those who are politely waiting their turn in the game to do something. Jason's game had a clear order and I always knew when to do what actions I was planning. I was 0-2 in Win-Loss, but 1-1 in enjoying my games.
 |
| Not far away, the Japanese team fights the evil Spider Queen and her minions |
The next morning was my flea market session, which I will talk about in my next post on my purchases. Instead, I will fast forward to Friday evening's Temple of the Dragon game. The GM was one of Jenny's favorites. She always tries to sign up for one of his games at Historicon. He was a very well-spoken gentleman with the flair for the dramatic. He dresses up in costumes for his games, and delivers an opening soliloquy with a theatrical flair. The table was drop-dead gorgeous! All of these things add enjoyment to a game. The game was set somewhere in Asia, in a valley surrounded by mountains and cut through by a river with a small village near the center. Temples and monasteries overlooked the village, and scattered throughout the table were Chinese coins or shiny tokens representing encounters or possible hiding places for the five scrolls we were seeking to win the game. Each would summon a dragon, and with the impending crush of evil brought on by world warfare, only their help would save humanity. He used modified
Silver Bayonet rules, which I owned, had read (and watched games on YouTube), but never played.
 |
| The English team, with its Frankenstein monster, confront a Plague Demon the bridge over the river |
There were a LOT of players, though. Our group was well represented among them. There were Jason and his son Graham, Jenny, Mike S (whose car we drove to Historicon in), and myself among them. We each had a force of 7+ figures from various nations (mine were Korean). Possibly to speed things along, he had doubled the movement rate of all troops. However, since player factions activated one after another, this meant all but one of the numerous coins or markers had been seized by other players before my second-to-last Koreans got their first turn. As each marker was revealed, the flaw in this grand edifice became clearer, though. There were simply too many players controlling too many figures. Plus, the GM was needed for nearly every interaction. Even the assistant GM did not know what would be revealed by each coin or marker that players encountered. From the time the we were given our forces, to when my Koreans made their first move, an hour had already passed.
 |
| The temple mount, where the Dragon King was supposedly buried, is fought over by 3 factions |
Although the GM had given us the basics of Silver Bayonet prior to the game's starting, he had modified it enough that his interaction was needed on virtually every encounter between opposing forces. In Silver Bayonet, figures are supposed to move one at a time. If it attacks another figure or creature, that figure can immediately strike or fall back, if it survived. Most targets of attack that I observed during the game were not given this opportunity. I am a novice at best with these rules, but I could see multiple things being done incorrectly (at least according to how the rules are written). We were also given the opportunity to move on our second action, which meant the GM's doubled movement became essentially quadrupled. Thus, the mounted units could move four feet across the table on one turn! And we were also allowed to "charge" as part of this second movement, so it became quite the disadvantage if your force was moving last in the sequence of players.
 |
| Second Seminole War pitting tribal skirmishers against uniformed U.S. infantry battling in a swamp |
As it was, we played only three turns. The combination of too many players, too many figures, lack of clarity in the rules, and needing to consult with the GM (even the assistant GM needed to ask him things) meant the game progressed too slowly. I know a lot of folks enjoy wild and woolly gaming sessions like this game. However, I know how stressful running a game at a convention can be. So, I am not going to hammer the GM with questions or badger them like a kid wanting his parents to buy him something at the toy store. So, in addition to my "No more Ambush Alley" rule, I may have to add another. No more huge games! If a convention game is slotted for more than, say, six players, I don't think I will sign up for it. And Historicon seemed replete with games with massive numbers of players. With few exceptions, I've found these games tend to be less than pleasant experiences. I know many wargamers love spectacle, but after decades of running miniatures games, I believe it takes a very finely honed and crafted game to be successful with that many players. I've found too many GMs can't harness the dragon that they've unleashed.
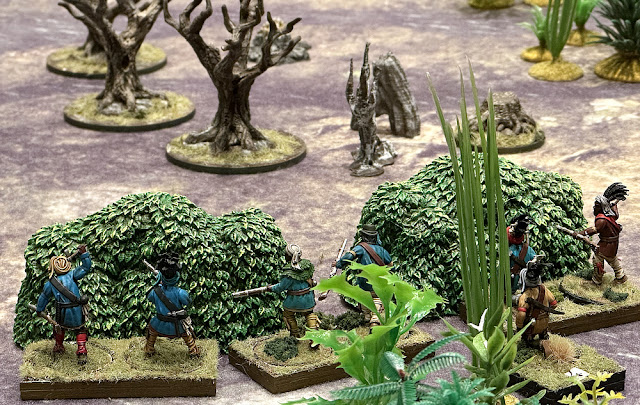 |
| One of my bands of skirmishers hidden from sight of the U.S. troops, waiting to pounce |
How did my force do? Well, we recovered one of the five scrolls we were looking for, lost no figures, and killed several enemy. Frankly, though, I have no idea how to answer that question. His stated goal of one force trying to seize all five scrolls was flatly impossible -- even with his generous movement! At the end of the game, his cryptic comments really could only be interpreted as none of us won...but the vampire faction definitely lost...ha, ha! In fact, we were actively arguing about whether we were supposed to actually summon the dragons with the scrolls or simply hold onto them. My Koreans said no -- the danger from Evil just wasn't present on the tabletop. Heck, only one of the dozen or more factions were evil. The others were all -- in the Silver Bayonet world -- fighting Evil.
 |
| I loved the GM's gators scattered in ponds across the tabletop! |
So, the Koreans decided to hold onto the scroll until the danger of Evil became imminent. The other three players with scrolls chose to summon their dragons. So, even that aspect of the game was unclear! Still it was quite the spectacle, and I hear that he won an award for the event he hosted Saturday evening. So, congratulations to the GM, but I honestly feel this scenario was simply not as enjoyable as it could have been. So, I guess I'm 0-3 in Win-Loss at this point. Worse, I'm 1-2 in games I honestly enjoyed.
 |
| My Seminole skirmishers leap out of the cover, fire a volley, and then retreat back out of sight |
Heading into Saturday, I was in a somewhat pessimistic mood. Long ago, when our group regularly attended Cold Wars, I would keep the convention programs and highlight the names of GMs who ran what I considered to be unenjoyable games. Would I need to start doing that again? I thought I had learned to decipher clues in the event descriptions to avoid games I wouldn't like. For example, I don't enjoy games where the GM deploys the troops on a terrain-less tabletop, and all you can do is march forward and roll dice. Another thing I avoid is the 20' long table with 20 players and their troops lined up shoulder to shoulder that get in only two or three moves. Unfortunately, there are always slow players (and slower rules), and with 20 players, you're bound to have a number of them in your game! Oh, and I avoid all micro-armor games because GMs tend to be unable to resist plopping down every tiny model they own onto the tabletop!
 |
| Firefights break out all throughout the swamp, with the Seminoles starting to get the worse of it |
Would Saturday break my streak of games I didn't enjoy? Things looked promising when I showed up for the 2nd Seminole War using
Sharpe Practice rules. The terrain looked really cool (I know, I know -- I just said no guarantee!), as did the miniatures. The table would not be flooded with troops. In fact, my force was just two units of six figures plus leader of skirmish infantry. I had never played Sharpe Practice, but was very interested in buying them. I'd watched play throughs using the rules on the YouTube channels
Graham's Wargame Vault and the
Crusty Colonel. If I enjoyed the game, I planned on buying them. The GM and players were very laid back and soft spoken, which also boded well.
 |
| Our last desperate chance for victory as our largest tribal band jumps out of ambush and charges |
As the game got underway, I was able to employ the harassing tactics of my Seminole skirmishers against the U.S. infantry. I was getting the hang of the rules, too. However, Sharpe Practice is one of those sets where your unit leader's card is in a deck that is shuffled each turn. So, it is suspense whether you will activate before or after your opponent. What's more, there's a "Tiffin" card that triggers the end of the turn. So, your unit may not activate at all that turn. There
are generic flag cards for each side that are set aside as the turn progresses. If the turn ends before your leader's card comes up, you can activate one of those units with a flag (assuming one of them came up for your side). Things were progressing fairly well for the Seminoles (despite our opponent's excellent dice rolling) until the bottom suddenly fell. We began to get the short end of the card flipping turn sequence over and over for several turns.
 |
| My final game was a Sci-Fi skirmish called 'Star Schlock', featuring the Siman Empire vs. Mutants |
At one point, the U.S. unit opposite my skirmish unit on the far right had its opponent activate four times before we had a chance to do anything. My center unit didn't have much better luck and the opposing U.S. infantry were able to simply walk up and blow us away. This was definitely not the fault of the GM, who did a great job helping us with the rules and keeping the game moving along. Sharpe Practice moves quickly, especially with as few units as we had on the tabletop. Still, we had a chance to seize victory despite our poorer dice rolling and unfavorable cards. My co-commander had held off his biggest and toughest unit. He deployed them in ambush and they emerged from the trees and charged into the U.S. infantry's largest unit, which was actually two deployed side by side. The Seminoles charged the closest of the two in the flank and shattered them. The Army Morale feature of the rules suddenly was closer (we had been significantly behind all game).
 |
| My mutants included a white-robed 'Missionary' mutant with a fearsome mental blast |
The U.S. player took a big risk and charged our victorious big unit frontally on the next turn. The player had been rolling great all game, so was confident. The dice were rolled, casualties inflicted, and then each player had to check to see if their leader was killed. The U.S. player flubbed that die roll and down he went! However, so did ours, and our Army Morale dropped to zero. We'd lost -- chiefly, in my opinion, due to poorer die rolls and unfavorable card flips. Still, the game had been fun. The figures and terrain were excellent. With only four players, it was calmer and more enjoyable. I might be 0-4 in Win-Loss, but at this point, I had enjoyed half of my games...woo-hoo! Based on the experience, I did decide
not to buy the rules, though!
 |
| As always, there are some amazing looking games at a historical miniatures convention! |
The final event on Saturday night was one that used the
Star Schlock rules. The Simian Empire was facing off against mutated humans on a mining planet. Jenny and I joined the mutant side in this six player game. The table was clearly divided into thirds and then again into six sectors by the centerline. You weren't limited to attacking only the faction straight ahead of you. Players could move left or right into a different sector, which happened to me when Jenny's opponent sent reinforcements to help the apes across from me. We each had a number of 5-figure units and one or more individually based hero or leader types. I had five mutant bands and one "Missionary" mutant leader.
 |
| Another look at this game (which I did not play in), which was tearing down when I happened by |
The GM and his son did a fantastic running the game. They were patient, kind, and thorough in explaining the rules and especially in coaching us on how to grasp the mechanics of the game. I would have to admit Star Schlock is a relatively complex rules set when it comes to how to activate and fire your troops. Both did a wonderful job helping us understand it, and by the end of the game, I think I could actually run it for another group of players. That is very well done! The rules author was in attendance at Historicon, too, and he stopped by to check things out. I asked him about a play balance issue and he explained it very well to me, how the seemingly weaker troops were those that were not trained in combat operations like my mutated humans and missionary. I'd noticed the other types -- actual trained soldiers -- were tending to win the initiative and get more actions. He explained to me it was to represent their superior experience and command structure.
 |
| A close up of one of the foreign legations (Austrian?) in Gordon's '55 Days at Peking' game |
I know that I've revealed the ending, and our mutants received a solid drubbing at the hands of the Simian Empire (and their allies, the NOT-Star Wars Galactic Empire). We kept things respectively close, but it was a foregone conclusion as our ranks dwindled and they were able to maintain control of the central objectives. I had a lot of fun, though, and would not be averse to playing these rules again. Would I buy them with all of the other Sci-Fi rules I'm playing? Likely not. However, if someone invited me to a game of Star Schlock, I would certainly play. Especially if the GM were one of the two running the game as they were clearly the best I encountered at Historicon 2025.
After the evening session of games, our crew of eight sat around and chatted while some of us enjoyed a beer or two. It had definitely been a fun time together. Although I was 0-5 in Win-Loss, I am satisfied with 3-2 in signing up for what I considered fun games. Above .500 "winning" percentage! I should note that I am NOT saying the games I didn't enjoy were run by poor game masters. I am simply saying that their game mechanics or scenario design needed more honing. Like I said, I'm sure the U.S. players walked away from the Black Hawk Down game having enjoyed a rollicking good time. And some players may have reveled in the spectacle woven by Tomb of the Dragon King. Perhaps it was me, but the flaws I felt were present prevented me from fully enjoying them -- despite their two tabletops being the most beautiful I played in all weekend! So, as we drove home the next day, I was in a positive mood having enjoyed my attendance at Historicon yet again.
MINIATURES Acquired vs. Painted Tally for 2025
- Miniatures acquired in 2025: 237
- Miniatures painted in 2025: 144
TERRAIN Acquired vs. Painted Tally for 2025
- Terrain acquired in 2025: 21
- Terrain painted in 2025: 46
SCATTER Acquired vs. Painted Tally for 2025
- Scatter acquired in 2025: 115
- Scatter painted in 2025: 112


