Wednesday, July 30, 2014

Too many projects! M-u-s-t h-a-v-e f-o-c-u-s...!

I thought with the Lead Adventure League done, and a big Acheson Creations order coming in, that there would be no indecision on what I would be working on at this stage. However, my project queue is a mess right now! I have about a half dozen things in various stages of progress clustering my painting desk and cluttering up the desk in my spare bedroom.
I have two each of these 28mm French & Indian War fortification pieces. The artillery emplacement on the left, and the stockade tower on the right
It all started when the Acheson Creations order was slow in coming in. I put together an order for me and a few friends, which turned out to be huge, in the end. And it turned out, so did half of the free world because of the excellent sale they were offering, putting the company way behind on filling orders. We've received three separate shipments from them, but the French & Indian War fort that I was thinking I'd be working on has not been among them. This last shipment did have two of the stockade towers and two artillery emplacements I ordered to supplement the basic fort set. So, I ran those through the dishwasher to clear off the mold release agent. So, that is project one, at the lowest possible stage of completion.
Two 25mm Old Glory Indian canoe paddlers on my contraption for slipping them in and out of the canoes (before painting, of course!)
Project Two is 12 Old Glory 25mm Indian canoe paddlers. I special ordered them without the lead canoe and picked it up at Historicon the other week. When I got them home, I was surprised how small they were. They have to be the tiniest 25mm figures I've ever seen Old Glory produce. I'm sure they probably shrunk the scale to allow them to fit in their lead canoes. However, I had another source for my canoes (see Project Six below). I studied them and decided I would create a base of sorts sized to fit in my canoes perfectly, so I could just pop them in and out. The base would be tall enough to allow their paddle to clear the side of the canoe. I cut clear plastic triangular bases that fit snugly in the front and rear of my canoes (the center part would be where my 28mm Conquest Miniatures Indians would stand). I then sliced a square of balsa wood to the right height. A slat of bass wood was trimmed to resemble the board they would be kneeling upon. It would also hopefully serve to disguise the balsa wood prop. I drilled a hole in the bottom of each paddler, and epoxied in a straight pin. This was trimmed with wire cutters to leave a projecting point about 1/2" long. The Indian was then pressed down onto the balsa wood prop, clamping the bass wood slat between his knees and the prop. I just finished painting the joints with white glue to better seal it all together. Next stage is to paint the base and the Indians themselves. This project is at the next lowest stage of completion.
Four 28mm reporters, newsmen, etc., that I will paint up and auction off at Advance the Colors 2014
Project Three is a group of four 28mm reporters or newsmen. These (along with Projects Four through Five) will be auctioned off for charity. The charity is my middle school travel group which I am taking to Italy at the end of this school year. The tour (through EF Tours) is not cheap, and the students are doing fund raising to offset the costs of their trips. Some parents want to send their kids, but can't afford the price, so I will be doing a variety of fund raisers. One of them will be a silent auction at Advance the Colors 2014. I am constructing and painting up three items which I will display at the convention. There will be cards for attendees to put in their bid for each item. I will post the highest bid every hour or two, so people can go back and up their ante if someone outbids them. Anyway, this batch includes a 19th century looking reporter jotting something down in a notebook. Another one is an old-time photographer with a large camera on a tripod and bent over the viewfinder with a cloth draped over him. A third one is an artist, seated on a barrel, and painting a picture of the scene (doubtless, the aftermath of a battle). The final one looks more 1900s, and has his suit jacked draped over his arm and is gesturing with a rolled up paper. These figures are assembled and epoxied onto metal bases. I will paint them up relatively generically, so anyone gaming Civil War, to Colonials, to the World Wars can use them as decorative elements on their battlefield.
Timeless, small resin bridge good enough size for either 15mm or 28mm
Project Four is also for the silent auction. It is a small resin bridge, which can be used for either 15mm or 28mm. I based up each end on styrene, but left no base in the center. That is so it can be placed over whatever the GM is using for his river material. I will add some scenic elements on the bases, too, to make it stand out as an attractive piece. The bridge itself is a timeless looking stone one which can be used for anything from ancients to modern. I have run it through the dishwasher, spray painted it black, and also gone over the black in a brush-on, 50/50 mix of water and acrylic black paint. So, it is probably at the midrange stage of completion for the half dozen projects.
Construction done, this small 28mm graveyard is awaiting spray paint
Project Five is a scratch-built, small 28mm graveyard. It is inspired by my own graveyard I constructed last year, but is a smaller version. It is assembled this from various bits, including resin stone walls, Acheson Creations graves with tombstones, and a "dead" plastic tree. All of these are epoxied down onto a 8"x6" piece of black styrene. The picture shows how I created some of the components. I placed textured plastic over where the two halves of the entrances joined together to hide the seam. And I glued decorative plastic jewels to the tops of the walls to give it some fancy elements. The tree is in a corner of the small graveyard and should look appropriately atmospheric. Like the bridge above, I have based these down, spray painted them black, and gone over them with the 50/50 black acrylic paint. There is still quite a bit of painting and flocking to do on this, but all the construction is done.
This is what the canoe looks like off the shelf at Hobby Lobby...will look MUCH better when I'm through!
The final project, #6, are a half dozen canoes for my French & Indian War period. I wanted canoes for various scenarios -- such as the lake battles from the James Fenimore Cooper "Hawkeye" novels -- or river actions. However, lead canoes are expensive. Worse yet, any figure with a reasonably sized base which allows it to stand up on the tabletop won't fit in manufacturer's canoes. The canoes are too narrow. My first solution was to construct them myself out of Sculpey. I have a three or four squares of it sitting on my desk in the spare bedroom, along with plastic tools for slicing and texturing it. However, it seemed such a big task, and one that might be artistically beyond my capability, artistically. So, I kept putting them off, putting them off, until I stumbled upon something at Hobby Lobby. In their birch wood products line I found a wooden canoe. It was on a stand, and had interior elements that would get in the way of figures fitting inside, but it seemed the right size. I bought one and took it home to mess around with. I popped it off its base and hollowed out everything on the interior so that it was just a wooden canoe shape that did actually resemble Indian ones. Three figures on my 1" square bases fit inside easily. Eureka! I went back up the next day and cleaned the shelves of the other five they had in stock. These are fairly far along. I will save description of how I did them for a separate post. Suffice to say, the canoes themselves are the closest of the six to completion.

Of course, that does not mean they will GET finished first! With six projects clustering for time, I need focus. Actually having that many things in various stages of completion is very frustrating for an anal person like myself -- ha, ha! I like to begin something and see it through to completion. The most I like having in progress at the same time is cleaning and priming the next project. So, stay tuned to see how progress on all these goes...!

Monday, July 28, 2014

Dakota Smith and the Forbidden Temple


We played the sixth of the seven scenarios I have planned for the first run of Pulp games last night. The archeologists were on the trail of the legendary relic, The Tears of the Buddha -- reputed to have mystical powers. They followed the directions from the inscriptions they'd deciphered from the Lost City to a distant mountain range. "Beyond the valley of the strange ones, lay the Stupa Mountains" the words said. And when the explorers caught sight of them, they were amazed at how much the range did indeed look like stupas from a Buddhist temple complex.

They soon caught sight of the Forbidden Temple, which the texts say housed the Tears of the Buddha. It appeared to be carved from a solid, rocky crag rising from a hillock in the center of a shallow valley. The top part of it was skillfully sculpted to resemble a giant deity, holding a raised sword over its head. The valley was ringed by cliffs which obviously were prone to rockslides. Rubble lay heaped up all over the valley, leaving only a handful of precarious paths through the valley to the temple.

I hope you enjoy this new style of battle report. It has become popular on the Lead Adventure Forum, so I thought I'd try it out. You will probably need to click on the photos to make them as large as possible to read all of the captions.


Monday, July 21, 2014

Road trip to Historicon 2014

My Thursday night game, "A Very British Battle," featuring an alternate history Spanish Civil War type conflict breaking out in Britain
Four friends and I made the nine-hour road trip to Historicon 2014, this past weekend. Thankfully, the weather in Fredericksburg, VA, was much cooler than it was last year when we went. Even better, we were staying in one of the three convention hotels, so it was a short walk of a couple hundred yards to go back and forth between the convention center and our hotel rooms. Maybe I’m getting old, but I always need that time to go back to the room and stretch out on the bed and decompress.

We left Thursday morning and arrived shortly after 5 pm at the hotel. We checked in, dumped our things in the rooms, and hurried over to the convention center to pick up our registration before it closed at 6 pm. We then met Jason and dashed off to get a bit to eat before our 7 pm games began. Jason didn’t have anything scheduled, so joined me in my first game, “A Very British Battle.” It was a 28mm alternative history game in a world where the Spanish Civil War breaks out in Britain, in essence. British communists, fascists, and various other factions fight for power as the country devolves. My Parliamentarians were fired on quickly by the nearby Fascists, and I essentially spent the game fighting them. Unlike my attacker, I used the cover of trees and stone walls to give myself an edge in the shooting. Despite two charges which wiped out some of my troops, I ended up grinding him down to just one small band which ducked into the church in the center of the village. That is where Jason’s remaining troops were, too, as the goal of the game was to try to get your hands on the gold stored in the church cellar. It was a bloody game, with some of the players indulging in over-the-top roleplaying of their factions.
My American force in "Jungle Gods" -- 28mm Pulp Action at Historicon. Note Teddy Roosevelt steaming upriver on the GM's scratch-build riverboat.
On Friday morning, my first game was a 28mm Pulp one called “Jungle Gods.” I played the Americans, led by Teddy Roosevelt chugging up a jungle river on his small steam launch. Mike S got in my game, too, and played German colonial troops trying to prevent me from trespassing in their territory while simultaneously putting down a revolt by the local African natives. There were also slavers and big game hunters, as well as two local African tribal factions. The game was one of the best of the con and also featured appearances by King Kong, a T-Rex, hippos, crocs, and a charging rhino. Early on, my Americans were treacherously fired upon by the slavers (seems to be a trend of getting fired on, unprovoked). We turned the launch and wiped out the slavers with the help of one of the tribes. Mike had a similar, bloody battle with one of the African factions, meanwhile losing men to an angry rhino and a giant spider. The game was called with pretty much every faction accomplishing their objective except mine (and the eliminated Slavers). Oh well, Teddy couldn’t leave such a back-handed blow unavenged, could he? We could discover the hidden temple another day!
Jason's Scots chase his opponent's Saxons off of a rocky outcrop in his 28mm Saga Tournament on Friday
After lunch, I dashed over to watch Jason play his final game of the Saga tournament. I have never played the game, but had been wanting to watch one from start to finish. Jason does not get as much gaming in down in South Carolina as the group back here in Ohio does, but it is one of the things he does get a chance to do, from time to time. I think Saga is one of the games that has begun to “fill in” for the decline of DBA and DBM Ancients. With only 8-10 participants, it is nowhere near as widespread a game as the others were at their height, though. Anyway, each round in his four-round tournament was given 75 minutes. It seems like an interesting game, but the thing holding me back from it is that it is a one-on-one, competitive format game. We don't really do that type of gaming on our Sunday nights. We are more into multiplayer scenario games. The “battleboard” — or set of dice with special symbols that each player rolls for his command and control — does not look like it would translate well to a multiplayer game. It was fun to watch a game from start to finish, though. I have a better understanding of the game, now. It is one of those things that I would play if it was what my friends were into, but did not entice me enough to try to convince them to adopt.
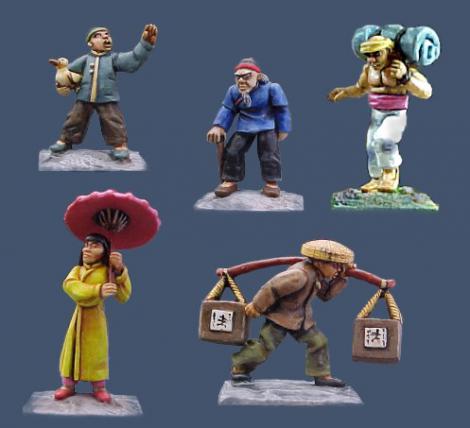
Pictures from Bob Murch's Pulp figures website of one pack of figures I bought (unpainted, of course!)
In the afternoon, I shopped in the flea market and dealer hall. For the weekend, my purchases totaled up to a respectable $120. They included:
  • Two packs to use as Chinese civilians from Pulp Figures by Bob Murch
  • 12 Indian canoe paddlers in 28mm by Old Glory (I’d arranged beforehand for them to bring a dozen paddlers without their lead canoes)
  • Eight 8-sided dice for use with the Pulp Alley rules
  • Four 28mm Indian youths with bows from a new company, Footsore Miniatures, who are offering them as “Skraelings”
  • Four jars of Howard Hues paints
  • A shrink-wrapped copy of Command & Colours Napoleonics at roughly half price ($40) in the flea market
  • A reference book from the flea market on French & Indian War Courier des Bois
  • A random pack of figures from the flea market for $1 that included three high class Chinese civilians
I like the innovative command and control of Richard Borg's "Command & Colours" games, and had been wanting to try this one out.
Disappointingly, my Friday evening game GM decided not to run the event without telling the event desk or anyone else. There were other games I could have gotten into, but I waited for awhile since the table was set up. I thought maybe the start was just delayed, but the GM never showed back up. Oh, well…I had managed to schedule two events for Saturday, so there would be no shortage of gaming over the weekend. After my friends finished their games, we dashed off to BW3’s for some food, and then played a rousing game of 7 Wonders. First place (Jason) was separated from last place by only six points. I came in third, but it was a fun game as always.

We started Saturday morning helping Jason set up his flea market table. I’d brought a half dozen games along for him to try to sell and I was incredibly pleased that they all did. Of course, they were all priced at bargain basement level, but that is how I do it. I took some of that money and spent $40 of it on a shrink wrapped copy of Richard Borg’s “Command & Colours Napoleonics.” I’d wanted a copy of it for awhile, and it was roughly half price. So, I spent most of my sales money on that, incidentally driving my purchases for the convention over $100!
My Sea Peoples and Libyan warrior command, fighting on behalf of the Egyptians against the Hittites in "Encounter at Jerboa" -- the Saturday morning game I signed up for and enjoyed
My morning game was “Encounter at Jerboa,” an Egyptian vs. Hittite encounter from the biblical era using a set of home rules I’d heard about. They were called NURDS and had an interesting concept. Every unit has an amount of endurance to casualties, morale stress, exertion, and so on. These are reflected in a number of boxes on their laminated unit card. Boxes are checked off on their card every time they do something causing battlefield stress. When they fall below half strength, they lose one of their two stands (and fight at half effectiveness). When they are out of boxes, they are destroyed. I played the Sea People and Libyan mercenaries of the Egyptian pharaoh. Our other two commands were a mix of Egyptian chariots and archers. Our enemies, the Hittites, had chariots and unarmored close order spearmen. Both sides maneuvered, some more aggressively than others. Our center commander was indecisive and timid, and continually pulled his four units back to regroup and rest them to regain some endurance. Eventually, that left my left flank wide open. I was mowing through my opponent, and had destroyed one of his units and dropped two to below half strength. When my elite Sea Peoples unit was charged in the flank by the enemy center command, the Sea People general sent a messenger scolding the center Egyptian general. He moved back into the fray, and we eventually destroyed the six enemy units we needed (I took out four of the enemy myself…!). It was a fun game, and the GM gave me a copy of the rules. I intend to try them out on the Sunday evening group some evening to see what they think.
An interesting concept plus enthusiastic GM does not always equal a fun game, as I found out in my colonial era Herero War game I signed up for on Saturday night
In the afternoon, I made the rounds of the dealer area handing out invitations to vendors for our HMGS Great Lakes conventions, Advance the Colors 2014 and World at War Game Day 7. We already have 5-6 dealers committed to the show, but it was a good opportunity to spread the word about our show. I made my last dealer hall purchases, too, and then headed over to the room to rest up before my Saturday night event. This was probably the only let down of the show…well, other than the canceled event! The GM was knowledgeable and enthusiastic about his game set in the Herero War in German South-West Africa. However, his organization and sense of timing could use a lot of help. He spent an hour and a half of a 4 hour event explaining the background and giving the sides their briefings. That, and no real solid method for us to mark down our hidden movement, meant we ended up playing only 3 turns. It was obvious that our side — the Hereros — were going to repeat history and maul the Germans. However, there was a LOT of sitting around waiting during that four hour time slot. With some more organization and a better system for the hidden movement, it could have gone much faster and been more fun.

That’s what happens, though, when you go to a convention. You get a mix of good games and not-as-good games. All in all, Historicon 2014 was a fun show.


Monday, July 14, 2014

The Forbidden Temple

Top-down view of my newest Southeast Asian temple
 It may seem weird that I felt compelled to construct a new temple for the upcoming scenario of Dakota Smith's Oriental Adventures. After all, hadn't I scratch-built four of them already? They certainly filled up the game board when I ran the "Dakota Smith and the Lost City" scenario.

My storyline for my 28mm Pulp miniatures games has the archeologists searching for the temple containing the legendary relic, "The Tears of the Buddha." It is meant to be hidden away from the rest of the world. Thus, the explorers had to cross "The Valley that Time Forgot" to get there. I envisioned it as a solitary temple, high in the mountains. Sure, I could simply have used one of my earlier builds and placed it there, saying it was the Forbidden Temple. However, I wanted this one to have secret rooms they would have to discover. To go along with that, I wanted to use the really cool piece of Lizard Terrarium terrain -- a statue of a sword-armed deity -- that I'd picked up at Petsmart earlier this year.
Sighted through the tress, the Forbidden Temple...!
So, my thought was to simply use two boxes for the Forbidden Temple itself -- disguised as a two-layer, rectangular plinth for the statue, which would sit atop them. Each box would represent a hidden chamber inside the temple. I wanted to be able to lift off the roofs and place an altar and set of spiral stairs inside each, too. The construction of the whole thing would be modular, so that I could use each layer of it individually as well, if I wanted.

The statue was actually already completed. I used it in the Pulp game I'd run in March at Cincycon 2014. I'd picked it up on clearance for just a couple bucks, making me wish the Petsmart with Lizard terrain was closer to my house! I had painted over the whole thing -- not liking the garish gold paint on the sword and other parts of it that it came with. Instead, I wanted a gray stone statue overgrown with encroaching jungle. So, first, I painted the entire thing black. I then wet-brushed a dark gray, followed by a light gray dry brush. A black wash then was applied to the whole statue to soften the brushwork lines. To give it the overgrown, jungle appearance, I used Woodland Scenics flocking liberally over various surfaces. Different shades of green clump foliage was glued into places that I thought vegetation would sprout most. As a finishing touch, I used a hot glue gun to affix two wire flowering bushes from model railroader's terrain. This gave it that "Angkor Wat"-style overgrown look. The statue is really an incredible piece, and all of this brought out its detail.
Two boxes sit atop each other, held in place by their decorated, styrene roofs
As I said, the statue would sit atop the two boxes, forming the decorative base or plinth for it. Since this is for a Pulp game, there HAS to be hidden doors which lead to interior compartments. That simplified my job, meaning I didn't need to actually construct a visible entrance to them. They could appear solid state. I already had one good sized box that I planned to use for one level. A quick trip to Hobby Lobby scored a paper mache box to utilize for the second level. The first step was to create a roof for each box. I cut two rectangles of black styrene plastic for these, and then affixed a rectangle of foam core material to the underside so that these set inside the box and kept the roofs from shifting around too much. The roof of the first level would also form a base for the second level to sit upon.
A close up of the roof decoration assembled from odds and ends from craft stores that I had in my boxes
For the first level's roof, I cut a rectangle of wooden decorative molding and epoxied it to the stryene base of the roof. I sized the rectangle so the second level would fit snugly inside the moulding, keeping it in place and from sliding off and bringing the whole three-level structure crashing down. Some beads were glued down along two edges of the roof for decoration, as well. The roof of the second level was what the statue would sit upon. I decided to decorate the edges of the roof with various bits of birch wood odds and ends I'd purchased over the years at Hobby Lobby, Michaels, or JoAnne Fabrics. Four, stupa-like mini towers rise from each corner. Their base is an upside down "flower pot." On top of that rests a wooden spool. And finally, crowning each is a plastic, fasceted "gem." More gems were glued along the edge of the roof. Once put together, both roofs were then sprayed with black, acrylic paint. I dry brushed them in a darker and lighter shade of gray, and did an final ink wash to give them a stone appearance that I hoped would match the statue's. The roofs turned out okay, but the lack of a real texture to their surface means they don't necessarily match the nicely-pitted statue that well. I should have sprayed them with "stone paint" or something similar to make the match better.
Close up of the Khmer frieze (printed paper) from downloaded and Photoshopped from CG Textures
 For the walls of the boxes, I wanted to try something different than I'd done in the past with my temples. I was intrigued by a comment from one of my friends, Keith, and wanted to try his suggestion. He had been looking at the interior of one of my jungle huts. For those, I had simply gone to the CG Textures website and downloaded high quality photographic images that looked like the wicker floors and walls I wanted to represent. Like Keith, I was impressed with how they had turned out. His comment was that you could possibly use the images for the exterior of buildings, too. CG Textures is an amazing resource, which I thank one of the posters on the Lead Adventure Forum for suggesting. Among their many excellent images is a selection of ones from Angkor Wat and other Khmer temples. I decided to utilize one of their stone carved friezes of seated gods. I measured the box sides, then opened the image in Photoshop. I resized, cut and pasted the images, finally printing them out on my laser printer. I did the same for the interiors, selecting a rough stone wall and mosaic floor pattern, as well.

I measured the inside and outside walls carefully and then cut each paper print out to size. I then painted the top and bottom edges of the boxes in black paint. I did this with the interior seams between the four walls with each other and also with the floor.  This is in case any of the paper doesn't extend all the way to an edge. The gap shows  black and gives the appearance of shadows or cracks. To affix the paper images, I painted each surface, one at a time, with straight white glue, then quickly applied the image. I smoothed it out, then went on the next. I did the floor interior last, after completing the outer and inner walls.
As always, the interiors look great using the printed paper. Note the spiral staircase and the Buddha altar inside the hidden chamber of the temple.
 I wasn't sure how well the marrying of two dimensional, paper walls with the 3-D roofs and statue would look. If I were to do it again, I would probably play with the color of the images more in Photoshop to try and get them to match the tone of the painted pieces. All in all, it looks okay, I think. I don't like it as well as my completely scratch-built temples. However, it was quick and easy to do, I think will look acceptable on the tabletop. Would I do it like this again? Hmm...probably not. However, I really wanted a temple with a Khmer-style frieze since my scenarios are set in French Indochina. It will work for the game, and I'm sure my players probably won't grouse about playing on second-rate terrain...ha, ha!

Wednesday, July 9, 2014

It's a Bridge...it's a pier!

My Acheson Creations Wooden Plank Bridge painted and flocked, with two extra plank sections and four stanchion piers per section for stability
I have had this Acheson Creations 25mm Wooden Plank Bridge for about a year and a half, now. Since I have a huge batch of their stuff on the way, I figured I'd better get it painted up before it got buried behind the incoming French & Indian War fort, blockhouses, and log cabins. The thing I like best about this set is you can adjust the length to make it as long as you want by simply adding more plank sections, and that you can make it a pier by simply leaving off the other end of the bridge. I ordered additional "Wooden Bridge Sections" so I could make it up to 16" long if I desired. I also ordered more "Wooden Bridge Piers" -- which are the supports underneath the plank sections -- so that I could have four per section (two on each side).
The image on Acheson's website. Not that it has only one plank section and one set of pier stanchions. I expanded that to three sections, each with four pier stanchions apiece.
I was really surprised by how quickly this painted up. Had I know how little time it would take, I may have gotten around to it sooner! The only real construction or modification I did to this was to epoxy tiny metal bases to the underside of the bridge. I then epoxied one rare earth magnet to each pier stanchion. It holds together like a charm, and seems really stable. Originally, I thought I'd make it even more stable by basing up each group of four stanchions on clear plastic. However, once I put it all together, the rare earth magnets held it strongly and securely.
At the bottom is the underside of the bridge planks with four 1/2"x1/2" metal bases epoxied on. At top, are the pier stanchions -- the dark black circle is the rare earth magnet.

 One of the things I like about Acheson Creations products is how easy they are to prepare for the tabletop. I did my usual routine of running the pieces through the dishwasher, and then spray priming them black with Krylon Fusion primer. I follow that up by brushing on a heavily watered down coat of black acrylic paint. Once dry, I wet brush the pieces a medium brown -- I use Howard Hues Camo Brown. I follow that up with a dry brush of Howard Hues Colonial Khaki. I wanted this piece to look sun bleached, so I did an additional light gray dry brush over the surface to make it look more like wood that has been out in the sun for awhile. A final black wash finished out the wood surfaces of the bridge.
The bridge as a pier. Simply take off one of the ends, and voila -- you have a wooden pier!
For the water effect on the bases, I painted them a very, very light blue -- I use Ceramcoat Coastal Blue. I then took a dark blue with a slight greenish tint and watered it down heavily into a wash. This I slopped on heavily onto the parts of the bases that had been molded to look like water. The wash sunk into the deep grooves, leaving the lighter blue visible in the tops of the waves. I did a straight white dry brush over the very tips of waves to look like whitecaps and sea foam. A little ground flocking on the very edge of the bridge ends and I was done.
"Now, where's that confounded boat? Looking down the length of the pier/bridge.
And it was really amazing how quickly I was done. Despite all the stages where I have to let the pieces sit and dry, I was done in just a few days. So, now I have a bridge for my Dark Age troops to skirmish over, and a pier for my Pulp games. This is definitely one of those models that -- when you finish it -- you like to sit back and soak in how nice it really looks on the tableop. Highly recommended!


Saturday, July 5, 2014

Buddha, Buddha!

Locals look to loot a temple watched over by a 28mm Stone Buddha from Miniature Building Authority
While at Cincycon this March, I was given a gift certificate to the Miniature Building Authority, who makes some pretty incredible stuff. However, since most of my buildings are from Acheson Creations (and I am doing fairly well with the ones I own), I decided to look at what they'd brought in accessories. What did I find but something that would fit perfectly for my next scenario of Dakota Smith's Oriental Adventures? Two medium-sized, resin Buddhas immediately caught my eye. Since the archeologists' goal is to find the legendary relic, the Tears of the Buddha, these would be perfect for an altar in a Buddhist temple.

Before I left for my nearly 3 week vacation to Taiwan and Vietnam, I got them ready to go. I created a stone altar for each Buddha from leftover Hirst Arts bricks. When I got back in town, I painted them black, then did a dark gray and light gray dry brush over the whole thing. The way they come from Miniature Building Authority, they already look like carved stone. However, I wanted to make them match the stonework of the altar more, so I painted over them. Once dry, I did a black wash on them, and they were essentially complete.
The French archeological party investigates a 28mm Stone Buddha from Miniature Building Authority
I trimmed up the styrene base and filled in the ground area around the altar with Woodland Scenics medium ballast. This I painted black, then dry brushed medium gray. Once it was all dry, I painted the ballast with white glue to make sure it sticks. A final spray of dullcoate and these Buddhas are ready for the tabletop!

Next up are some more Acheson Creations pieces. I bought a 28mm Bridge/Pier from them at the last Advance the Colors. So, since a pier is something I have in mind for the wrap-up scenario to this storyline of Dakota Smith, I figured it was time to get it done! Stay tuned for more on that...