Sunday, August 23, 2020

Moorish Cavalry Rides Again - 2nd Batch

Six more Gripping Beast 28mm Andalusian cavalry for my Saga Moorish army
I decided after painting my first batch of Andalusian cavalry for my Saga Moorish army that I would reduce my batch size. Painting 8 28mm horses and riders is a slog. I have always preferred painting in smaller batches, including way back in my 15mm painting days. It always seemed to me that you were rewarded with seeing progress on a more consistent basis. So, I tended to stay inspired more when seeing batches get finished. 

Closeup of three of the figures - I particularly like the cloak on the guy on the left
With 12 mounted figures left to paint in the army I had bought at Advance the Colors 2019, it made sense to do two batches of six, instead. I decided to save the armored cavalry (hearthguard troop class in Saga terms) for last. So, I picked out six of the unarmored riders and selected horses for them and got them primed and ready to go. For the riders, this meant giving them weapons. Unlike the first batch, I gave all six riders shorter spears, as the Moors in Saga are armed with javelins. I had actually forgotten that when I painted my first batch of eight...oops! I use the North Star wire spears, which I purchase from Brigade Games. I highly recommend Lon Weiss of Bridgade Games for all your Saga purchases. His service is quick and congenial. 

My favorite horse coloring, Cremello, (and my favorite robe pattern) of the batch
I pulled out the horse color chart that I talked about (and posted) in my post on the first batch. I selected six horse colorings that I hadn't used yet. I opened up my drawer of paints and decided which colors I own would match up the best with that particularly coloring of horse, and set those paint bottles out behind the horses themselves. As mentioned last time, I decided to paint the horses alone without riders first, and then epoxy them on after the riders were finished. My favorite of the ones I picked out was one I almost didn't choose. I really like how the "Cremello" turned out. I used a linen color for the base coat of the horse, with white speckling. I also liked how the "Sooty on Chestnut" turned out, as well as the Red Dun. 

New floral robe pattern I created for this batch -- I like it and will do it again
As discussed in earlier posts about the army, I like to mix up the patterns I use for the Andalusian robes. I am going with a softer, pastel pallette to represent the silks and fine linens the wealthier Andalusians might wear. This time, I decided to try a new pattern I'd thought up: four red dots in a rectangular pattern with a larger, kelly green dot in the center. I was hoping this would give the effect of a flower, and think it came out very nice. I also used the oval pattern I'd liked so much on the last batch, this time with tan dots on a medium green robe. In fact, this particular figure turned out to by my favorite of the whole batch. One of the reasons I like to save the commander and other special figures till the end is that I can find out what color combinations (and robe patterns, in this army's case) that work out particularly well. I'll use those on the general figure and his bodyguard so that they are deservedly the most striking figures on the table. 

One of the Gripping Beast riders with a helmet rather than headdress
Typically, when I am painting a 28mm miniature, I begin with the flesh tone and then work my way out, so to speak. The main tunic or shirt and pants would be next, then cloaks or whatever garments are on top. Then, I do the equipment and finally the details, like shield patterns, tattooes -- whatever. However, with the Andalusians, I am painting the robes and headdresses first. These actually show so little skin it is easier to do the my base coat and dry brush of it first, then go back and fill in their faces and hands. I've stuck with the three basic skin tones for this army -- a deep brown, dark leathery tan, and lighter but not Caucasian tone. I will organize my painting by pulling out the three paint bottles in those colors and literally lining the figures that will receive that tone in front of the bottle. I do this fairly often -- including when I am deciding what color trousers or shoes to give them. It lets me change my mind and switch things up so that the army looks even more irregular and each figure unique. 

The 3 dots pattern has been a standby I've used for this army since the very first batch of spearmen
After the skin tones and their highlights in the next shade up, is the most time-consuming stage: the robe patterns. I turn on my lighted magnifier, grab my tiniest brush (with the handle trimmed to half length so it doesn't bang up against the magnifier), and take my time. I clean the brush regularly while at this stage to prevent the paint from gathering up on the brush and blunting the tip. I do the lines for hem and cuff borders first, then proceed to the robe patterns. Most of my patterns are simply a series of dots in various arrangements, though I have taken to painting some spirals and "S" patterns. Typically, I am hunched over the painting desk for at least an hour at this stage. If I do all the patterns in one session, the plan is for the borders to be dry by the time I finish the dot patterns. That way, I can add dots or even tiny patterns to the borders, too. I try to force myself to take breaks and get in some walks on the day I am doing the robe patterns so that I don't end up with a sore back. Again. 

I like to mix in patterned headdresses, too -- typical just randomly spaced dots
I've also taken to doing patterns on a couple of the headdresses in each batch. I really like throwing in this variety. Even if only one out of every 4-5 figures has a pattern on the headdress, it is the effect it gives that is important. Your eye "fills in" the rest, and you see a more respendently patterned army. The ones that have only borders on their robes, for example, give your eyes a rest and present a more visually appealing (and not overwhelming) tableau. Or, at least that's what I think! 

I wasn't crazy about this shield pattern until I added the red dots in the middle of the yellow balls
The interesting thing I've found is that after the robe patterns and faces (beards and eyes) are done, painting the rest of the figure is somewhat anti-climactic. I feel like I am done, even though I have a number of equipment details yet to complete. This has led me to occasionally forget to do sword hilts, sheaths, and various other tiny details. Then I have to go back and hurriedly add them in before washing the figures. Speaking of skipping things, this batch I did not do my usual research phase before sketching out what patterns these six figures would have on their shields. I think it kind of shows, as these aren't as eye-grabbing as some of the previous batches. Maybe not! Anyway, I hand-paint all my shields for the twin reasons that I've never had success getting shield decals to go on properly, and that I am a cheapskate and don't want to buy them! Still, I think in general the shields came out just fine. 

Andalusian cavalry armed with javelins - we'll see how they fight in Saga!
One thing I started to do on this batch that is completely new is listening to Saga podcasts or video blogs while painting. For example, I really enjoy the conversation of "Northern Tempest," as two or three Brits talk about their Saga tournaments they've played. They analyze their armies and those of other contestants and give tips on how to use various factions' battle boards. One word of warning if you're going to follow suit and give them a listen is that their earliest podcasts deal with version one of the Saga rules. So, maybe start with the most recent and work your way backwards? I've also taken to listening to a couple video blogs - the ones by Herkus Monte are my favorite, I think. Saga Thorsday is another one you may want to give a listen, as well.

So, all in all, I am very happy with how this batch of Andalusian cavalry came out. I am getting really excited to get this army on the tabletop. However, with another batch of cavarly, two more of archers, and a final one for the warlord still to do, I don't expect it to happen at the next Saga Game Day. I think I will be lucky to have them ready by the Dragons Guildhall meeting on Sept. 20. Another reason for that is I am actually taking a mini-break from this army and painting up a batch of Vikings, next. These are mostly shield maidens for Jenny's Viking army. She wants to be able to field the figures not just as the "Shield Maidens" mercenary unit, but just as generic warriors. There's one other surprise in this batch, but you'll have to wait till my next post to see that!

Sunday, August 16, 2020

Mystic Helps Picts Overcome Strange Invaders at Dayton Saga Game Day

Nechtan Mac Fergus' Picts advance to contact against their Saracen foes
Six of us gathered to play Saga at the Dragon's Guildhall for our monthly meeting in the Dayton area. Adrian and Jim hosted, and had brought along two newer players, Adrian's brother Aaron and Jim's friend Mark. Jenny and I drove over from Columbus, which made for three games. Jim set the matchups, with Jenny helping Aaron in an Viking vs. Irish battle, while he coached Mark in a Viking civil war. That left my Picts (Scots in Age of Vikings) to face Adrian and his Saracen army.

The right of the Saracen battleline - horse archers, foot warriors, and more Saracen horsemen
Adrian is a big fan of Saga's Book of Battles, so he randomly rolled one of the scenarios for us to square off in. "Old Feuds" was the result, which meant each of our armies would be bolstered by a "challenger" -- a single-figure "hero." As first player, I chose the Mystic -- not because I thought his abilities would be useful, but simply because I have a great druid-looking figure that would be perfect for him. Adrian chose the Brute for the same reason -- he had a great, loathsome slave master figure terrorizing a slave with a whip. The goal of the scenario was to kill the other's hero. If one player did that while preserving their own, they automatically won -- no matter what the army losses were. If both challengers died (or survived), the scenario would be decided by slaughter points. My Mystic's special ability was to possibly give me additional "Saga dice" to roll for my board, though I think that happened only once or twice. Luckily, I never rolled a "1-2" on 1d6 and lost Saga dice, though!

The Pictish spear advances obliquely on the enemy, while archers race through the woods on the left
Otherwise, battle setup was fairly normal for Saga. We each placed terrain, with me putting out several woods to mess with his horse archer's abilities to shoot at us (or scoot around the board too quickly). Examining the Saracen battle board, I noticed "Ruse" which he could use to remove a command dice from my Saga board if he isolated one of my units with two of his. Thus, my plan was to keep all of my units within at least a Short distance of another to prevent him from using that abilitly. Our Old Feuds deployment helped with that, as all units must begin within a Very Short of another friendly unit. My warlord, Nechtan Mac Fergus, planned on keeping his units close together and under his control -- much like when he faced the Huns many months ago. 

Saracen center - many of Adrian's awesome figures are converted Haradrim from Lord of the Rings
I deployed with my Levy archers in the large wood guarding our left flank, with the Mystic closely following them through the trees. In the center, our three large spear blocks (12 figures, 10 figures, 10 figures) were deployed obliquely, stepping back towards our baseline. Following up behind them were Nechtan Mac Fergus and also his small unit of mounted noble hearthguards. We would keep this relatively tight formation throughout most of the game. The Saracens had five mounted units, and I didn't want them isolating and encircling a lone unit. 

The Saracen's main weapon - their large, composite bow-armed warrior units
Adrian deployed with one of his larger units of composite bow-armed mounted warriors on his baseline opposite my woods with the Levy bow. To their left was a unit of 12 foot warriors. Their center was tightly packed together, as well. Behind the foot warriors was a smaller mounted unit of warriors armed with spears and swords. To their left was another large unit of composite bow-armed mounted warriors, backed up by a small unit of mounted hearthguard. Adrian's left was guarded by his warlord, brute, and a tiny unit of four foot warriors carrying along another cool figure on a palanquin.

With no charge coming, the Pictish spear advance to within Medium to use 'Reach'
I began the battle with a steady advance, the archers darting among the trees to get into firing position against either his horse archers or foot warriors. The staggered line of Pictish long spearmen advanced, followed by its supports. Adrian opened the battle galloping forward with the center unit of horse archers. Composite bows fire as a free action that does not generate fatigue. However, they must move or do something else between shots, and have a range of only a Medium distance (half of foot bow's long). Adrian had a strategy in mind, though, and had no plans on leaving the horse archers dangling, exposed in front of my long spearmen. The horse archers galloped to within Short distance of two of my spear units, firing at one of them using Armour-Piercing Shafts (+1 bonus to shooting). They followed this up by playing Multiple Shots on their battle board, which meant that each of my units within a Short of the horse archers must roll a die equal to or lower than their armor, or suffer an additional casualty. Luckily, we took only a limited number of hits from these initial volleys. 

The Pictish counterpunch of 'Reach' has hurled the first wave of Saracens back, killing many
Adrian then pulled the horse archers back out of my range with Thoroughbred. He would then begin the next turn resting the unit to take off the fatigue all of that shooting and moving had generated. This was an effective use of his battle board, and he employed it time and again during the game. However, his shooting rolls (and my saves) meant it caused fewer casualties than it probably should have. Other than the very beginning of the game, this seemed par for the course. Adrian's rolls were bad to awful, at times.

A close up of Adrian's Saracen foot warriors - great conversion job!

We continued our slow, steady advance. I kept my battle board stocked with my usual defensive advanced Saga abilities, expecting a charge at some point due to some particularly deadly melee abilities the Saracen battle board had. However, after three turns of this shooting and scooting, I realized there was no charge planned. The Saracens were going to try to whittle me down with bowfire. By then, my archers were in range, and they began to pour withering fire into his foot warriors (Adrian's saving dice rolls were well below average, and the unit began steadily shrinking, unable to hit back). Nechtan Mac Fergus then waved the spear line forward and all three units closed to within range to use Reach -- a surprisingly effective counterpunch that the Scots battle board has (allowing them to "fire" at Medium distance). The horse archers began to take casualties, trapped, unable to fall back as the second line of Saracens hemmed them in.

The Saracens have been whittle down, with the reach of Pictish long spears causing many casualties
His center stung, Adrian sent forward the next unit of horse archers on his right, and they tried the same tactics against the Levy bowmen lining the edge of the woods. I was a bit worried when, instead of retreating with Thoroughbred, they darted around the woods, threatening to circle around and fall upon my rear (or worse yet, try to target the Mystic in the woods!). A wave and a shouted command from Nechtan Mac Fergus sent the Pictish mounted nobles wheeling around to meet this threat. As the foot archers softened up the encircling horse archers with a volley, the mounted nobles charged into them, driving them headlong into the corner of the battlefield. Meanwhile, the Pictish spear line used Reach again and again. Soon, few Saracen foot warriors or horse archers remained in the center of the Saracen line. 

The end around attempted by the other horse archers meets its own end on the spears of Pict nobles
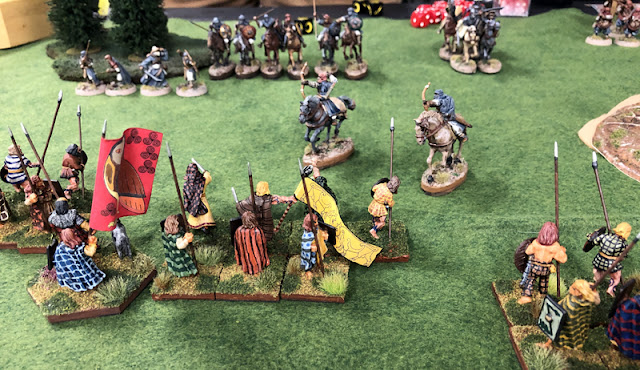
At this point, Adrian tried a gambit I had not expected in the least. He loaded up his battle board with four command dice in the Ghulams section of his board, which allows him to active hearthguard or hero units. Then his warlord went for a blazing ride across the battlefield, across the front of and around my spear line. The clansmen from the hills watched in admiration of his horsemanship as he encircled their lines and spurred his horse into the woods towards the Mystic, who was performing ancient, arcane rituals beneath the trees. However, it was a desperate gambit, as the warlord arrived Exhausted from his ride. The Mystic flung crackling potions from his deerskin pouch and wielded his bronze knife dangerously, driving the warlord back. 

The brave gambit of the Saracen warlord and his hearthguard leaves them in the midst of the Pict army
Seeing their lord in danger, the Saracen hearthguard embarked on an equally impressive ride of excellent, Bedouin horsemanship. They arrived tired, but their bodies blocking their lord from archery fire by the Levy foot. Nechtan Mac Fergus knew this was the moment when he could break the enemy army. He pondered for a few seconds. Too much haste could spoil this opportunity! In response to his gestures, the archers poured fire into the Saracen hearthguards, halving their numbers. The nearest unit of spear then shouted a battle cry and charged into the horsemen, spearing them to the last (using Wall of Spears). Nechtan Mac Fergus heard a trumpet blast that signaled his nobles charging in again to slay the last of the cornered horse archers. 

Archery fire, the charge of a wall of spears, and Nechtan Mac Fergus' own blade ends the gambit
The moment had come for the stout Pictish warlord to unsheath his own sword. With his Scottish deerhound Broch bounding at his side, the warlord charged his Saracen counterpart. Nechtan still bore the scar from his last clash against the Jomsviking warlord a month ago, that had left him bleeding at his enemy's feet. He'd been saved that time only by Broch who leapt and snapped ferociously at the startled Viking driving him back until his men could rescue him. The old wound seemed completely healed, though, as he swung his sword. With a few strokes, he cut down the exhausted, dazzled Saracen commander. Behind him, his men roared in triumph, knowing the battle was won.

My Mystic exacts revenge for the Saracen intrusion upon his arcane rituals in the woods

At his point, Adrian and I called the game. He had no more chance to get the quick victory by killing my Mystic. I could possibly charge and kill the Brute, but there was no need. The slaughter points would favor me, as I had lost only a handful of spearmen and none of my Levy or Hearthguard. I felt bad that Adrian's rolls handicapped his good battle plan so thoroughly. He had structured his army around utilizing his horse archers as his main weapon. When that failed, the only thing left was to charge me. The Picts have great defensive abilities in melee, and he knew that probably wouldn't come out in his favor. His gambit with the warlord could have worked, especially if my consistently good die rolling had picked that moment to fail. I have to confess when I rolled those saves for my Mystic, I was worried. My luck didn't desert me, though, and the Picts triumped over their strange, new enemy from the faraway deserts.

Viking levy archers under attack by Irish warriors and an Irish hero in Jenny & Aaron's match

Meanwhile, Jenny and Aaron had a bloody confrontation that turned Ireland's green shores red with blood. Jenny came out on top, led once again by her shield maidens (along with her skillful use of the Odin battle board ability to blunt the Irish javelin fire.

Jenny's Shield Maidens (with banner) advance on the Irish in support of a unit of Viking warriors
In the remaining game, Jim fell into the trap that many of us veteran gamers have when playing a novice -- teaching them so well, and giving such good advice -- that he lost. Mark's Vikings triumphed over Jim's in a bloody battle for lordship of Norway. In addition to being a good coach, Jim is an amazingly generous man. He gave all five of the other participants $20 gift cards to the Dragons Guildhall. I found the store's stash of 28mm Dark Age figures, and picked up three packs of leaders from Warlord games. Jenny picked up a supplement for Terraforming Mars for us to try some Saturday evening.

Jim, at left, coaches Mark in the bloody slaughter that is a Saga Viking vs. Viking game!
Since it was getting late to start another game of Saga, Jim invited us all to play a game of Wingspan (which I had purchased at the Guardtower East on our last Saga Game Day there). It was a tight game, with me eking out a narrow victory over Adrian and Aaron. All five of us enjoyed the game, though. We closed out our trip to Dayton with our usual pizza dinner at Cassano's -- which Jenny, as a Dayton native, loves. All in all, a great way to spend my last day of summer (tomorrow, school starts up for me). Thanks to the Dayton crew for being such excellent, generous hosts! I am pondering a way to return the favor...!

Saturday, August 8, 2020

Moorish Archers - First Batch

My first batch of 28mm Gripping Beast archers for my Saga Moorish army

 
When I opened up the tin where I have kept my unpainted miniatures for my Saga Moorish army, I was surprised to see that I had 24 archers -- not a dozen like I had thought. My first thought was, "Sigh...so I am NOT half done with this army!" My second thought was how big of a batch size to paint them. I decided to split them into three batches of eight rather than doing 12 and a Saga "point's" worth. In the old days, I rarely painted more than six figures at a time. I've been creeping that up, and eight seems like a good amount. I prefer small batches over large because you see progress much faster. Getting a certain number of figures based up, flocked, and ready to go (and posted here) is encouraging. That last batch of eight mounted figures took WAY too long!
I am painting my 24 archers in three batches of eight, so that is why most of these are the same pose
 

Anyway, I had been kind of avoiding these figures because they needed the hands holding the bow glued onto the figures. This is a new thing with figure manufacturers, and I wish it would be a passing fad. Readers of my blog are probably aware that I hate gluing anything together in my miniatures. I will never paint up any of the new style of plastic figures which require you to glue the arms, torso, heads, etc., all together! Yes, I realize it allows you to "mix and match" and customize your figures more. However, as someone who is super glue challenged, this would be a self-defeating proposition. So far, I have loved my Gripping Beast miniatures for this army. This was my first "hmphf!" moment.

I tried to use duller tones and less patterns in the archers. Not sure I was successful, though!
 

That said, I had recently purchased Gorilla Glue super glue to repair a lawn ornament (didn't work, of course). So, I thought I would give it a try again. I drilled out the wrist stump deeper so that the peg that comes on the end of the separate hand would go all the way into the hole (as cast, it did not). I then put a single drop of super glue on the wrist stump and then pressed the hand peg into the hole, counting to 45 seconds like the instructions recommended. And lo and behold! It worked!! I actually superglued something together successfully for the first time in my life...ha, ha!

The guy in the light brown is my favorite from this batch, with his oval pattern of dots on his robe
 

I had separated the batches by pose, and this group of eight had seven of one pose and one of another. Even though it may seem more boring to paint the same pose, it is a good way of making sure you don't end up having two figures with identically colored clothing. I decided that I wanted to make these archers slightly less fancy than the spearmen and cavalry. I supposed that, as levy, they won't be able to afford the best material for their clothes (read fancy patterns on their robes, here) -- though the Emirate of Cordoba was quite wealthy. So, three of the figures were done in robe patterns, while the remainder were given just borders at most. I also decided to do a few patterned turbans, as well, to mix it up some more. 

Note the one non-conformist pose in the off-white robe. I think I like this pose better than the firing one
 

I also used less bright colors and more dull ones -- at least that was my intention. Some colors I used were the same as the spearmen or cavalrymen, but I introduced some duller ones, like a light gray and light brown. After seeing them completed, I am not sure an observer would immediately notice that the archers are meant to be less bright and colorful. Oh well. I do have two more batches of archers to do, so I can tone them down even more if I desire.

I have begun painting the headdress in a different color from the robes as I  progress on this army
 

I like how these guys came out, as well. So, I am really excited about how the Andalusians are coming along. Besides the two more batches of archers, I have 12 more cavalry to do (likely in two batches of six) and the warlord's base. I have picked out a "pet" for his base, as well. No, I won't reveal the secret, but it won't be a dog. Muslim society doesn't go gaga over dogs like Western European ones. So, it is going to be something different and within the realm of historical possibility. So, no polar bears or anything like that! You'll have to wait and see, though, to see which animal it will be!


Monday, August 3, 2020

Andalusian Cavalry for my Saga Moorish Army

Four of my first batch of eight Andalusian cavalrymen -- 28mm Gripping Beast figures
For the longest time, I had a "standard" way that I painted horses. I had black horses, dark brown, medium brown, tan, dun, white, light gray, and dark gray. I usually gave them "socks" white coloring near their hooves and a splotch of white on their foreheads. All the horses I painted for my various armies had the same basic coloring. Then I saw a colorful, cartoonish chart on the internet that showed various colorings simplified - dappled grays, buckskin, black "blue" roans, and more. There were more than 70 varieties depicted.
The cartoonish color guide I found on the internet and use for painting horses - feel free to download!
I decided to experiment and try to use the chart as a guide for my color choices. I was VERY happy with how they came out. So, when it came time to paint the cavalry for my Andalusian army for Saga, I found the chart again and swore to myself I would not take a shortcut and paint my old standard way of doing horses. This batch is the first of three batches of mounted Andalusian troops for my Saga army. I'm very happy with not only how the horses came out, but also the troopers atop them. In fact, the richly colored robes kind of overshadow the poor mounts and you have to pay attention to notice the markings on the horses. Hopefully, the two complement each other rather than detract from the other's effect.
All eight of the cavalrymen lined up and ready for battle
I was a little disappointed that most of the riders have the closed fists that you need to drill out to place spears or other weapons into. I prefer the open hand that Gripping Beast used for the Moorish infantry I'd painted already for this army. However, most of my drilling attempts worked out with only a few misaligned holes resulting in the hand being half open, half drilled. I took the worst of those mistakes and widened it with an X-acto blade to place swords instead of spears in their hands. But that is getting ahead of myself!
Close up of the other four Andalusian cavalrymen for my Saga Moorish army
I actually began with the horses, and painted all eight of them completely before beginning the riders. I even had them based and flocked before the riders had anything more than primer on them. This was a change in my methods, as well. Normally, I epoxy the figure to the horse before priming. However, with the patterns on the robes being so intricate, I thought it might be better to paint the riders separately and then epoxy them to the horses after completed. It did make turning the riders around, sideways, and upside down easier, which allowed me to execute the patterns with a minimum of struggle. Wait a minute...am I getting ahead of myself again??
The dappled gray - I honestly feel the rider overshadows the mount with his fancy shield and dotted headdress
Back to the horses! So, after cleaning up the very minimal flash on the miniatures (I am becoming more and more of a fan of Gripping Beast metal miniatures), I attached the horses to cardboard squares with white glue. Next, I brush-primed them with white acrylic craft paint. Then, I grabbed the chart and wrote onto the cardboard square which type of coloring I would use for each horse. One of my favorite 28mm horses that I have ever painted is a dappled gray in my Welsh army, so of course I would try one of those! Now, before anyone comments at the end of my blog that a particular marking I chose was not around in Andalusia during the Middle Ages, I want them to know I realize that is a possibility. I am trying to make my horses look more realistic than my cookie-cutter method I used before.
I really like using this chart for my horse coloring -- it really makes the mounts "pop" and look more realistic
The horse coloring was done first, and it actually made painting horses more enjoyable doing it this way. Normally, I look at horses as drudgery and focus my enthusiasm on the riders and infantry. However, I like how these look, and it is inspiring to see them begin to look lifelike while painting. That said, there was a lot of horse equipment -- each mount had some sort of saddle blanket, as well as reins, bridle, saddle, straps -- you name it! Quite a few even had tassels. I decided that I would make the horse blankets colorful and indulged my creativity with patterns, stripes, borders, and swirls.
This was the only shield I painted Arabic calligraphy on -- which matches the horse coloring, too (lucky accident!)
As mentioned earlier, once the horses were done, I went ahead and based and flocked them, too. I use 1"x2" rectangles for my horses (infantry are 1" squares). I actually use two of those infantry bases epoxied to a 1"x2" piece of styrene plastic. So, the cavalry bases are a fraction taller than the infantry ones, and if you look you can see the separation of the two bases. Yes, I could probably order some Litko 1"x2" bases, but I haven't painted cavalry in so long that I didn't see the need.  Anyway, I also added in a larger stone on each base (coarse buff talus from Woodland Scenics), as well as the usual scatter of small rocks (medium buff talus). I washed the larger stones with a black wash to give them more depth. I really like how the basing turned it on this batch of cavalry!
One of the riders that was given a spare 28mm sword I had instead of a wire spear
Once I was finished with the horses, I set them aside and began work on the riders. First, I attached their weapons -- North Star wire spears trimmed to appropriate length for six of the riders and 28mm swords for the other two. No weapons were included for the cavalry in the bagged army I had purchased at last year's Advance the Colors dealer room. So, I had to supply my own swords from my dwindling supply (though I recently ordered a restock of 80 wire spears from Brigade Games-- that should last me awhile!).

When I Googled Andalusian shields I saw a leopard skin one, so I HAD to paint one this way -- I like it!
I decided to attach the riders to squares of cardboard like the mounts had been. This is kind of tricky depending on the pose. I essentially leaned them up against something heavy, put a blob of glue on the sole of each foot and placed them upright on the cardboard, leaning against their chosen object. I did have two figures pop off the cardboard during the painting process. Once they were completely done except for their shoes, I popped them off their square. I held onto them with my hands, painting the shoe, and later while drybrushing the shoe and detailing the leather stirrups. Once the riders were completed, I matched them up against the horses, picking out a mount for each. I didn't want them to match perfectly, but I wanted the coloring of each to complement each other.
The double almond shaped shields seemed to be a common Andalusian motif...and tassels, too, I guess
They were attached by scraping off a bit of paint on the horse's saddle and the underside of the rider. This would hopefully give a metal on metal bond with the epoxy. We'll see if I have a problem with riders popping off as time progresses -- hopefully not! Oh, and I guess I lied. The riders weren't completely done when epoxied onto their mounts. I did the black and brown wash on the riders after they sat atop their horse. My system for washing this army is somewhat complex. The lightest flesh tone of the three I am using gets a brown wash. The darker two tones get a black wash. For equipment and clothes, if it is in the white/yellow/tan tonal range, that part of the figure receives a brown wash. If any other color (red, brown, blue, etc.), it gets a black wash. For some reason, brown washes don't seem to show up on the greens and reds and so on.
The pattern on this robe turned out to be my favorite -- that of the horse blanket came out not too shabby either!
I added in a couple new patterns for my robes this time, too. My favorite new one consists of 7 dots - a central dot and 6 around it. I will definitely be using this one, again. I may try to do a light dots on a darker robe color with this pattern next time. The three-tier, two-color floral pattern didn't come out as nicely, though. At least it is not my favorite. All in all, I was very happy with how the robes look on these riders. I'm so glad I went out and bought additional colors when doing my second batch of Andalusian infantry. I think the variety of subtle shades really add to the look of the army.
Trying to balance things, this rider got a simple border for his robe since I knew I would be doing something for his cloak
For the shields, I did a lot of Googling images, looking at Gripping Beast's web page, and of course the one I've mentioned before, Joe/Neldoreth from An Hour of Wolves and Shattered Shields. His artistry is something I can aspire to, but never achieve. Before planning out what I will do for the robes or the shields for each batch, I look through every single one of the images of his al-Andalus gallery on his site. I can only hope that others see these pages of Lead Legionaries and it gives them an idea or two to try for their own tables!


Sunday, August 2, 2020

Ten Warlords Clash at August Saga Game Day

Adrian's Irish at bottom emerge from the terrain to advance upon Dave's Romans, who await them
We're growing -- that's encouraging news. We had 10 players attend our August Saga Game Day at the Guardtower East in Columbus, OH. This was up from the eight we had play in July, which I hope foretells continued growth. The store requires masks while up and about in the store, but are optional while seated and playing. Our group has adopted a courtesy approach to add to that: if your opponent feels more comfortable remaining masked, then please keep it on while playing, too. Nearly everyone wore their masks the entire time, taking it off only for refreshments, it seemed to me.
All players wore masks and respected their opponents, which allowed us to enjoy our Saga Game Days once again
I know there are gamers out there who refuse to attend events where masks are required, but considering how we were completely closed out of game stores for months, I think it is a small burden to bear to allow us to play miniature wargames in stores, again. Besides, some of us (myself included), have continuing close contact with elderly parents who are at extreme risk. It is a chivalrous gesture to those gamers to endure the discomfort of a mask for a few hours so that they can have peace of mind and increase the likelihood of their family remaining safe. I know others may have different opinions, but this is my blog. Please don't use the comments section as a venue to attack my point of view. Show respect.
A close up of the crazies in Adrian's Irish army as they prepare to throw themselves on their Roman foes
Politics aside, as we had 10 warlords sending in RSVPs, I set the matchups so that no one played the same opponent as they did last month. We had 2 Viking warbands, 2 Irish, 1 Jomsviking, 1 Anglo-Saxon, 1 Norman, 1 Pict (Scots from Age of Vikings), 1 Crusader,  and 1 Roman. Several players were getting their first crack at running a new army, including Bob with his Crusaders and Andy with his Anglo-Saxons. Unfortunately, we had an abbreviated second round -- only two players were able to stay for a second game. I apologize to my opponent Jim, as our game ran so long he wasn't able to get in a second. I still am not sure how tournament games finish in 1 hour and 45 minutes (or whatever it is they run). I seem unable to get my games done in less than two hours. Of course, I *do* get up a lot to take pictures of other games for this blog!

My nobles and archers on my army's right would play a key role in our slugfest with Jim's Jomsviking army
Jim and I set up a Clash of Warlords game. He was running Jomsviking, which I had played once before. There were two large woods, one on either flank, and three smaller patches of terrain spread across the board. Jim was probably placing so much terrain to impede my Levy archers, as his army was entirely hearthguard -- 24 figures (2 units of six, 3 units of four, and his warlord). My rank and file doubled his numbers, with 32 warriors split into units of 12, 10, 100, 1 unit of 12 Levy Bow, 1 unit of 4 mounted hearthguard, and a foot warlord. We rolled the "Deployment C" which means no unit can be within a Medium distance of another friendly unit.
My wall of spears closes in the center while the nobles and archers get in position to launch their coordinated attacks
I deployed my largest spear block -- with a new twist, a war banner -- on the far left, facing off against one of Jim's 6-man hearthguard units. I joked that my Picts felt they were the equal of his Vikings (technically, each unit was 1.5 Saga points...haha!), so weren't scared. My two smaller spear units were in the center, backed up by the warlord in the center and the Levy Bow and mounted nobles on the right. I opened the game moving my archers into the large woods to slow down any possible attack from his small hearthguard unit on that flank. The nobles moved up to support them, which caused the Vikings to back off towards the center, surprisingly.
On my far left, one unit of spearmen and Jomsviking hearthguards clobber each other to a stalemate the entire battle
Jim opened the battle up on my far left, marching the large hearthguard unit towards my unit with the  warbanner. He also used on of what I consider a very dangerous weapons they had on my spear: Nordic Tempest. This advanced Saga ability on the Jomsviking battle board allows them to launch a 3-dice attack on any enemy unit anywhere on the board. I felt relieved he was targeting my largest unit, not so relieved that for his first three turns he rolled 8 of 9 hits (on a 50% chance to hit). My saves were not nearly as good, and my unit was down to 8 figures when his Jomsvikings hurled themselves towards our line of spearpoints.
My spearmen and warlord's attempt to use 'Reach' was shot down by the Jomsviking's 'Punishment' ability
This opening melee would be the game in a microcosm. My Picts closed ranks and used a couple of defensive abilities to negate their hits. We killed one of their number, so they recoiled back, surprised. Jim admitted he was surprised by how doughty and durable the Picts were in melee. In turn, I was surprised by how many times their units could hurl themselves at an enemy in the same turn. One unit even charged three times in one turn. They have abilities that allow them to remove fatigue, plus Fury of the Pagans allows three units to move for one Saga die. Time and again, the Jomsvikings would charge. We would throw them back, each of us losing a figure or two. And then, they would come on again, relentlessly. It was impressive.
Here they come! Advancing to use Reach put us within the charge range of many ferocious Jomsviking hearthguards
I gained a further appreciation for the Jomsviking battle board when I closed to within a Medium move with all three spear units and my Warlord, planning to use Reach. This allows them to "shoot"out to javelin range, though I rationalize it as representing a dash forward with our Pictish long spears, jabbing at them, then falling back. Jim cancelled the action with the Punishment advanced Saga ability. I could have in turn canceled his Punishment by allowing him to take 4 Wrath tokens, but I have learned that things are best if you don't rise the "wrath" of the Jomsvikings. This unique feature of their board allows opponents to cancel out their advanced abilities, but at the cost of allowing them to accumulate Wrath, which (in general) makes their attacks more vicious. Over the course of six turns, I let him accumulate only three Wrath tokens, which he ended up being unable to use.
The nobles arrive and ride down one unit of hearthguard, while my spear line and warlord are steadily driven back
I knew what was next, though. We had closed within a Medium all across the board. His hearthguard were going to charge again and again. As they did, though, my right wing began to get into the game. My archers fired at the Vikings again and again, beginning to wear them down. My mounted nobles circled the woods on the right and closed in on their center. In the end, I attribute our eventual success to these two units -- plus the stalwart defense of my Pictish spearmen. My archers whittled one hearthguard unit down to 1 figure. Then the nobles would follow charge that unit and destroy it. We did this three times, using the fatigue they'd accumulated in fighting my spearmen to make it difficult or impossible to do damage to my horsemen.
The nobles save the day, charging hearthguard units whittled down to one figure and eliminating them
I thought this would be the way the game ended when my nobles galloped down onto his Warlord, who had two fatigues already. Poor dice rolling (and equally poor shooting by the archers beforehand) meant he gamely drove off my horsemen. Of all the crazy heroes in Jim's Jomsvikings, his warlord was the craziest of them all. On the very last turn, he launched two charges against my own Warlord. My dice were wavering, though, and I could not manage enough hits to finish off his warlord. Twice, though his warlord rolled spectacularly, scoring five rolls of "6" on 11 dice. It was too much for Nechtan Mac Fergus, who went down under his blows, sorely wounded.
Jim, on right, commanded an excellent game and is the first opponent to destroy my army's warlord!
That proved to be the final stroke of the game, but it did not secure the Jomsvikings victory. Their losses proved to be greater, and I edged out Jim 22-18 in final points. It was a truly epic slugest between an offensive powerhouse and a doughty, defensive foe. I think both of us came away with new respect for the opponent's army. Jim did a great job as general of the Jomsvikings and boldly kept up the pressure -- never afraid to even throw his warlord into the fight or the hurl the same unit against my spear wall multiple times. Fun game!
Anthony's Norman cavalry and archers advance towards their Vikings foes in their Round 1 game
Meanwhile, the other four games had all finished by the time we did. The results were:
  • Jenny's Vikings duplicated our score and defeated Anthony's Normans 22-18 in Clash of Warlords.
  • Joe's Vikings spoiled the debut of Bob's Crusaders 34-17 in Clash of Warlords.
  • Tyler's Irish similarly defeated Andy's Anglo-Saxons in their first battle in Feasting & Pillaging, 28-25.
  • Adrian's Irish defeated Dave's Romans in another Clash of Warlords (I believe -- I forgot to ask and they did not add up the final score).
As the army of Normans comes closer, the Viking Levy archers find a safe spot in the woods
Once again, I felt bad that our game ran long and Jim was not able to get in a second round game. He and Adrian drove over from Dayton and had to get back. Others peeled off for various reasons, leaving only Bob's Romans and Jenny's Vikings to square off. Bob was trying to get revenge for last month's defeat while learning to play the Crusader battle board and his new army. He was using a legendary commander, Godfrey of Bouillon, which costs two points (when normally your warlord is free in Saga). Looking over Godfrey's abilities, I think he's a bit over-costed. He DOES generate two Saga dice (instead of one), but otherwise he seemed little better than a free warlord.
Jenny's berserkers hurl themselves upon the Crusader warrior crossbowmen, who are eliminated to a man
By the time I got my stuff put away and the tables put back the way we found them when we arrived, their game was half over (and more than half their troops dead already!). I showed up just as Jenny's berserkers killed Bob's warrior crossbowmen to a man, losing all but one of their own figures in the process. Bob counter-attacked with his small mounted hearthguard unit into the flank of Jenny's Levy archers, chasing them into the woods but not eliminating them. Jenny counter-punched with her Shield Maidens -- warriors who love to test their mettle against enemy hearthguard. Although the Crusaders drove them off, they were being whittled down. Her warlord charged him to eliminate the last knights still standing.
Bravely, the Crusader knights charge into the Viking force, killing many archers and sending the survivors fleeing
Bob was having command and control problems as Godfrey had fallen earlier in the battle. His two remaining warrior units were unable to move and strike back. This allowed Jenny to assemble her attack, stack her battle board with Thor, Loki, and all of the other nasty Viking abilities and wade into the largest remaining warrior unit. Weary from slaughter, both armies staggered through the final phase, their ranks horribly depleted. Counting up the points, Jenny's Vikings triumphed again, 29-22. The Crusaders retired to bind their wounds, and reconsider their strategies when facing these equally fearsome opponents from the north.
Bob's Crusaders stream towards their first round foe, more Vikings, this time commanded by Joe
Although they look unstoppable, the Crusaders ran afoul of the deadly Viking battleboard abilities like 'Thor' & 'Loki'
Another view of Anthony's Normans and Jenny's Vikings battling it out in Round 1