Tuesday, November 28, 2023

First Squad for the Bronze Legion in Xenos Rampant

    My first human (humanoid?) squad for Xenos Rampant Sci-Fi skirmish - the Bronze Legion!
I want to paint up a number of forces for Xenos Rampant Sci-Fi rules, so plan on switching back and forth between different types of figures. I started things off with the Terminator 3-D printed figures, so now thought I'd switch to a human (or humanoid?) force. Most of these figures are from Wiley Games intended for their Galactic Heroes rules. I purchased one of their groups of five figures (for the price of four) which included two Marines, as well as a Marine sergeant and captain. The fifth miniature was from Reaper Bones and was a Science Fiction figure called XXXXXXXXXX. He had armor so I thought he wouldn't look completely out of place alongside the Wiley marines.

    These resin figures are from Wiley Games and are billed as "Marines" - I love the helmet & armor!
I'd recently picked up a new metallic craft paint called Ancient Bronze, so thought I'd try it out on these figures. It was much brighter after drying than in the bottle. Almost a copper tone. However, I did a dark black wash on them and really liked how it toned down the color. It was closer to matching what the color looked liked before application. To try for a nice 3-D look, I then watered down the paint some and applied it over the highlights of the armor pieces. I followed this up with full-strength Ancient Bronze towards the center of the highlighted area in hopes of giving a light-shining-on-armor look.

    I mixed in this Reaper Bones figure 'Gavin Markus, Novacorp Hero' to beef the squad up to five
The hardest part was next when I painted recessed areas and deep crevices in the armor black. My thought was that their was a black uniform underneath the armor showing through in areas between the armor plates. For some tinier areas I pulled out the black micron pen and color tiny dimples and other recessed areas with that. It was at this point that I was very thankful I had decided to paint up five figure squads for Xenos rampant, with each figure being 2 strength points. Doing the black on a batch of 10 figures would have been quite the grind. 

    I did several layers of a new metallic bronze paint and wash for the effect of the armor

I wanted the visor of the helmet to look like a dark, smoked plexiglass. I used Iron Wind Metals Steel for that, and really like how it looks. After I was done with dullcoate spraying them, I painted the visors with a brush on gloss paint. For the weapons, I painted them a dark metallic craft paint with accents in a metallic brown. Once I was satisfied with the accent work, I did a dark black wash over it. Finally, it was time for some red accents. The marine captain has a kilt of sorts around his waist, which I did in a Moroccan Red craft paint. I also added red accents on their chest armor and belts.

    A squad of the Bronze Legion investigates an abandoned research station
The Reaper figure has quite a bit more detail with a backpack of some sort. He has taken his helmet off and wears some sort of headset underneath. Once I was done with the four marines, I took another hour or so to finish off his detail, including his human skin, hair, mustache, and eyes. Thankfully, his sizes matches up well with the marines even if he isn't an identical fit. The flocking on the bases was done similarly to the Terminators. I paint the base a medium gray, then glue a couple bricks to it. I then paint the base with white glue and sprinkle Fine Woodland Scenics Mixed Gray Ballast over it. Once dry, I apply a black wash to the base (out of the tub, I think it is too bright). If the wash makes it too dark, I do a light gray dry brush over it again to pick out the texture. Finally, I add some patches of grass and a dried grass tuft to complete what I like to think of as an urban battlefield look.

I really like how the Bronze Legion, as I am calling them, came out. I took advantage of Wiley Games' Black Friday sale and ordered another squad's worth, which should be coming within a week. I have also been flocking up Jenny's new Saga army (Iberians from Age of Hannibal) that she sent out to Ted B to get painted. Still, I feel like I am being incredibly productive of late, what with 2/3's of her army already flocked, the Silent Slumbers Motel MBA building completed, and Droids and Robots, and now these marines. Hopefully, this burst of productivity will continue! Stay tuned to see!!

Friday, November 24, 2023

'Silent Slumbers' Motel - Resin Building from Miniature Building Authority

    The Santanas take over my Two Story Shanty Hotel from Miniature Building Authority
This is one of the heftiest buildings I have ever built and painted up. From Miniature Building Authority's amazing line of resin buildings, the Two Story Shanty Hotel comes with upper and lower levels, roof, stone staircase, and balcony railings. It's a fairly heavy hunk of resin, but incredibly detailed down to cans and other trash in the hallways outside the motel room doors. I took my time on it and worked on it here and there over a few months until finally finishing it today.

    This hotel is a hefty hunk of resin, but very solidly built and has LOTS of details
I bought it last year at Advance the Colors (2022) and was honestly hoping to have it done before this ATC. Alas, it was not to be. That incredibly busy period from late Spring through October was consumed with getting things ready for that convention. I wanted to paint the hotel up as generically as possible so that it could be used for different periods. The air conditioning units affixed to the back of each room definitely dates it to the 20th century forwards. However, the weathered and aged stone construction means it could be used in a number of settings. Heck, with Star Wars liking for desert planets, this wouldn't really be out of place in a Sci-Fi game, either!

    Once you glue the balcony railings on, it is a three piece building - upper & lower story and roof
The first step in getting this ready for the tabletop was to glue the two balcony railing pieces to the upper and lower levels. I also glued the stone staircase to the side of the lower level, placing it so it would help hold the upper level in place. To help with that, I cut a piece of curved wooden molding and epoxied it to the front of the building. I attached it to the lower level, but half of its height extends to the upper level so that it will also help keep the upper level stable and in place. I considered magnets, too, but felt that the weight of the piece, along with the staircase and sign holding it in place on two of its sides made this unnecessary. 

    The stone staircase glues to the side of the lower level and its top step helps hold the upper in place
Once all the epoxying was done, I spray painted the three levels (lower, upper, roof) with Krylon Matte black, and followed that up with a 50/50 mixture of black acrylic paint and water. This helps the paint sink into all grooves and crevices, as well as giving a thick surface for the paint to adhere to and prevent the wear and tear of scratches or gouges. I decided to begin the painting with the interiors of the motel rooms themselves and work my way outwards. I chose four somewhat pastel colors to wetbrush the four rooms on each level in. I then painted the tiled floors in a contrasting color. Next, I picked out the interior door and window trim in a darker version of the pastel color. So, each room had its own color scheme.

    I began painting the interior rooms first and then worked my way outside
Next up were the blinds and doors, which I did with a base coat and dry brush. Finally, when all was dry, I moved on to the exterior surface of the building. I did its base coat in Howard Hues Camo Brown. This was applied in a thick wet brush, covering most of the surface, with only an occasional crack left in black. This was also applied to the tops of the walls separating each interior room. Once dry, I dry brushed the exterior in Howard Hues Colonial Khaki. I really like the way it came out, giving a warm, earthy feel.

    The front of the motel - this is a quality model and can likely be used in many periods & settings
It was on to the numerous details next, which included the air conditioning units on the back wall of every room, power wires running to each unit, the exterior window trim and doors, metal door handles, metallic plates anchoring the power wires, and even the trash in the hallways. The floor of the hallway was done in to look like concrete with a dark gray base coat and light gray dry brush. Once all the very significant details were completed, I applied a brown wash using watered down Vallejo vehicle wash. I am always happier with how anything dry brushed look when I finish off the exterior with a darker wash. I feel it "softens" the edges of the brush strokes and makes it look smoother overall.

    A three quarters view of the hotel back and good look at all the detail molded into this model
The last thing I did was the roof. It had been done in black base coat like the other sections. I did a red brown wet brush next, followed by a dry brush of the more orange tone Howard Hues Middle Eastern flesh. Once dry, I applied a dark brown wash over this, as well. The motel was almost open for business! I designed a sign on my computer to go over the long piece of molding I had glued to the bottom level. I went back and forth on naming the hotel. I was tempted to name it "Suite Dreams" -- liking the irony if it was used as a hotel of ill repute in a bad section of town. However, I know how wargamers are and someone would invariably point out the rooms are far too small to be suites! Wanting to forestall that banter, I decided instead to go with "Silent Slumbers Motel." This also has a slightly ominous tone for a location in the bad section of town!

    The detail goes all the way down to the trash strewn in the corridors
Miniature Building Authority terrain is always high quality and looks amazing on the tabletop. I encourage folks to shop with Kirk -- he's a great supporter of our hobby and a nice guy all around! Look for a few more of my MBA purchases to follow the motel onto this blog. I have more cool buildings I purchased from MBA, and hope to begin working on them soon!

    "Get a room!" the rest of the Santanas may have shouted to Margarita and Julio...


Monday, November 20, 2023

Some Cool-looking Robots and Droids for Sci-Fi Games

Selection of Droids & Robots from three different manufacturers recently finished up for Sci-Fi games
These have been sitting on my desk base-coated for several months, now -- perhaps longer! I began working on them when I was painting droids or robots for enemies in Space Station Zero. With my interest beginning to tail off and my painting schedule for last year's Saga tournaments picking up, they simply sat their dormant and patiently waiting for their turn. Now, that I have a renewed interest in Sci-Fi miniatures with my purchase of Osprey Games' Xenos Rampant (which I picked up from Shieldwall Gaming Club). I based them all on circular bases and pulled them into the painting queue.

    The three miniatures assembled - called Vatacina Sentinels and Purifiers on the Aberrant webpage
The three on the left in the metallic green, red, and blue are from Aberreant Games for their Rezolution Science Fiction Miniatures Combat Game. I don't know a lot about the rules, other than the website says they represent a dystopian 2175 A.D. future. I picked the miniatures up from Bryan Borgman at his flea market at the Origins Game Day this past January. Look at the website for Aberrant, I got an amazing deal. I swear he was selling these packs for $1 each. On their website now, they list for nearly $20 per figure! That said, I ended up failing miserably at putting them together and handed them off to my friend Keith. He's more adept at super glue, model cement, and other types of bonding agents. He did a fine job on putting them together, and I had to admit they looked a lot cooler than they had unassembled in the packed! I wish I had bought more, now...!

Love the look of these -- kind of like a cross between Star Wars droids and Starship Trooper arachnids
The miniatures resemble a cool-looking cross between the Starship Troopers arachnids and Star Wars battle droids. I painted them a base white way back when I started getting them ready. Recently, when I began working on them again, I changed my mind. I based those that were unbased on round magnetic bases and spray-painted them Krylon black instead. Following that up with my usual 50/50 acrylic black paint and water, I waited from to dry, then painted the entire surface with a dark metallic color. I then gave them a very dark black wash to see if I wanted to keep them a dark metallic. I decided instead that they would look better in brighter metallics. I chose my three current favorite metallics, a red, green, and blue. I left some portions the dark metallic and others I did in an accent color. I picked out various other details, such as tubing and silver blades. All in all, I was ecstatic about how they looked. Once again, at a buck apiece, I wish I'd bought more!

    Tracked robots (or droids) from Wiley Games, Reverisco, and Aberrant Games
The next batch is from three different sources. The futuristic artillery piece is from Reviresco Miniatures, the large, tracked robot is from Wiley Games, and the tiny droids are also from Aberrant's Rezolution line. The Wiley Games bot is called B3EAST and is a resin figure for only $5. He needs to be glued together, but that seemed to be fairly easy to accomplish. I decided to try some white metallic paint with red accents for this one to give it a more retro look than the crab-like Vatacinas. It took a couple coats, but it finally covered my original all dark metallic paint, and I like the way it turned out. The Wiley Games minis are very affordable, and I recommend them to anyone who wants to pick up some interesting or odd figures.

    The Droid/Robot artillery pounds away at their human enemies from the cover of a ruined building
The Reverisco Robot Power Gun was rather more interesting to put together. No matter which way I placed the pieces, I had some left over. Maybe it was meant that way to give you some variety? Reverisco is very old school metal minis. They tend to be on the clunky side and not as cleanly sculpted as more modern day miniatures. However, once painted up, it definitely looks cool and will be a good addition to a Sci-Fi force. Xenos Rising has support artillery as a troop type, so this will be perfect. RRB Minis & More has other Reviresco Sci-Fi gun types, so check out their site and pick up some! I just did a search on their site for "Reviresco" to see what they had.

    Another look at the whole batch of cool-looking robots and droids, ready for the tabletop!
 The tiny droids were in one of the packs I picked up from Bryan at his flea market table. I like the way they look and -- shocker -- wish I had picked up some more! All in all, I'm very happy with how this batch of mechanoids turned out. I look forward to using them in games of Xenos Rampant, and who knows? Maybe I'll start playing Space Station Zero again and they'll show up as the enemy in there...

Wednesday, November 8, 2023

"I'll be back...!" - Some Skeletal Steel Terminators

    My first specifically-painted miniatures for my Sci-Fi project, a couple of T-101 Terminators
I'd been going back and forth on what rules set I want to use for some Sci-Fi gaming. Originally, I had picked up Space Station Zero to play that with the guys on Sunday night. However, after playing one game of it here at the house with Jenny, I am not 100% sold on it being a good game for as many players we're going to have regularly. I bought the rules because the concept sounded interesting -- your crew is marooned on a massive, derelict space station that you are exploring. I liked Reign in Hell, another rules set by Snarling Badger Studios. I was hoping the rules would essentially be Reign in Hell with missile fire weapons (since Reign in Hell is all melee -- no missile fire at all). However, it uses a completely different system for both activation and combat resolution.

    The three different rules sets I was considering for my loosely-planned Sci-Fi project
Another candidate was the Wiley Games Sci-Fi rules Galactic Heroes. Inspired by Star Wars themed threads on The Lead Adventure Forum, I was planning on running Star Wars games using those rules. We already use the Core Rules from that stable for my post-Apocalyptic campaign, so the players would be familiar with the mechanics. That's good and bad, though. Would games simply feel like the same thing with different miniatures? Many years ago, we got into that rut when we were using H.O.T.T. (Hordes of the Things) for a number of different miniatures games. On the plus side, Keith had donated to me a bunch of the prepainted figures from the Wizkids Star Wars line. So, I'd already have figures if I went with that.

    The 3-D printed "Exterminators" packs contain a variety of poses and weapon types
At Advance the Colors 2023, I purchased a couple sets from the "Rampant" rules series from Daniel Mersey and released by Osprey Games. Their Sci-Fi variant Xenos Rampant caught my eye. Upon returning from the convention, I'd first read through the 2nd Edition of Lion Rampant (Medieval/Dark Age warfare). I was definitely intrigued by the system. The mechanics seemed fun and easy to pick up. I have also read numerous posts online from folks who love the Rampant system, so I thought it might be worthwhile playing one of their games regularly on Sunday evenings. Since we already play Saga for Dark Ages, I figured it'd make more sense to go with a different genre or period of gaming for the Rampant series. That way, it will both feel and looks different.

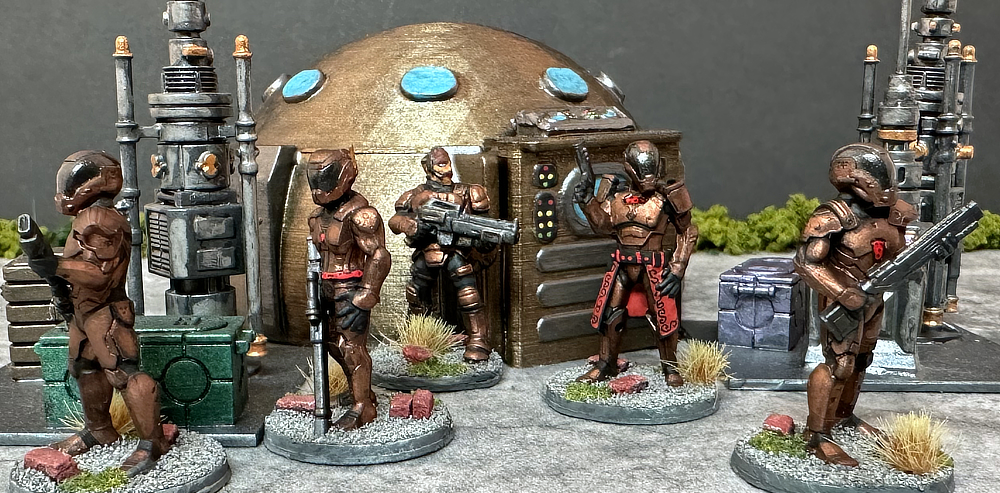
    1st batch of 12 Exterminator figures from JS Wargamer Printing (run by Cincy gamer John Leahy)
So, after examining each of the three finalists, I chose Xenos Rampant. My friend Keith has many figures already painted up that are usable for the system. Xenos is more of a "miniatures agnostic" rules set. It is meant to be adaptable to whatever figures you own or want to play with. I chose for my first batch of figures to painted up for the system 3-D printed ones that I purchased at CincyCon 2023 from John Leahy. He and his wife started a company called JS Wargamer Printing and sell a huge line of miniatures. These include lines inspired by Star Wars, Planet of the Apes, Warhammer 40K, and (crucially) Terminator. I bought two packs of his "Machine Wars - Exterminators." For all of his lines, John changes the name of the figures so they are not technically marketed as copyrighted lines, but they are all immediately recognizable. I believe they are designed and the STL files sold by Papsikels Miniatures. I can't confirm that as John was very busy at CincyCon and I couldn't talk much shop with him!

    I found 3-D printed figs fragile - one snapped minor handling and is now scrap for casualty markers
Like all 3-D printed miniatures, they ARE fragile. Very fragile, if you ask this metal miniatures enthusiast! John warns of this on his website, though. In this batch of 13 Exterminators, one of them did break at the ankles and ended up being useless except for scrap for casualty markers and such. Although John Connor may be hoping the Terminators end up being that fragile on the tabletop, I certainly do not! I'd hate to be repainting and replacing figures on a semi-regular basis and hope this was not a failed experiment...! 
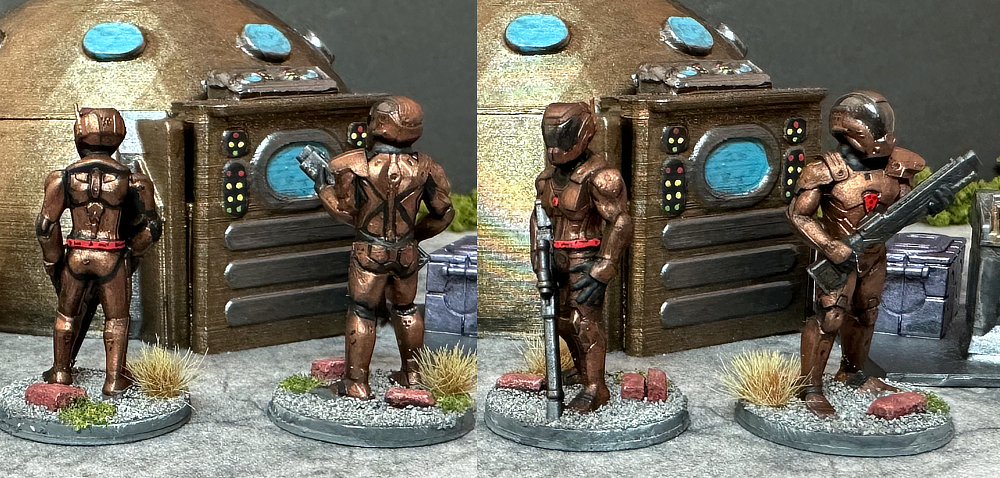
    The other half of the dozen figures I painted up in this batch
The Exterminators did paint up VERY easily, though. I spray-painted them Krylon Matte Black, then went over it with my usual 50/50 solution of black acrylic paint and water. Next, I painted them a "Metallic Gray" (dark metal) base coat. Once it had dried, I dry brushed them silver. I touched up various other colors on the weapons, eyes, and other other metallic components. I did a dark wash on the weapons so the skeletal looking figures stayed shiny, but the weapons were a darker metallic. 

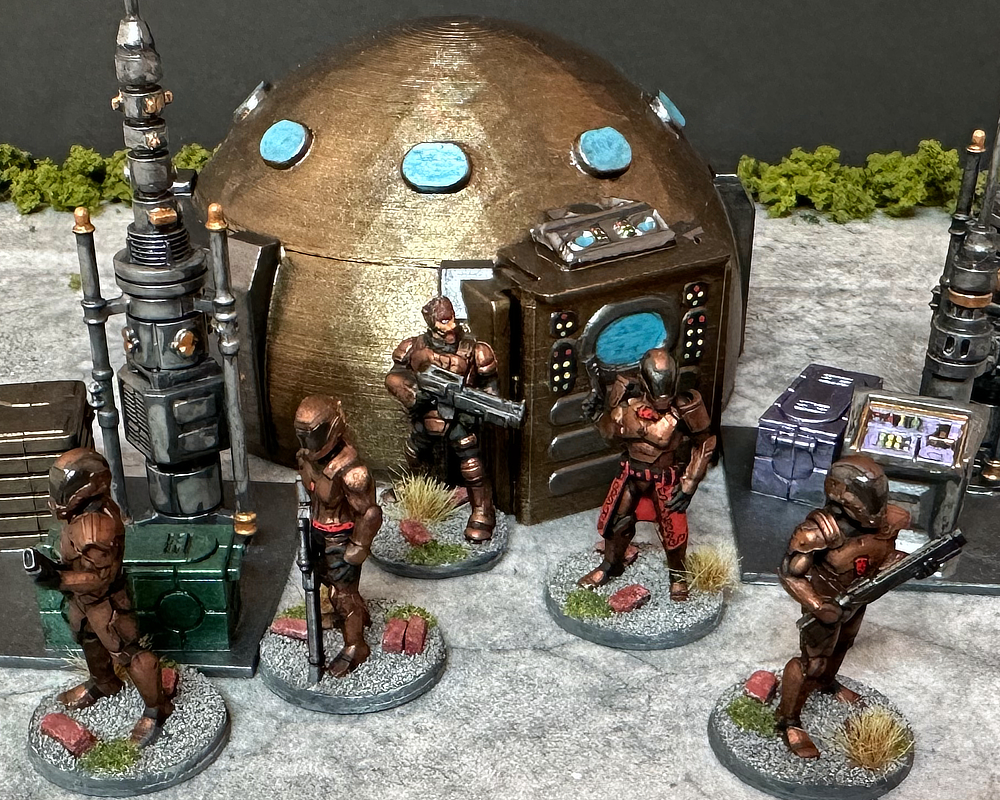
    Another look at the first batch of Exterminators - I'm very happy with how they look!
For basing, I used the wealth of leftover plastic circular bases that come with the Gripping Beast Saga army packs. I normally use square wooden ones for Saga, so have lots of these left over. I applied magnetic sticky base bottoms from Litko Aerosystems to the plastic bases and am fairly happy with how they worked. I used 5-minute, two-part epoxy to glue the Exterminator feet to the plastic bases, and they seemed to hold well. I jazzed up the bases with small rocks and bricks, then applied Woodland Scenics Blended Gray Ballast to the bases. I did a dark wash over the ballast, then actually dry brushed it lighter gray to bring some depth back up. Some more Woodland Scenics turf, burnt grass looking tuft, and spray clear coats and they were ready for the tabletop.

So, what's next? I have been acquiring some large, well-armed, robot looking figures over the last year or so, and they have finally made it to the front of the queue. They'll hopefully make for good support for the Exterminators and round out my first faction for a game of Xenos Rampant. Stay tuned for more!