Showing posts with label Scratch-built temples. Show all posts

Tuesday, November 28, 2017

SE Asian Temples: Two Smaller Temples & a Stupa

Originally built for my 28mm Pulp campaign, these temples will find use in my upcoming Frostgrave one, as well!
This will finish out my SE Asian temples built earlier for my Pulp campaign. For the full thread on how I built them, please check out Southeast Asian Temples (actually, eight separate blog entries -- here's a link to the first): http://leadlegionaries.blogspot.com/2013/10/southeast-asian-temple-part-1-materials.html
I like how these scratch-built temples are mostly made from various bits and pieces that I picked up at the craft store.
These two temples are a great size. I can really see them coming in handy for my Frostgrave: Ghost Archipelago campaign. Expect treasure counters to be located in them regularly!
The second temple, a twin of the first, with Pulp explorers posing in front of it for a photo op
Printed interiors look the part, I felt, and add that extra bit over an all black or blank inside


Round Stupa
A common feature of SE Asian archeological sites are these round stupas, that look for all the world like a giant, stone tea bell sitting on a platform. They are usually solid state with a relic of the Buddha inside. However, being a fantasy/Pulp piece of terrain they HAVE to feature a hidden entrance into the interior (where doubtless great treasure is secreted away!).
A round paper mache box, a craft food finial, some beads, stone spray and voila! A SE Asian stupa!
The upper portion pulls off of its base to reveal a hidden chamber!

SE Asian Temples: The Forbidden Temple

Scratch-built SE Asian temple (warrior statue is from a pet store "lizard aquarium" section)
Here are pictures of what I call the Forbidden Temple. This is also a big temple -- the biggest part being the statue from the "lizard terrain" section of a pet store. To read the blog entries about how it was constructed, go to my blog post on it ("The Forbidden Temple"): http://leadlegionaries.blogspot.com/2014/07/the-forbidden-temple.html
The friezes on the sides are actually are downloaded and printed out on a color laser printer from an Architectural website, and depict Angkor Wat
I called it the Forbidden Temple because it was the one I used in my series of Pulp games in which adventurers were looking for the Eye of the Buddha (found inside). It will see new action on the tabletop when I begin my Frostgrave: Ghost Archipelago campaign soon.
Another shot of the paper friezes glued onto the temple's sides
The interior of the Forbidden Temple - also printed patterns

Monday, November 27, 2017

SE Asian Temples: The Big Temple

Three quarter view showing the entire temple
 Here it is, the grand-daddy of all my SE Asian temples that I have built (so far...?). I call it simply, The Big Temple. Creative, isn't it?
Detailed shot of the roof of The Big Temple
Photo of the interior of the temple with the printed architectural patterns

View of the entrance to the temple and the styrene brick pattern sheet and Hirst Arts blocks entranceway
Anyway, to read how I created it, you'll have to go back to the original thread from 2014: "Snowed In? Build a Temple!" It may seem strange that I am duplicating the finished photos here, but...sigh...there is a reason. My previous image hosting site, Photobucket, has decided to charge more than $400 for "third party hosting" -- in other words, "hot-linking." That's when you upload a photo to their site and link back to it on another, such as a blog. Why Photobucket is essentially committing business suicide, I don't know. No one that I know of will pay that ridiculous amount when there are perfectly sensible free options. Such as a Google blog!


Tuesday, October 29, 2013

Southeast Asian Temple, Part 8 -- Finished!

So, kind of an anti-climax for the last installment. Here are the photos of the interiors. I went with CG Textures' website http://www.cgtextures.com/index.php, suggested by someone on the Lead Adventure Forum. I simply downloaded the images, resized them in Photoshop, and printed them off. Looks so much nicer than trying to scratch-build the interior. I know some purists may feel it is crossing the line between modeling and cardstock buildings. I just didn't want to spend lots of time on the interiors, seeing how much time I spent on scratch-building the temples themselves!

The interior of one temple, showing the door
Here is the interior of one of the temples. I painted the interior solid black, then cut the floor and four walls in separate pieces. I painted the interior lightly with white glue and voila! Instant stone wall or floor. The wall with the door was done using photoshop, as well. I found a likely door, cut it out electronically and pasted it onto another image of a stone wall. I am really happy with how realistic it all looks.

CG Texture images downloaded (free!) look very realistic when printed out and glued in
I went ahead and did an interior floor for the stupa, as well. Technically, these buildings are usually solid -- there are no rooms on the inside. But hey, these are also for pulp games...so there HAS to be a secret room with a hidden latch that opens it...!

I plan on doing at least one larger one, now that I have the techniques down. Hope you have enjoyed the tutorial...feel free to leave a comment. Or heck, even subscribe (or become a Follower) of my blog!!!


Monday, October 28, 2013

Southeast Asian Temple, Part 7 - Exteriors complete!

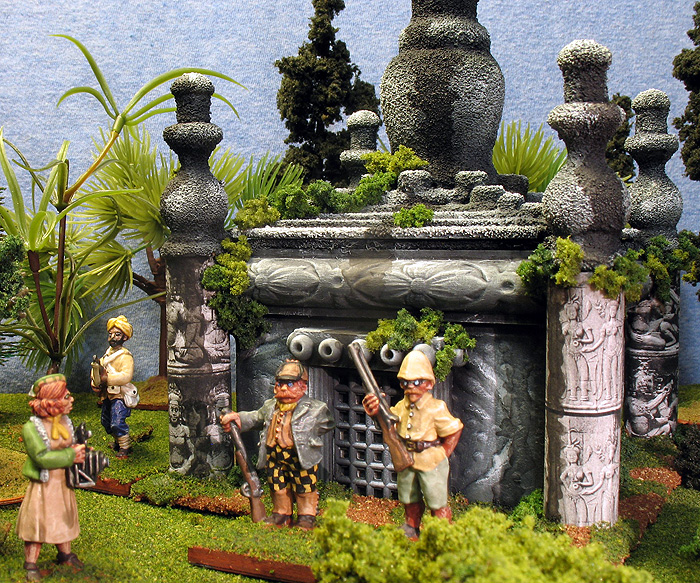
Von Jaeger and the German archeological party discover the first of my small Southeast Asian temples. I think the printouts of the bas relief carvings on the corner columns turned out fine.
I got a little busy at school, so the temples had to sit for a few days before I got around to finishing their exteriors. I added the light gray and white dry brush coats, as I mentioned in the previous post. These also went quick and really made them stand out more and look less like monotone stone. Once all the coloring of the stone surface was done, it was time to start flocking them.

Wide angle shot of the first small temple...definitely captures the "lost in the jungle" look -- at least in my humble opinion!
 I mixed up a batch of white glue and the earth red color of paint I use for my bases (Ceramcoat Burnt Siena). I added a bit of water to get it to flow and liberally coated the styrene base, slopping some up on the lower portions of the structure on purpose. I then poured Woodland Scenics Medium Ballast onto the paint/glue mix. Once dry, I took the leftover paint/glue and watered it down even more, to close to a 50/50 mix or so. I painted the ballast with this and then poured sand over the top. In addition to doing this one the styrene bases of the two small temples, I did it to the lowest level of the stupa base. The paint mix seeps up and wets the sand from the bottom, coloring it. I then sprinkle it with Woodland Scenics brown turf to cut down on the reddish tone a bit.

Harris McLeod and Maj. Speke-Eastman pose in front of the second of my Southeast temples they've discovered in the jungles of Southeast Asia. This one differs in having the columns set out from the temple building a bit, as well as the decorative trim beneath the roof.
 Now, it was time to see if my idea for the corner columns on the small temples worked out. I had found a website earlier call CG Textures (recommended by Amlaric on the Lead Adventure Forum). They have various high resolution photographs of walls and other images. One of them, I'd noticed while checking out the site, was of Angkor Wat in Cambodia. I downloaded a bunch of the images and then resized them in Photoshop. I took strips and duplicated them, sometimes flipping them horizontally so they looked slightly different. I ended up with two rows of images meant to resemble bas relief carvings of dancers, gods, etc. Since my temples were staying with a gray tone, I made sure to change them to black and white images.

I know...not a lot of difference in this angle...but you can see the staining I did on the columns and temple surface fairly well. The British archeological party benefits from having McLeod's niece as a correspondent for the London Times!

Printing them out and then gluing them on the temples took less time than I'd figured it would. There is no mistaking it was a relatively tedious process. Nevertheless, it went much faster than I'd anticipated. The paper had no problem sticking to the wooden dowel columns. I simply painted each column with a thin layer of white glue, then wrapped the paper around the column. The hardest part was trimming it here and there to make it fit perfect and minimize any crinkling.


Close up of the Stupa and the American archeological party. You can see the sand on the surface pretty much erased the embossing (oh, well!). Not nearly as "sexy" as the temples, but stupas are an integral part of any SE Asian religious complex.
 I gave the columns awhile to dry. Then, I took straight white glue and painted it on the areas tht I wanted grass. I sprinkled Woodland Scenics Blended Green Turf onto it. I always leave areas of brown earth showing so that the grass is patchy. More waiting for it all to dry followed. This is always a "work for 20 minutes and wait" part of the process. I then broke out the three different colors of Woodland Scenics clump foliage that I own. I tore the bits into tiny pieces because it would need to stick to vertical surfaces. I then simply painted areas I wanted vegetation clingng to it with white glue. I looked for flaws in the gluing job of the column images and made sure to cover those up first. I then recreated vines and other creeping vegetation by gluing lines of tiny pieces of clump foliage all over the temple face. I ended up putting on enough that it wouldn't look pristine and out of place on a jungle board. I also wanted it to be fine in an overgrown, "weedy" sort of way if the temple was located in the plains.

As Eric Bylan gazes up in wonder at the stupa, Dakota Smith hears a noise in the jungle off to his right...
The final step for the exterior was to create stains from the moisture and vegetation. I mixed up some black paint and water (less than 50/50). I then created water tracks from high points to lower points. Once the watery black streak was in place, I watered it down even more along its edges. I'm not sure if it will actually show, but the goal was to make it look like stains from dark areas of the stone, vegetation, or something else that was streaking the flue velvet.

A final spray of dullcoate and the exteriors are done! Note that I specify this because I have plans for the interiors, as well. I will print it out more resized images from CG Textures and glue them on the inside of the boxes. Hopefully, the sides are straight enough to look nice when I glue the images in. So, until I get that part of the project done, the temples and stupas are complete. I hope you've enjoyed this tutorial, so far. These have turned out every bit as nice as I'd have hoped for. I look forward to using them on the tabletop...!

Sunday, October 20, 2013

Southest Asian Temple, Part 6 - Coloring the Stone

One of the temples with the first layers of dry brushing done

 As mentioned in the last post, once the sand texture had been added to the stupa and parts of the temples, I did one final spray coat of flat black. This was to seal it in, so that when I went to paint the surface, the brush didn't scrape the sand off. After the spray dried overnight, I sat down to what I thought would be the most tedious and time consuming part. I always like to coat my temples entirely in black acrylic paint. This allows the dry brushing to show more depth and fills in those nooks and crannies spray cans miss. I diluted the black paint down to about 50/50 with water, and was actually surprised how easily it went on. I was expecting this to be a laborious process, but it went by fairly quickly.

The stupa with its black base coat, dark gray and medium gray dry brushing. Note you can barely see some of the embossed surface design which was mostly covered up by the sand.

 I let the black paint dry overnight to "shrink wrap" onto the models. Then I grabbed my darkest gray paint, a cheap craft paint by Ceramcoat, and used a "web brush" technique to cover most of the surface. I left little crevices and joins black, but the gray is so dark it is really hard to see the difference. Once again, I let it dry overnight. Then I grabbed Ceramcoat "Hippo Gray" -- a medium gray tone -- and did a thick dry brushing over the surface. However, I left some of the less raised areas the dark gray to give it some depth. For example, I made sure each level on the roofs of the temples is visible, and left parts where the sunlight would be blocked in the darker gray. Still, I was painting more than 50% of the surface, though. This is the stage at which these photos were taken.

The second temple - note I did not put the sand on the lower portion of the temple in the hopes the embossed design on the cardboard box would look nice.

You may notice I have left the lower part of the corner columns of the temples black, so far. I intend on trying to print out an image of a carved surface and apply it to them. Hopefully, it works out! Next up, though, I will do a light gray -- Howard Hues Rebel Gray -- on a smaller portion of the models. I plan on doing a final white dry brush on the highest portions. I am trying to reproduce the effects of sunlight on the surface, of course.

Thursday, October 17, 2013

Southeast Asian Temple, Part 5 - The Surface

One of the small temples assembled
 
Everything was going together well on the temples, so far. The next stage could be tricky, though. I wanted to coat the surface to make it look more like stone than flat cardboard or wood. So, I decided that first I would spray paint it flat black. Then, after dry, I would paint the surface with white glue. While wet, I would pour sand over the surface to give it a rough, stone-like texture.

The other small temples assembled
 I was worried that it might look globby (technical term), so I started out with the stupa first. I really like how the sand made the beads that I'd glued on as decorations look like actual stone carvings projecting out from the surface. The hollow oval beads were mostly filled in by the glue and sand and looked like they were carved. It did kind of dull the difference between the two different size and types of beads, though. They look more uniform, now. However, that's not necessarily a bad thing, I guess.

The Stupa and one of the temples coated with white glue and sand
 I am afraid, though, that the sand has obscured the embossed detail on the cardboard box. You can still see a little of it, but I'm not sure if with another coat of black spray paint won't blot it out completely. That said, there is a chance that once I dry brush the stone surface, the raised detail will show up again. To be on the safe side, I did not coat the decorated wall surface of either of the small rectangular temples. I simply coated the roofs, doorways, and upper wall surface of one of the temples. Right now, they look nice, I think.

The other temple with the area around the doorway, the roof, and the upper portions of the columns coated in white glue and sand
 The next stage will be to spray paint them again in flat black. One that is dry, I will go over the entire surface with watered down acrylic black paint. I'm sure the sandpaper surface will be rough on the brushes, but I need to have the black thoroughly coated before I dry brush it. I will dry brush the temples and stupa in two shades of gray.

I was happy with how they looked when they were all assembled, but I have a feeling they'll really pop out when they are painted.

Sunday, October 13, 2013

Southest Asian Temple, Part 4 - Construction done, ready for paint


The round stupa with all construction done

The addiction continues. I should be grading an assignment my students turned in on Thursday, but I'm putting the last bits of construction together. The temples continue to come together wonderfully, though I think I've hit my first snag. The roofs are going to have a hard time fitting once the corner columns are in. I'm thinking I'll have to snip a bit of the roof off at the corners, but we'll see.


The "secret compartment" for Pulp Explorers to find

Anyway, both temples and the stupa are pretty much done with their construction. The stupa is the simplest, though gluing on the decoration took the longest. I even went to Michael's craft store last night to pick up some decorative, flower-like beads to glue around one of the upper levels. A southeast Asian stupa is generally solid -- there are no inner rooms or sanctuaries. They are supposed to contain a Buddhist relic inside. However, since these will be used for Pulp games, I've made mine with a secret compartment. Some Indiana Jones on the tabletop will likely find the vial of the Lost Tears of Buddha hidden within -- or something like that! The construction was straight forward. I glued the top finial to the top of the upside down round box. Then I cut out a circle of foam core that the box will j-u-s-t go around, providing a tight fit, and glued the foam core to the circular plywood base I bought at Hobby Lobby. The most time consuming part was gluing on the beads and decorations on the outside.

The first small temple with its roof next to it. The spindles atop the columns m-a-y cause problems...

The temples went together nicely, as well. As you can see from the picture, I got the idea to cut out and glue onto the door a black mesh knitting screen. Hopefully, when painted up, this will make the door look like it has recessed panels. The last stage was to glue the four columns to each corner of the building. I had to saw away at some of the decorative moulding to provide a tight fit for one of the temples. And here is where I think I'll have fitting problems. The spindles glued atop the columns probably flare out too much and will bump against the roof. If this happens, like I said, I plan on snipping off the corner of each of the roof's four corners. That should allow it to fit. We'll see...I'm waiting for the tacky glue to dry before I try to fit them on.

Detail of the first small temple. I like the way the decorative moulding compliments the embossed design on the cardboard box

 These actually are looking much better than I had hoped. I can't wait to start the next phase, painting and texturing. I am thinking I'm going to go with a black/gray/white look to the stone. I have been to a number of Southeast Asian temple complexes in three different countries. The red sandstone ones seem to be peculiar to Angkor Wat. Both Bagan in Myanmar and Ayyuthaya in Thailand are a stone covering over brick. Maybe for my next one I'll show some exposed brick. I wanted to keep theses simple, though, for my first attempt. I have plans for the interiors, but we'll wait until I get to that stage to talk about them.

The second small temple. No moulding, but instead a row of "furniture buttons" along the top edge.

Feel free to leave a comment, if you like. I hope to start the painting process early this week.

Close up of the second temple. I really like how the black plastic screen gives the door a more decorative look.

Saturday, October 12, 2013

Southeast Asian Temple, Part 3 - Doors & Roofs

I'd forgotten how addictive working on scratch-built terrain can be. I've been working on and off on these for about two hours. As they progress, I keep thinking how cool they are looking, which makes me want to do the next stage, and next stage, and so on! Kind of like a computer game that keeps pulling you in to do one more turn...! Anyway, today's step was to scratch-build the doors and roofs for the two small temples. Meanwhile, I keep gluing on the decoration for the round stupa.


The doors were fairly easy to build. I started with a very thin piece of styrene plastic. I cut it out into the size and rectangular shape I wanted the door plus columns and lintel to be. I figured it would make it easier to attach to the embossed cardstock surface if I glue it on as one unit. For the columns, I used ridged wooden pegs which look in this scale exactly like fluted columns. I've used them before on scratch-built ruined Greek temples and such. I trimmed the tapered ends off and cut them to size with my hobby saw. The lintel was a simple square dowel cut to size so it rests on the columns. I glued it all together with tacky glue, and then decorated the lintel with tiny beads. The doorway itself looks kind of plain, now. So, I may add some decoration to it, too. Southeast Asian temples were highly detailed and decorated.


The roofs were also very easy to create. In Part 2, I talked about the finial which is the centerpiece of the roof. The roof itself is made from successively smaller black styrene plastic squares glued atop of each other. The finial is glued to the smallest, center one. I then decorated the roof with different sizes of beads. I thought about placing something inside the beads, sticking up out of them, but decided not to. I may still add that later. The last touch will be to glue a square of foam core to the bottom of the roof to fit inside the temple walls and hold it in place.


I am liking how they are looking (as I mentioned before), so far. They are moving along fairly fast, too!The next step will be to attach the temples to their base and glue down the columns to the corners.

Friday, October 11, 2013

Southeast Asian Temple, Part 2 - Assembly

So, having purchased most of what I need for these first three temples, I began assembling them that same night. The first step was to take the dowel and slice it into columns. I used my craft saw and did my best to cut it straight and level, though I'm sure it wasn't always successful. Each column was 2 inches tall. It was then capped by a wooden wooden spindle. The spindles needed the bottom peg portion sliced off, and then needed in turn capped by a small "furniture button."


I used tacky glue to assemble the pieces, one step at a time. The button went on the spindle first, then those two were glued atop the columns. I used blue tack to temporarily hold the columns in place, first. The larger finials, which would be the central roof stupa, were glued to wooden disks.


 Next, I began decorating the rectangular temples. I used the small furniture buttons to create a ring of projections along the top edge of one of the rectangular temples. There is a bare, unembossed portion of the cardboard box which the lid would normally cover. Although it was simple and easy to blue tack them to the box, it should give it a more intricate and exotic look. For the second rectangular temple, I went back to Hobby Lobby and bought a package of 18 "Artistic Mouldings" made of bass wood (I believe). I chose one of the narrower ones and cut it into 4 pieces that I could glue along the bare portion of the box. I will eventually have to shave the corners down, though, to make the columns fit snugly.


 I also began decorating the round stupa. I decided to go with alternating furniture button and wheely-gear-like beads I have leftover from another purchase. While at Hobby Lobby, I picked up a round plywood base for the stupa to go on, too.


 These purchases added $5.36 to the supply costs. However, I am using only one of 18 mouldings, so I should realistically divided that cost out among several projects! Total so far, $19.67.

Stay tuned...more to come!

Thursday, October 10, 2013

Southeast Asian Temple, Part 1 - The materials

So, the only thing keeping my 28mm Pulp project from seeing the table is...well, a table! More specifically, I need terrain for various European archeologists and Indiana Jones wannabees to explore. Sure, I could put them on a regular gaming table of woods, hills, ordinary buildings and such. But considering how much time I spent painting the figs, I may as well wait until I have a suitable canvas to roll them out onto!

I have American, German, British, and French archeological teams all set to explore the hidden temples of Southeast Asia. So, what will the first terrain pieces I'll build for this project? Well, temples, of course! So, the picture below is one I took in 2003 when I visited Myanmar and the temples at Bagan. This is the look I'm trying to recreate. These Buddhist/Hindu temples should look exotic on the tabletop. I can put them on the plains of Bagan or in the jungles, like Cambodia's famous Angkor Wat, and they shouldn't look out of place.
 
Since Pagan has about 3,000 temples in an area the size of the county I live in, I will need a number of them to make the tabletop look right. So, that means one thing: scratch-building. I stopped by Hobby Lobby, a discount craft store here in the U.S., on the way home from work. I cruised the aisles looking for ideas on how to make a few smaller temples to start off with.

I found the boxes below for a little over $1 each. They are made of very stiff cardboard that I think should hold up to paint and the wear and tear of the tabletop well. The thing that attracted me to them was the design embossed on the surface. It could represent bas relief carvings on the temples and make decorating most of their surface as simple as a good dry brush to bring out the design. I intend to add a decorative molding or something along the top, too. The roofs will be separate to make gaming with them on the table easier. I'll construct those out of styrene or bass wood -- I haven't decided which, yet.


I intend to add columns at each of the four corners, and a bell-shaped stupa tower to the roof. I perused Hobby Lobby's selection of craft wood pieces. I decided to go with a thick dowel for the column's length, and top it with a couple pieces to represent the decorate bell-shaped capitals. I snagged packages of wooden spindles, finials and "furniture buttons." These should all fit together well enough (I hope) to give the feel of Bagan's temples. I'm not modeling after any one building, but rather just going for the general look.


I was disappointed I couldn't any decorative bass or balsa wood trim pieces at Hobby Lobby, Jo Ann Fabrics, or the local Hobbyland. I know I've seen them carried in those stores before. I wanted to line the top edge of the temple with one to represent the fancy stone carving on the temples. I haven't given up, though. I have another idea or two how to recreate it without too much time, effort, expense. Speaking of expense, so far I have spent $14.31 in materials for what will be two small rectangular temples and one round stupa.


Stay tuned for more updates on this project!