Showing posts with label Beaver Wars. Show all posts

Tuesday, August 9, 2016

Beaver Wars in Ohio Playtest, Turn 8

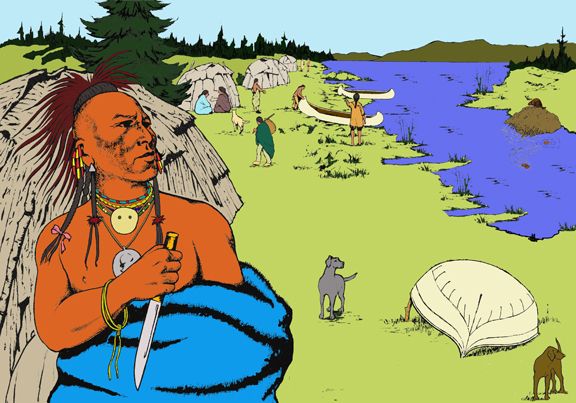
Attack at the Portage was my scenario for this  round, and saw my Erie hunters spread out carrying our canoe and bundles of goods past a section of rapids
Being out of the country for 5 weeks this summer meant our playtest of the Beaver Wars in Ohio Campaign Rules and Scenario Book was put on hold for awhile. The tribes must have missed the chance to settle some scores, as more players chose "War" cards this turn than in any previous turn. The higher the value War card a player selects, the better chance he has of selecting his opponent. In particular, the tribes in the middle of the scoring range (Mohawk, Seneca, Kickapoo) wanted a chance take the leaders (Neutrals, Shawnee) down a peg.

After the cards were played and the order set, here were the declared attacks this turn:
Mohawk attacked the Neutrals, rolling “The Creek Runs Red” (War vs. War #3)
Seneca attack the Shawnee rolling “Rescue the Captives” (War vs. Hunt #6)
Honniasont attacked the Erie, rolling “Attack at the Portage” (War vs. Hunt #3)
Kickapoo attacked the Miami, rolling “Give Them Time” (War vs. Hunt #1)

To read the account written by Keith covering his Neutral tribe's battle against the Mohawk, visit his Game Reports page.

With an odd number of players, as GM (and Erie tribal chief) I sit out some of the turns. However, this turn the Susquehannock player was feeling under the weather on the morning of our meeting, so I substituted in for him. I was actually happy that I got a chance to play the "Attack at the Portage" scenario, because I think it is tactically a very interesting game.
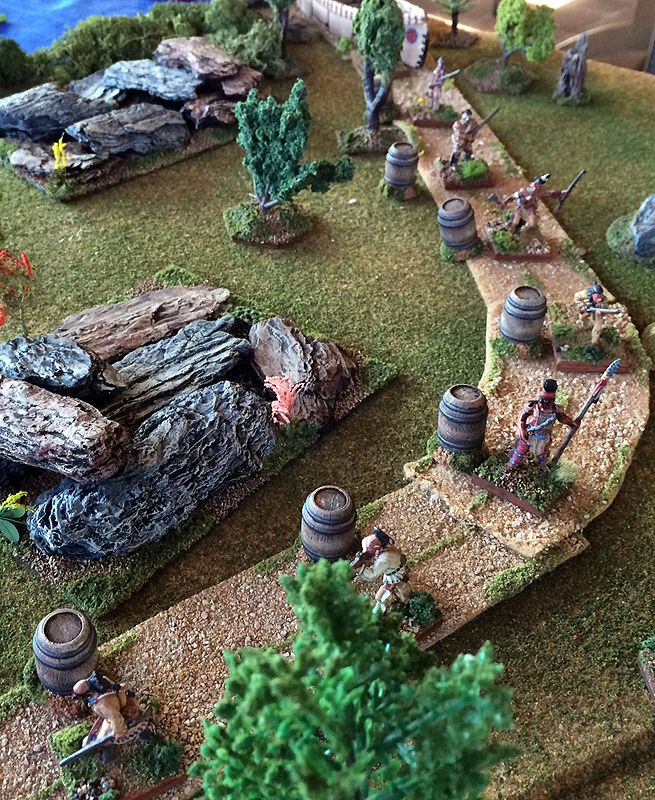
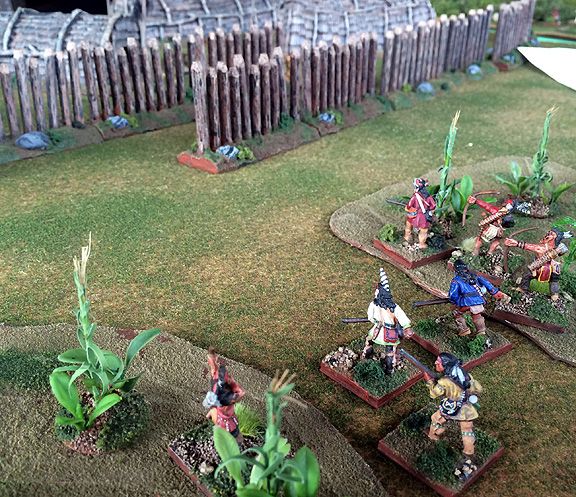
My battle plan would be to have my Erie hunters carry their bundles to the rocky outcrop, left center. We would deposit them there, and consolidate to make our stand against the Honniasont
I chose my standard force -- one Chieftain with matchlock (Q3, C3, Marksman);5 Warriors (Q4, C2) with matchlock; 2 with Bow, Light Armor, and Primitive Weapon; and two Youths (Q4, C1, Wavering) with Bows. Taking a couple figures with Light Armor was a new one for me. My tribe's Beaver Pelts accumulated so far meant we could upgrade only 6 figures of our 10 with Matchlock. I always give one to the chief, and the remainder to the Warriors. That left two armed with Bow. I knew I would likely send them forward into melee, so I figured I'd see how this strategy worked out of giving them a Primitive Weapons -- think Last of the Mohicans, the big sword club -- but protecting them with Light Armor. As it turned out, I liked it quite a bit. I knew I'd be involved in melee regularly, facing the Honniasont. So, I figured it was best to come armed for it.

Why was I expecting a melee rather than a shooting match? Well, Bruce -- who plays the Honniasont -- has hit on a favorite tactic of maxing out his troop list with Youths. He seeks to overwhelm the enemy with numbers. He's had mixed success with the tactic, but is having fun tweaking it to see how he can make it work better. So, my 10 Erie would face a force of 17 Honniasont (1 Chieftain, 16 Youths). It provides for some interesting, though a slight bit longer, games. The key to me is to try to pick off his Chieftain so you can force a morale check. The Youths all have the Wavering trait, which means they should begin to flee fairly quickly once he's gone. Otherwise, it can be a long and dangerous process wearing them down to 9 losses (more than 50% is the point where you check morale if your leader has not died).
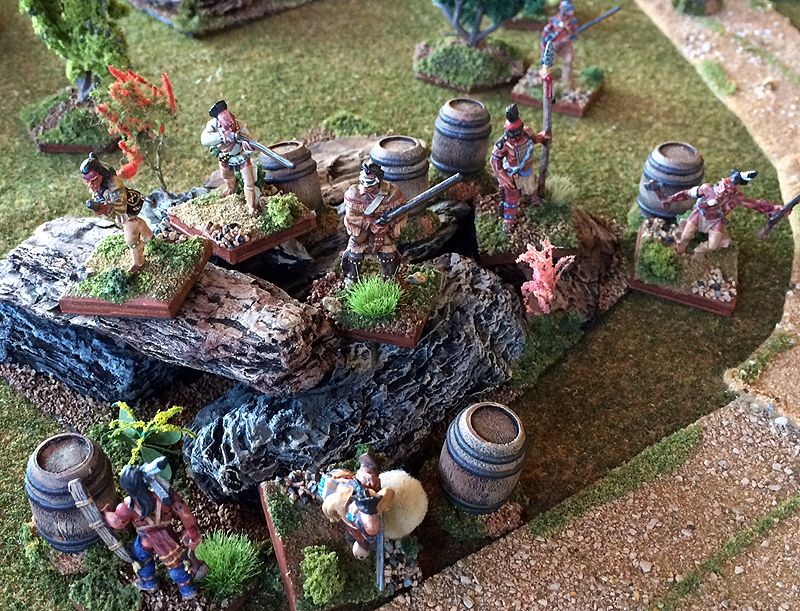
My troops have almost all made it to the rocky outcrop. Note the warrior with wooden armor holding the spear on the right side of the rock
The other reason I expected a close quarters game was because of the scenario. The background story is an Erie hunting party is portaging their canoe and supplies across a stretch of rapids. My two Youths were carrying the canoe (hey, put those young muscles to work!), while the rest of the men carried a bundle of supplies or goods. While carrying those supplies, we fought at -1 in melee, and could not move more than one Movement distance per turn. We were carrying our loads along a curving path through rocky areas and forest. We were dispersed along the path, and only a handful of my men would be within command range of the chieftain in the middle.

My battle plan was to have all of my men move to a rocky outcrop inside the bend of the road. We would drop our bundles there, and consolidate against the more numerous Honniasont. My command rolls on my first turn were abysmal. I think out of 14 die rolls I scored no rolls above a "3" -- not a great start! The Honniasont had split their forces into one advancing from my right and another blocking the trail ahead. My rolls improved enough that slowly, my men moved to the rocky outcrop, put down their loads, and readied their weapons. The Honniasont also began to take shots, and edged closer. He began to rush in Youths, attempting to gang up on my Warriors and force an even-up or roll at an advantage.
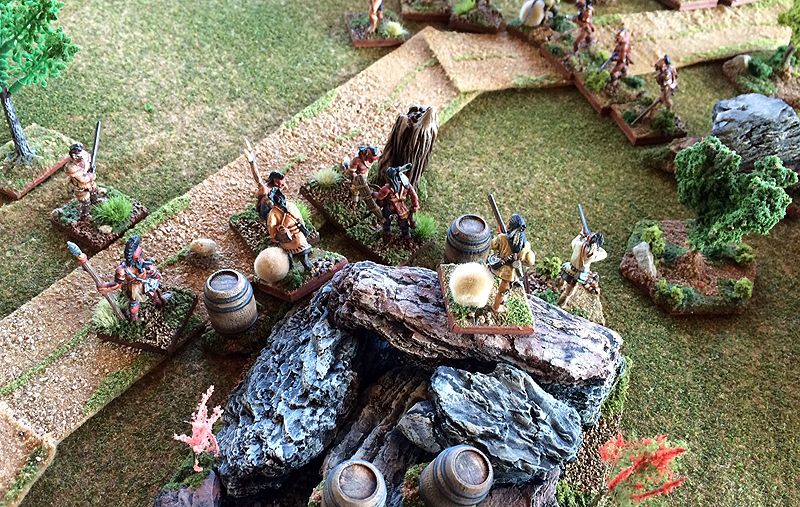
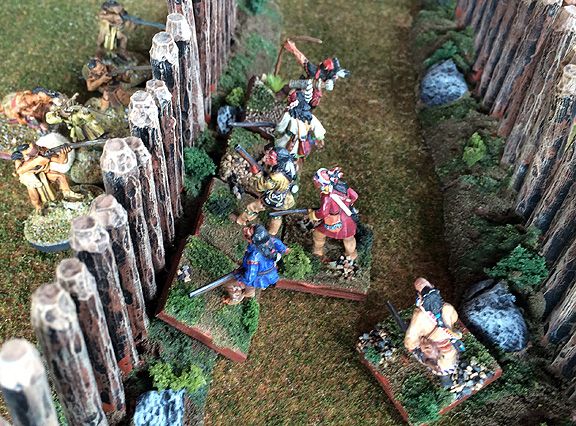
And here they come! The Honniasont Youths begin to throw themselves against my Warriors (two are in contact in the center of the picture, while another line advances from the top)
My advantage was on the counterstrike, though. When he put two against one, all I had to do was move one of my Warriors into contact with one of those two and they'd be a severe disadvantage. Slowly, I began to whittle his forces down. He scored several kills against me, too. I made it a point to grab any scalps of Honniasont I killed immediately when I had a chance for the victory points. I never did get a clear shot at his leader, though. However, my own Marksman leader began to score kills or wounds against the Honniasont clustered beneath him atop the rocky outcrop. I used my Warriors with Light Armor as the point of my spear, so to speak, though I did lose one. We stayed consolidated where my leader could use his command influence to keep my men activating, shooting, reloading, fighting, and moving to where they were needed.
What our enemies saw -- the view from the woods as Honniasont Youths work up the nerve to assault my troops clustered around the rocky outcrop
Eventually, his ninth Youth died, and the Morale tests began. Some fled offtable immediately, while others fell back a great distance. We managed to kill another, and these morale checks spelled the end of the Honniasont threat. Bruce acknowledged his forces could not win, and withdrew from the field. We were successful because we kept our men together. Whenever one Warrior was drawn into a melee, others would immediately go to his aid. Although he outnumbered me in total forces, at the point of attack, it was either even up or we had the advantage. This ended up being my most overwhelming victory, points-wise, of the campaign, so far. We scored a 27-3 victory -- killing 10 of the enemy, taking 7 scalps, and maxing out on the points for staying in control of the bundles.

As it played out, Turn 8 belonged to the Defender. All four attackers lost. Sadly, for the middle pack who'd initiated the attack on the leaders, they failed. The Neutrals and the Shawnee entered the turn tied for the lead. Both scored major victories -- the Neutrals over the Mohawk and the Shawnee over the Seneca. On the remaining battlefield, the bitter foes the Miami and Kickapoo met again, with the Miami getting the upper hand, again.
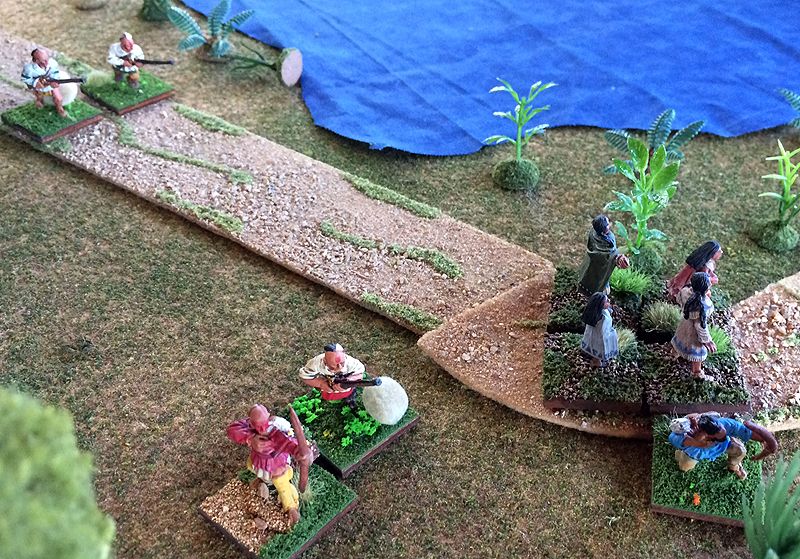
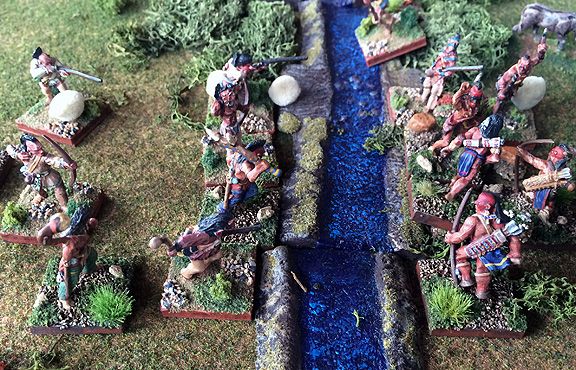
One of the other scenarios: At top left, Shawnee braves pursue a force of Seneca who have raided their town and taken some women and children captive
There are two turns left before this playtest ends. I am happy with how the rules work, but I want to more playtests of the scenarios that will be included with the rules. I also want to see how the numbers play out -- if I need to increase the maximums, so that players don't max out early on Scenario Victory Points or Beaver Pelts. Plus, the players all seem to be having a good time. So, no reason to cut the fun off early!

Here is the score in the campaign, so far. The Shawnee have edged out in front of the Neutrals! The Mohawk, despite their loss on the battlefield this turn, remain in close contention for the lead. We'll see next month if that means the two front-runners will face off, or if they will continue to fight off attacks of the other tribes.

Tribe
Place
Victory Points
Shawnee
1st
26.5 points
Neutrals
2nd
23.5 points
Mohawk
3rd
21.5 points
Kickapoo
Tied 4th
14 points
Seneca
Tied 4th
14 points
Miami
6th
13.5 points
Erie
7th
10 points
Susqehannock
8th
9 points
Honniasont
9th
3 points

The victory points come from three categories. First, Prestige Points (PPs), which come from battlefield success:
Tribe
Prestige Points (PPs)
Neutrals (Keith Finn)
19 (6 MajV, 1 MinD)
Shawnee (Joe Merz)
19 (4 MajV, 3 MinV, 1 MinD)
Mohawk (Dave Welch)
12 (3 MajV, 1 MinV, 1 MinD)
Seneca (Mike Stelzer)
12 (2 MajV, 3 MinV)
Miami (Jenny Torbett)
11 (2 MajV, 2 MinV, 1 MinD)
Kickapoo (Andy Swingle)
10 (3 MajV, 1 MinD)
Erie (Mike Demana)
8 (2 MajV, 2 MinD)
Susquehannock (Steve Phallen)
5 (1 MajV, 2 MinD)
Honniasont (Bruce Adamczak)
3 (1 MinV, 1 MinD)

Next, is SVPs, or Scenario Victory Points, which come (unsurprisingly) from fulfilling your objectives in the scenarios you play in:
Tribe
Scenario Victory Points (SVPs)
Shawnee (Joe Merz)
107
Neutrals (Keith Finn)
106
Mohawk (Dave Welch)
82
Seneca (Mike Stelzer)
80
Miami (Jenny Torbett)
80
Kickapoo (Andy Swingle)
68
Erie (Mike Demana)
65
Susquehannock (Steve Phallen)
60
Honniasont (Bruce Adamczak)
33

And finally, the Beaver Pelts. The higher value "Hunt" cards you play, the more pelts you collect. This also translates into the more Firearms upgrades you obtain for each battle (those Europeans will give matchlocks for quality beaver pelts).
Tribe
Beaver Pelts
Shawnee (Joe Merz)
45
Mohawk (Dave Welch)
43
Neutrals (Keith Finn)
41
Kickapoo (Andy Swingle)
36
Susquehannock (Steve Phallen)
32
Erie (Mike Demana)
31
Miami (Jenny Torbett)
29
Seneca (Mike Stelzer)
23
Honniasont (Bruce Adamczak)
22


Wednesday, June 1, 2016

Beaver Wars in Ohio playtest, Turn 7

We are in the home stretch of our second playtest of the Beaver Wars in Ohio campaign rules. I'm very satisfied with this version of the campaign framework. The turn by turn record keeping is minimal, and is easily handled by the GM. My players have said that it would be very easy for the GM to be a player in this campaign. There really is no advantage to what he "knows" or doesn't. I know from past experience that, when a GM doesn't get to play in the campaign as well, it is harder to keep up a level of interest that you would have as a player. The Beaver Wars allows the GM to take on the role of a tribe, as well, and get the same enjoyment out of it that his players are receiving.
Seneca warriors rush the gates of a Neutrals town in "Hold Them at the Gates"
We had four battles generated on turn 7, and they were bloody and brutal ones, at that! The way the Song of Drums and Tomahawks rules work, battles usually end when one side falls below 50% of its starting forces and their morale begins to falter. It is rare when forces fight to the last man (just as it was rare in history). One side will usually run away before that happens. The campaign's "Scenario Victory Point (SVP)" system also encourages a player who's down to his last few guys to not futilely sacrifice them, as he will generally just give his opponent even more SVPs. Players are free to voluntarily withdraw their forces so that they can "live to fight another day."
Cheers rang out in the pizzeria's party room as the battles went down to the bitter end on Turn 7
That said, we had two of our four battles go down to the last man, this turn. If I'm not mistaken, this was the first time it has happened all campaign that both sides were whittled down to a single warrior. I know my Erie tribe had a battle that went down to a 2-on-2, and we have had forces entirely eliminated. However, to have two games come down to the last swing of a tomahawk was fairly unusual, as well as very gripping for my players. There were mighty cheers resounding in the local pizzeria's party room that Saturday morning. As GM, it was gratifying to me to see them still enthusiastic about seizing victory after seven turns of campaigning.

One of the games that went down to the final deadly swing pitted our second and third place tribes, Dave's Mohawk vs. Joe's undefeated Shawnee. The scenario was "Collision on the Forest Path," and is a fairly straight-forward encounter scenario. The opposing tribes have sent raiders towards each other's lands, and these forces bump into each other on their way. Dave knew that the Shawnee warriors were deadly Marksmen (Joe had armed most of his warriors with that Trait), so closed quickly to hand-to-hand to minimize that advantage. Three Mohawk fell quickly, though, and Dave began to worry that the Shawnee reputation for prowess in battle was well-deserved. He battled back, though, and soon enemy warriors began to fall. The Mohawk were the first to fall below half, and saw their battleline fragment as warriors panicked momentarily. The Mohawk chieftain kept them together, though, and soon the Shawnee faltered as their losses fell below half. Warriors kept falling on both sides, though, until only two were left. They traded blow for blow until, at last, the Shawnee fell. The Mohawk held the field, although at great cost. The final score was 15-11, a Mohawk victory (and the Shawnee player's first battlefield defeat).
The Miami warriors are caught by surprise while reclining around their campfire, but soon turned the tables on their Kickapoo attackers
The 18 scenarios that will be included in the Beaver Wars in Ohio campaign rules feature a mix of setups and tactical puzzles. While setting up, the Miami player complained that "Blood on the Campfire" was too disadvantageous to the defender. Most of his forces begin prone around a campfire, with one alert guard keeping watch. The Kickapoo player decided to make it even tougher on the Miami by purchasing the Sprinter Trait for a number of his warriors. This enabled them to rush the prone warriors and attack before they had a chance to rise to their feet. Both shook their heads ruefully at the forthcoming slaughter. Both were surprised by how the game turned out. Yes, the Miami did lose a few drowsy warriors to quick attacks. However, when they counterattacked the Kickapoo leader, who'd entered combat, they slew him, sending panic rippling through the attackers' ranks. The momentum had shifted, and it was Kickapoo warriors who were being chased down and killed by Miami roused from their evening rest. Both players joked that Miami must be VERY grumpy in the morning, and it is probably best to leave them alone until they've had their morning coffee! The Miami scored their first Major Victory of the campaign, winning 11-3.
Seneca warriors flood the passageway into the Neutrals town, but stop to exchange shots with the town defenders
One of the strategic aspects of the campaign is in choosing which "Hunt" or "War" card your tribe will play for this turn. Some, like the Mohawk, have played mostly Hunt cards, which score the tribe more Beaver pelts (one of the three categories tribes are competing in for the victory). Others prefer to be able to select their opponent and choose War cards. The Seneca have chosen that strategy more often than not (and somewhat historically, too!). They played their highest War card this turn so that they could once again attack the Neutral tribe, which was still in 1st place. I rolled up "Hold Them at the Gates" as the scenario for Mike and Keith. This features a struggle for the entrance of the defender's town. Indian towns during this period were usually encircled by palisades that often did not have gates. Instead, they had a looping entranceway that attackers would be exposed entering. Mike's Seneca charged quickly into the entrance, but then took up position along the palisade, firing into the town at the Neutral defenders collecting to oppose them. The Neutral charged to shove them back from the palisades, but lost several warriors. They fell back to defend the longhouses. The Seneca dithered for a few moments before charging into the town and engaging the Neutrals. A couple Seneca braves fell, but when their full might got to grips, the Neutrals began to fall in greater numbers. Soon, the Neutral force broke away from contact as they fell below 50%. Keith chose to have his warriors keep running, even though his losses had not fallen that low. This surrendered the town to the Seneca, who scored a Major Victory, 19-2. 
A small creek runs red with slaughter as a party of Susquehannock hunters is attacked by Honniasont youths in "A Shot Rang Out"
The final scenario pitted the Honniasont against the Susquehannock. In this battle, a party of Susquehannock hunters have shot a deer and are gathered around it to butcher the kill. They are surprised by a force of Honniasont Youths led by a veteran chieftain, who challenge their rivals right to hunt on their ground. A steep-bedded, but shallow, creek divides the two parties. The youths raced to attack the trespassers in hand-to-hand immediately. Meanwhile, the Honniasont preferred to shoot at their enemies from across the creek. Although the firearms of the Susquehannock caused losses in the more numerous Honniasont, the teens were able to gang up on the hunters and began to kill a number of them, as well. The enthusiasm of the Honniasont youths enabled them to withstand the worrisome sight of their friends' and companions' deaths. Even when their numbers fell below 50%, many remained to continue the fray as stalwart as veteran braves. Soon, the Susquehannock numbers dropped below half, and their hunters began to leave the field. The youths remained steadfast, and dealt killing blow for killing blow. Amazingly, it came down to the leaders of each force, trading blows in hand-to-hand. The Honniasont avenged his slain youths, and felled the leader of the Susquehannock hunting party. The spirit of the deer was kept in great company by the numbers of the brave slain. The score was tied at 15-15, but victory was awarded to the Honniasont as they had possession of the field.

In the end, both our 1st and 2nd place tribes lost this turn -- the 1st-place Neutrals losing badly. How did this affect the standings after 7 turns? The Neutrals dropped to a tie for 1st place with the Shawnee. Instead of being 3 1/2 points out of first place, the Mohawk closed to within 1 1/2 points of the lead. The Seneca jumped over the 4th place Kickapoo to be next on the Leaderboard.  Here are the overall standings, followed by each individual category.

Tribe
Place
Victory Points
Neutrals
Tied 1st
24.5 points
Shawnee
Tied 1st
24.5 points
Mohawk
3rd
22 points
Seneca
4th
16 points
Kickapoo
5th
15 points
Miami
6th
12.5 points
Susqehannock
7th
11 points
Erie
8th
7 points
Honniasont
9th
3 points

Tribe
Prestige Points (PPs)
Neutrals (Keith Finn)
16 (5 MajV, 1 MinD)
Shawnee (Joe Merz)
16 (3 MajV, 3 MinV, 1 MinD)
Mohawk (Dave Welch)
12 (3 MajV, 1 MinV, 1 MinD)
Seneca (Mike Stelzer)
12 (2 MajV, 3 MinV)
Kickapoo (Andy Swingle)
10 (3 MajV, 1 MinD)
Miami (Jenny Torbett)
8 (1 MajV, 2 MinV, 1 MinD)
Susquehannock (Steve Phallen)
5 (1 MajV, 2 MinD)
Erie (Mike Demana)
5 (1 MajV, 2 MinD)
Honniasont (Bruce Adamczak)
3 (1 MinV, 1 MinD)

Tribe
Scenario Victory Points (SVPs)
Shawnee (Joe Merz)
97
Neutrals (Keith Finn)
92
Seneca (Mike Stelzer)
79
Mohawk (Dave Welch)
76
Miami (Jenny Torbett)
66
Kickapoo (Andy Swingle)
62
Susquehannock (Steve Phallen)
60
Erie (Mike Demana)
38
Honniasont (Bruce Adamczak)
30

Tribe
Beaver Pelts
Mohawk (Dave Welch)
43
Neutrals (Keith Finn)
37
Shawnee (Joe Merz)
35
Kickapoo (Andy Swingle)
32
Susquehannock (Steve Phallen)
25
Miami (Jenny Torbett)
22
Erie (Mike Demana)
22
Seneca (Mike Stelzer)
22
Honniasont (Bruce Adamczak)
19