|
| The warlords wore masks and our restart of our Saga Game Days at the Guardtower East was a success |
After polling our local Saga gamers, enough people expressed interest in restarting our monthly Saga Game Days at the Guardtower East in Columbus, OH. The store has a policy that masks must be worn while up and walking around inside the facility, but are optional while actually seated at the table gaming. I made it clear to the gamers that if your opponent wanted to remain masked that they should honor them with that courtesy. In addition, the store has reduced the number of tables and spaced them out closer to double the six-foot recommendation. Under those conditions, we had eight players show up today -- with others being busy and saying that they would have otherwise. All eight of us got in two games, something that doesn't happen on our normal meetings, so everyone must have missed in-person gaming.
 |
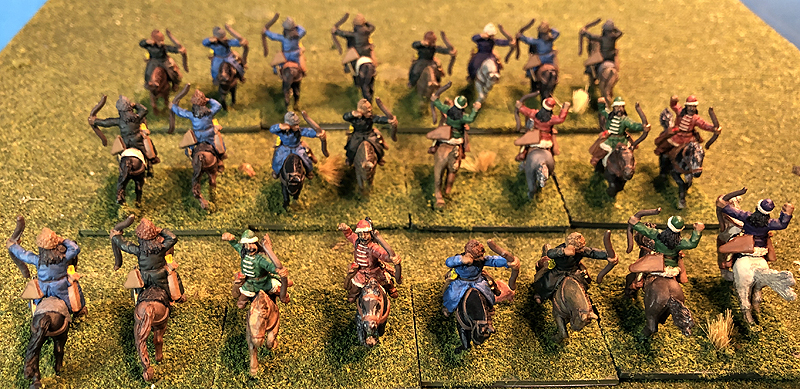
| It was good to see 8 Dark Age armies deployed for battle on the table again, exchanging blows and shooting bows |
I think the masked Saga Game Days were a success from the reactions of the gamers. No one was grousing and saying the mask was such a pain that they're never coming back. No one was saying this is crazy and I'm not taking the risk to come back. I would call it the definition of a happy medium if all eight of us were happy, and that's what it appeared to me. One gamer drove over from Dayton, another from Springfield, with the remaining six of us from Columbus. Hopefully, our success will continue on in two weeks at the Dayton group's monthly meet at the Dragon Guildhall in Beavercreek, OH. We are even talking about maybe trying a tournament in August there, if the store is willing to host it. Stay tuned for more news about that.
 |
| Adrian's Anglo-Saxons were my 1st opponent - here his mounted hearthguard charge into battle urged on by his warlord |
I brought my Picts (Age of Viking Scots list) again, and had two very challenging games. Other armies that people brought included Anglo-Saxon (2), Viking (2), Last Romans, Romans, and Irish. We had one brand new player who had just finished their army that week, and another bringing a newly-acquired army seeing their first Saga Game Day. Two gamers used loaner armies, which means we still have players needing to paint up figures...haha!
 |
| The attack of the Pictish spearmen on the left was blunted by Anglo-Saxon levy foot and archers |
In my first game, I finally got to play Adrian from Dayton. He wanted to play a scenario from the Book of Battles called "Battle of Heroes." It is a somewhat bizarre one that requires the players to roll special conditions for Scenery, Deployment, Game Length, Victory Conditions, and Special Rules. Our game was in Rough Ground and Hostile Land (all uneven terrain was dangerous), and used Pincer Attack deployment rules, which meant we split our armies into two halves and began incredibly close to each other. It was a normal game length (Until Dark), and used Carnage (Survival Points) for victory conditions. I completely misread the Pincer Attack rules and misdeployed my troops -- particularly more poor 4-figure mounted hearthguard unit. Adrian was able to deploy his Levy archers within range and he took the first action, shooting them twice and knocking them down to one figure remaining.
 |
| On my right, my archers in the wood and one unit of spearmen attempted to hold off the surging Anglo-Saxon hordes |
In the beginning of the match, my die rolls were absolutely horrible and his (particularly his saving throws) were unreal. For example, on my left, I quickly advanced and charged one of his 12-man Levy units with my 12-man Warrior unit. I had loaded up my battle board with Long Spears, Hold at Bay, and Counter-Attack. This one-two-three punch produces a phenomenal number of attack dice and can usually wipe out or decimate a unit. I caused only three hits on his levy unit. Now, don't get me wrong, I realize that Anglo-Saxon levy units have a LOT of abilities on their battle board which means they are essentially Warrior units. But three casualties for 24 attack dice?? Meanwhile, the Levy bow unit next to the heroes who were facing down my largest warrior unit were filling my 10-man warrior unit with shafts and knocking them down by several figures with each shot. I couldn't buy a saving roll, it seemed!
 |
| After spending several turns attacking at range with Reach, we began to whittle away at the stalwart Saxons |
After a couple turns of beating my head against the Anglo-Saxon wall of levy, I changed tactics and began to use Reach. This allows my non-missile armed infantry (including my Warlord) to shoot as if they have javelins. In addition, every turn I used Diversionary Shot with my Levy archers, and began to slowly chew up his troops, too. Gradually, my shooting began to wear away at his troops. I refused to play into his hands and let Adrian use the abilities he'd stack on his battle board for the melees he expected me to initiate. I had written off a win, and was instead going to wear him down so the battle could possibly even be a draw. I did charge a couple charges, but tried to limit them to when his board was empty and it would be a fight more on my terms and less on his.
 |
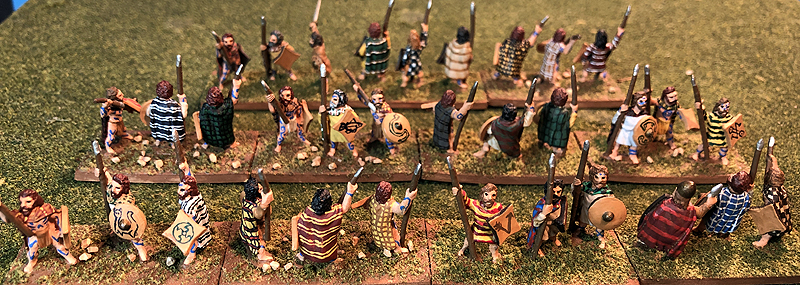
| A wild Irish battleline - Tyler finished painting his army this week and fielded it here for his first game of Saga! |
Eventually, Adrian decided he needed to kill my archers in the woods. He ended up charging them three times with Anglo-Saxon levies, and once with his Warlord. The archers hung tough, and still had two figures left at the end of the game -- even driving off their attackers once. On the left, where my first charge had gone so badly, I began to grind down his units. The dice had swung a bit, and I was getting better rolls and his were less impressive than how he'd begun. I was waiting to charge him when his board was pretty much empty. This allowed me to destroy his levy unit, archers, and even his mounted hearthguard unit.
 |
| One of Tyler's units was a warrior pack of Irish wolfhounds and handler - a scary prospect charging across the table! |
It was going to be a close game, because we received bonus 2 victory points for each unit of at least four figures more than a Long distance from our baseline. His left wing had done that to my right, and my left had done it to his right. The final score ended up being 18-16 -- the narrowest of victories for me. I agreed with Adrian that levy (which are the Anglo-Saxon army's strength) don't get a fair shake in most victory conditions. My surviving warriors were counting for more points than his surviving levy, and this was enough for me to eke out a win. It was a heck of a game, though, and one I was certain for most of it that I would lose.
 |
| Round 2 games: Joe (left) and Andy battle in the foreground, while Bob and Jenny square off beyond them |
The scores for the first round were:
- Bob B's Last Romans defeated Anthony B's Anglo-Saxons 31-12
- Joe M's Vikings defeated Dave E's Romans 31-14
- Tyler P's Irish defeated Jenny T's Vikings 23-11
- Mike D's Picts (Scots) defeated Adrian J's Anglo-Saxons 18-16
 |
| Tyler's Irish emerge from the terrain to swarm Jenny's invading Vikings |
I was happy that everyone wanted to play another game. Usually, about half of the players leave after the first round on our normal Saga Game Days. So, we switched opponents and deployed our armies for battle, again. I faced off against Dave E's Romans this time. Dave's army has probably the single most discombobulating 1/2 point unit in the Saga universe: a ballista. When the Romans spend a point on a ballista, they also receive a 6-figure levy unit. Why is it so disconcerting to face? It is hell on wheels against large unit. What do I play with most of my armies? Large units. For example, if he were to get a shot against my 12-man Warrior unit, he would roll 6 dice (half the figures of the target unit) at +1 to hit. Granted, it takes a fatigue after each shot, but that doesn't make up for the tree trunks falling amidst your big units!
 |
| Valhalla bound! A lone Viking warrior faces off against more than a score of jeering Irish |
So, what to do to negate the less than 1/12th of his army? Fight tree trunks with TREES! I placed two Woods. Surprisingly, Dave place a large woods, too, on his left flank. I told him in the future he should consider Marshes, which slow down the enemy but provide no cover and do not block line of sight. After we placed our terrain and Dave adjusted a piece, we had a large wood on each flank and I had a smaller one guarding my center not far from my baseline. I cravenly hid my army at deployment so that he began the game with only one shot on the back edge of one of my 10-figure Warrior units.
 |
| The gadfly of my battle plans -- the 1/2 point Levy ballista unit in the Roman army |
My plan was to maneuver to the left with my 12 and 10-figure warrior units, backed up by my Warlord. My 4-figure mounted hearthguard would stay hidden behind the center woods and be reserve. On the right, I deployed my levy archers behind the large woods, supported by another 10-man warrior unit. Dave's army features a lot of smaller units. Besides the ballista, 6-figure levy javelinmen, and warlord, he had two small foot hearthguard infantry of Praetorians, and a small mounted hearthguard, as well. He had two 8-figure warrior units, one of bow and another of hand weapons. Against my attacking wing, he had deployed the mounted hearthguard, warrior hand weapons, and small levy javelinment. On his hill in the center, Dave deployed his ballista, flanked by another foot hearthguard and the warlord. Against my delaying wing on the left, he deployed his warrior bows and another small unit of Praetorians.
 |
| My attack goes forward on the left with two Pictish spear units, the warlord, and my mounted hearthguard in reserve |
Dave did not back down to my attack, and advanced to meet me on my left. On turn 2, he ordered a mounted charge with his small hearthguard unit against my smaller warrior unit (which had been nicked by the ballista and was down to 9 figures). We were ready, though. My battleboard was loaded up with my 1-2-3 punch and I let him have it. With 19 attack dice, and seven bonus defense dice, my warriors eliminated his charging cavalrymen and suffered minimal casualties. Meanwhile, an archery duel had arrows whistling through the woods between his warrior and my levy bows. His troops were in the woods, but mine were not. I could never spare the dice, it seemed, to move them into the woods to even out the modifiers. My poor levy gave it their all, though, slowly chewing away at the smaller warrior unit, and never losing huge numbers.
 |
| Roman cavalry dispatched, the Pictish spearmen close in on the Roman legionaries and auxillary javelinmen |
In the meantime, we continue to advance on the left. I switched gears and used Reach against his foot warriors, attacking him with both warrior units and the warlord. On the next turn, I charged him with my larger spear unit and his foot warrior legionaries, as well. Dave wasn't about to back down, though, and sent the Praetorians on the hill into position to attack my smaller warrior unit, which was taking it on the chin from his javelinmen and his ballista. When the Praetorians charged the Pictish warriors, we closed ranks and went all defense with our Saga abilities. We suffered no casualties, and causing one on him, which forced the imperial guards to withdraw. Down to just five figures, my warlord ordered the depleted unit of warriors to the rear (where it could continue to provide its Saga dice), and brought up the mounted hearthguard to take their place in the line.
 |
| An archery duel between the Roman auxilary archers and my levy archers lasted for the entire battle |
We tried Reach again, but by this time, our very good dice at the start of the game had begun to cool. Dave's very bad dice had begun to heat up. All of our shots caused no hits on this 3 Praetorians. Undeterred, the mounted Pictish nobles charged in. The Roman gods smiled on Dave and we each caused only one casualty to the other. This forced my nobles back. Dave's foot Praetorians held the line for him for almost the remainder of the game. Aided by the shooting of the javelinmen and the ballista, we simply were unable to do anything but the most minimal casualties.
 |
| Dave's gorgeous Praetorians launched an ill-fated attack on my right that may have cost the Romans the battle |
Emboldened by the goddess Fortuna, Dave ordered an attack against my delaying right wing. His 4-figure Praetorian foot did a double advance and charged my 10-man warrior unit. We saw him coming, and were able to load up our board. Rather than Counter-Attack ("chickens," as I call the Scots uncommon die, were not coming up on my saga dice rolls), we instead used a Saga ability we rarely try: Wall of Spears. With this, we roll 1 dice for each figure in the unit. Any that score under my armor class (4), give my unit one bonus attack dice AND one bonus defense dice. So, an average roll would be five successes, but on this roll my old luck returned and I scored 7. With 17 attack dice and 7 bonus defense dice we completely eliminated his Praetorians and suffered one casualty.
 |
| Round 2 game saw Adrian's (left) Anglo-Saxons exact revenge for his defeat on Tyler's Irish |
At this point, Dave lost heart. I reminded him his shooting was doing a rope-a-dope on my left wing, and it was going to be closer than he thought. The warlords even got in the action on the final turn, but both survived. Mars protected his double-fatigued warlord against my fresh one, and it was time to count up points.
 |
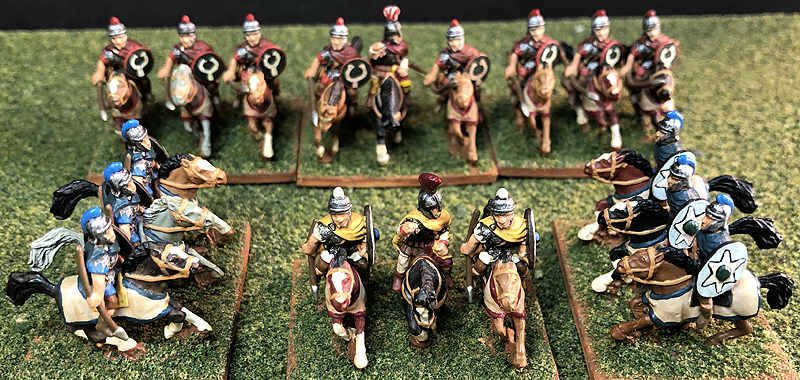
| Bob's massive and beautiful cavalry force in his Last Romans army - including the Legendary cataphract unit |
In the end, my Picts triumphed 24-21. One more point less for me or more for him and it would have been a draw! As I feared, his ballista was a constant drain of casualties on my troops. It easily killed more than a half point worth of Picts, and along with his javelin levy and one unit of Praetorian foot, staved off disaster and nearly won them the victory. Two VERY close games, and very challenging games against determined opponents. The Picts might have gone home victorious, but they were battered and bruised, and had plenty of wounds to bandage.
 |
| The Legendary Last Roman Klibanophoroi -- half of their army points -- charge Jenny's Viking hearthguard in Round 2 |
The results of round two were:
- Adrian J's Anglo-Saxons defeated Tyler P's Irish 29-9
- Joe M's Vikings defeated Anthony's Anglo-Saxons 23-17
- Jenny T's Vikings defeated Bob B's Last Romans 24-19
- Mike D's Picts (Scots) defeated Dave E's Romans 24-21
 |
| The Last Romans hurl themselves upon Anthony's Anglo-Saxons in a round 1 victory for Bob |
I am looking forward in two weeks to our next group meeting at the Dragon Guildhall. Some of you are probably wondering what was it like gaming for more than five hours wearing a mask. It was less uncomfortable than I thought. There were times I honestly forgot I was masked -- just like when I am at the grocery store or picking up carryout. Everyone was courteous and respected each other's preferences, as I'd hoped. The Guardtower's tables are very widely spaced apart, and for much of the time, there wasn't even another game going on in the room besides ours. I hope we have continued good turnout of masked, in-person gaming until that day when we can leave them at home and see each other's smiles like to good old days! Feel free to join us and give it a try!
 |
| Anthony's Anglo-Saxons try their luck against Joe's Vikings in a fast-playing slaughterfest in Round 2 |
 |
| Joe's Vikings got to deal with Dave's ballista in Round 1, but their Odin Saga ability made it MUCH easier! |
 |
| Vikings and Romans close in on each other and come to sword and axe blows in Round 1 action |