Tuesday, May 4, 2021

Moors Overcome Clever Roman General's Trap in Hard-fought Battle of Heroes

    My Moorish spearmen close ranks atop a hill, ready for an enemy charge
I was lucky and got a chance to play two rounds of games with my Moors at our first "reboot" of our monthly Saga game days at the Guardtower East in Columbus, OH. My first matchup was against Jason Stelzer, who I have tagged as the "Next Generation," He and his cousins Daniel and Thomas are all in their late 20s, compared to many of the rest of us in our 50s or 60s! Jason has tried a number of armies over the year-plus that we have been playing Saga, locally. Lately, he's decided to stick with his Roman warband from Age of Invasions, and has steadily improved with them in both skill and craftiness.

    My Moorish lines deployed in this Battle of Heroes against Romans from Age of Invasions
He wanted to play Battle of Heroes in the "Chaos" version, which gave me a chance to whip out my cards for that scenario that I had downloaded from the Studio Tomahawk website. I had Jason randomly draw one from each of the five piles covering Scenery, Deployment, Game Length, Special Rule, and Victory Conditions. He drew Uplands, so I chose tucked the requisite rocky ground in my corner, then placed  a large gentle hill  in the center to give some open ground for my Moorish cavalry. Jason chose a forest, which he placed in the left center, and a ruins piece on the right flank. He was attempting to cut down on my maneuver room and give his infantry cover from my missile fire.

    Jason's Romans deploy in a tight mass, ready to react to the maneuvers of the faster Moors
After we had placed our terrain, I used the "Meeting Encounter" deployment to essentially rotate the board 90 degrees. I selected my deployment spot as the short edge on my left, which would contain both the rocky area and ruins, denying him that cover. He chose the short edge opposite, which gave him the woods to guard most of his right flank. I deployed half of my army first. I placed my levy archers in the rocky ground, flanked on either side in the open by a unit of warrior spearmen. Jason placed his Romans in a compact mass with the woods guarding their right and the large hill to their front.

    Moorish cavalry's opening gambit - darting along the left flank towards the waiting enemy
Jason had drawn "Cautious" for our game length, meaning it would last only five turns. "A Good Day to Die" meant there were no special rules, and "Show of Force" would grant 3 bonus points to a player who got a unit of 4+ to within Medium of the opponent's board edge. Players would also receive 1 bonus point for each melee that they won. As it turned out, those bonus points became HUGE, and would be the key to me sneaking victory out of this closely-fought game.

    A dozen javelins tossed & only one Roman cavalry trooper has fallen. Time to charge?
I opened the game moving all of my troops with Maneuver, as we were way more than one Long distance away from each other. The infantry moved forward, drifting to the right to seize the hill as a vantage point to shoot at the advancing Romans. My two units of Moorish cavalry (6-man mounted hearthguards with javelins) galloped ahead along the left flank. Their goal would be to find Romans to rain down javelin fire upon, and then withdraw out of their charge range. On his first turn, Jason's foot levy spear and one of his warrior units began a cautious advance forward. The rest of the army moved to their right. One warrior unit entered the woods, with his big, 8-man foot hearthguard elite legionary unit close on its heels. His small mounted hearthguard cavalry unit guarded the gap between the woods and his base edge.

    One unit of Moorish cavalry is frozen out of place, victim of hubris and a clever Roman gambit
Little did I know that clever Jason had actually put them there as bait, not to guard the gap. I took the bait and sent both of my cavalry units forward to hurl javelins at the Roman cavalry. I thought I had a decent chance of eliminating them with javelins alone, since their armor vs. missile fire was only a 4. Unfortunately, 12 attack dice later, I had killed only one trooper. No biggie, I thought. I had my deadliest battle board ability, Torrent of Iron queued up. I activated it, and for the first time, actually used the missile attack option prior to the charge. 

    The Moorish bows finally have the Roman infantry in their sights, prompting the legions to charge

As Short Round warned Indiana Jones, "Big Mistake, Indy!" Although this second shot caused a fatigue, I was sure Jason would use it to affect the ensuing melee. My shot was twice as effective as previously, and only one Roman remained when we crashed into them. I immediately used the fatigue my charge generated on his unit (a key component of Torrent of Iron) to raise my armor to 5. Clever Jason chose NOT to use my fatigue, which meant that I had two fatigue at the end of the melee. I had lost no casualties and his unit was eliminated. Things were off to a great start, or so I thought. When I played "Perseverance" to pull back both cavalry, he cancelled the activation of my victorious unit. Uh-oh. This would leave them within easy range of his elite legionary unit.

    Moorish infantry is victorious! Archers repulse the Roman levy and warriors beat their counterparts
Jason rolled his Saga dice and loaded up his battle board for the kill. The 8-man hearthguard unit crashed into my 6-man mounted unit. Although we were both fresh with no fatigue, he had a full battle board of offensive abilities. He also loaded up on defensive abilities, as he knew he'd be facing 12 dice in return. His legionaries cut down all but one of my troopers, while losing none of his own. In all my games playing my Moors, I honestly think this was my cavalry's greatest defeat in a melee!

On the next turn, I tried to exact some revenge with shooting attacks on the battle-fatigued legionaries. My attack rolls were poor and his save rolls were above average. Nine attack dice caused zero casualties on the Romans again. I pulled my full strength and remnant cavalry back to mid-board. At least I was ahead on victory points with the 3 point bonus for coming within Medium of his base edge! We reasoned, correctly or not I am not sure, that our "base edge" for the Show of Force rules was the edge we deployed near.

    Archers and mounted javelinmen poured fire into the Romans, who simply would not fall!
After a furious beginning, the game set into a lull in the middle turns. I slowly advanced my levy and spear, trying to get a shot at his warriors. He kept them screened either by the hill or the 12-man levy spear unit. It wasn't until we advanced up the hill, that Jason became more aggressive. I had queued up my loan defensive ability, Forest of Spears, to protect the infantry. The levy were going to rely on their numbers to save them, I figured. Jason charged in, levy spear vs. my levy archers and 8-man spear unit against my spearmen. To both of our surprise, my archers hurled back his levies. Not to my surprise, my warriors, who had closed ranks and played Forest of Spears, took no casualties from his charge. The fact that the Roman warriors took 3 casualties WAS a big surprise. 

In addition to the casualties, this helped me with the bonus points for winning melees. In addition, Show of Force uses Survival Points for victory conditions. That means bonus points for units that are large enough to still generate a Saga die. That gave me an objective for my fifth and final turn: bring the warriors down to 3 or less. I needed to kill two Romans, and had my cavalry's javelins and my levy's arrows to do it with. Three attacks later, Jason had saved every hit. I pulled my troopers back behind my lines in disgust. Our point lead would have to be enough to survive whatever he gained on his last turn.

    The situation at the end of a close, hard-fought battle: Moors hung on to a 1-point victory!
He brought forward his elite legionaries to charge my spearmen who had shrugged off the warrior's charge. We closed ranks and played Forest of Spears, again. However, 16 dice is a lot harder to weather than 8 attack dice. With the offensive abilities the Romans have on their board, he killed all but one of the spearmen, who gladly retreated to the warlord's side -- happy to be alive. His invulnerable legionaries took no casualties. Jason followed that up with a charge by the arrow-proof warriors against my archers. This time, luck was more on his side and he brought them down to 6 figures -- which luckily, meant they'd still give me the bonus victory point for generating a Saga dice. Once again, Jason took no casualties.

This was going to be close. My continued failures at missile fire and his late success was going to make this a nail-biter. We counted up the points and were dead even until we got to the last line, where the player subtracts one point for each completely eliminated unit. I still had all six of my units, but his Roman cavalry, the "bait," had been destroyed to a man. That single point gave my Moors the game. Battle of Heroes is not one of the scenarios that require a 3-point margin, like Clash of Warlords, so we s-q-u-e-a-k-e-d out this victory.

    Majik Ibn Battuta al-Waqaa and his pet cheetah Scirocco narrowly escape defeat by the Romans
Initially, I felt I got very lucky to win this game. Later, when I recounted all my shooting woes, I think the dice balanced themselves out. Still, I learned a lesson this game. Think through all possible outcomes before committing my cavalry to melee. With an Armor of 4, they are simply too vulnerable to counterattack. I love my gallop forward, hurl javelins, then pull them back with Perseverance tactic. I like how Torrent of Iron means they can charge and deal death in melee just as easily. However, my hubris in this game at their ability to escape retribution nearly cost me the victory. Jason played an excellent game, and I look forward to matching up against him again in future Saga clashes!

Note: I will cover my second round game with Thomas in another blog entry.

Monday, May 3, 2021

Saga Game Days Restart in Columbus


    Here come the Gauls! Andy continues to cut down his opponent's with his Age of Hannibal Gauls
A dozen Central Ohio Saga players showed up to restart the Saga Ohio game days at the Guardtower East this past Sunday in Columbus, Ohio. The group is in the midst of a recruiting boom and that, combined with the long, Covid-induced layoff for many players, meant I wanted to get a head start on figuring out the player matchups. I try to have a fairly experienced player (and good teacher) matched up against our novice warlords. That way, they can coach them through their game and help them learn the rules. Saga has a moderate learning curve, especially as it relates to managing an army's "battle board" -- the command and control function of the game. A couple last-minute player cancellations made me shuffle the matchups slightly, but on the whole, I was satisfied with the teaching that would be going on.

    Lots of teaching Saga! Here Jenny gives Lee a few pointers, while Anthony fields his Anglo-Danes
I had also been busily making new terrain specifically for Saga. I created four new fields, along with the same number of rocky areas and ruins. I reshuffled my terrain boxes to better stores the pieces and make them more accessible to players. I got a lot of compliments on the new terrain pieces, so I will eventually add in some more. More than likely, I will do a blog post on how I created them. So, stay tuned for that! 

    Jenny's Viking archers occupy one of my new Ruins terrains pieces I recently created
As it was, I have kind of taken over from Andy S and Steve P (who moved to San Diego) in providing most of the ground cloths and terrain that we use. I admit I was also very inspired by Jim B's terrain boards he unveiled two weeks ago at our Saga game day at the Dragons Guildhall in Beavercreek, Ohio. I figured that it was high time I step up my game in that area! Especially since I had no rocky areas or ruins for players to use during terrain deployment prior to creating these.

    Daniel advances his Norse-Gaels as Thomas' Crusaders await for what will be a bloody clash!
As players showed up, I let them know who'd they be matched against and nudged them to get started. So, the round one games began gradually. Thomas and Daniel M were stuck in a traffic jam driving over from Dayton, so were our last game to get started. I felt bad that the twins had to play each other, but they confessed they had yet to be matched against each other in Saga. They set up their battle on the table next to Jason S and my game. 

    The Norse-Gael battle line advances towards a deadly combo of knights and fanatic pilgrims
It was especially enjoyable to hear them banter back and forth while Jason and I were playing. In fact, the four of us on our table were the only ones to switch opponents and get in a second round of games. The other eight players were sated after one round. It is actually a rarity for me to get in two games in Columbus. I usually sit out the first round as I am busy matching folks up as they show up.

    A look at one of my Rocky Ground terrain pieces with its removable bases of larger boulders
The first game to get completed was a slugfest between Andy's Gauls and Allen S's borrowed Vikings. Allen is one of our novices and this was only his second game. Andy has been playing Saga longer than anyone else in our group, so he was a natural to help coach Allen through his first game. Apparently, the Gauls were able to bring the "Power of the Ancient Gods" ability on their battle board ability to bear regularly. Allen said later Andy was rolling more attack dice than his units were fairly consistently in melee. 

    Allen and Andy were the first game to finish as the "Power of the Ancient Gods" brought victory
Andy and Allen's scenario was Battle of Heroes, with Andy patiently explaining the more unusual deployment and game conditions in this scenario. Battle of Heroes is probably our second most popular scenario played in our meetings (after the standard "Clash of Warlords" from the book). Late in the game, Allen's forces had been cut down by the Gauls to such a degree that he conceded defeat. On a positive note, Allen said he is having fun learning Saga, so hopefully we have another long-term recruit.

    Allen's Vikings sound their battle horn as the waves of Andy's Gauls approach
My own first game was the next to finish. My Moors were taking on Jason's Romans from Age of Invasions in another Battle of Heroes. I felt lucky to be the first player, as it allowed me to turn our "Uplands" terrain condition into a roughly open battlefield. I did this by using the "Meeting Encounter" deployment option to make us fight with the short edges of the 4'x3' battlefield as our base edges. I will post another blog entry describing this game (and my second round matchup against Thomas' Crusaders) later, so stay tuned for that, as well. 

    Lee's Scots (my borrowed Picts) move through the woods to attack their Viking enemies
It was tough fight. Jason gets better and more skilled with the rules every meeting. He craftily laid an ambush for one of my units of mounted hearthguard, killing 5 out of 6 figures. He'd given up his small, 4-man mounted hearthguard unit in return, but appeared to win out on the exchange. However, with "Show of Force" victory conditions, his completely eliminated unit came back to bite him in the end, and he lost our game by a single point. I felt VERY fortunate to escape this game with a victory. 

    Dave's Romans from Age of Invasions march past one of my new Fields terrain pieces
Thomas and Daniel finished next, despite being last to start. They are both aggressive players, and the Levantine Crusaders fanatic pilgrims mean LOTS of charges and follow up attacks. Daniel's Norse-Gaels are no slackers either, and his "Spill Blood" ability meant carnage ruled on this battlefield. Between that and the lethal Crusader board with its boatloads of additional attack dice, figures died quickly. I laughed as each jokingly accused the other of using cheesy advanced Saga abilities. The fanatic pilgrims out-cheesed the Norse-Gaels in the end, apparently. Thomas won fairly handily 33-19.

    Jenny's Viking warlord watches the advance of the more lightly-armored and numerous Scots
Jenny T's teaching game with Lee P (who I believe was playing only his fourth game of Saga -- and first in many months -- was the next to finish, I believe. Lee had borrowed my Scots. Jenny said Lee wrong-footed her from the deployment when their Clash of Warlords game switched to the diagonal corner deployment method. Her archers were ineffective, and the Scots proved every bit as tough as I remember them. One of the things I like about Saga is novices are able to pull off the victory fairly often against a more veteran player. There is enough dice rolling, and plenty of openings for clever tactics that an opponent had not considered, to make a big difference. Lee pulled out a victory over Jenny, who has learned the Viking battle board quite well and routinely defeats opponents with it at our game days.

    Bob and Keith played an introspective game, as they regularly discussed the abilities of their armies
Another one who keeps getting better and better with their chosen army is Dave E with the Age of Invasions Romans. Last meeting, he defeated a very tough Norman army. This week, he was facing Anthony B with his Anglo-Danes. Dave was able to slough off Anthony's fatigue generating abilities and defeat him. I did not get a chance to see much of the game, as Jason and my game was a nail biter and very close.

    Bob's Last Romans, infantry sheltering in terrain, await the approach of Keith's Irish
The last first round game to finish was Bob B, who'd switched back to his Last Roman warband. He was teaching Keith F, who was playing Irish in his fourth game of Saga. As always, Bob is extremely patient, and Keith said the two spent a lot of time discussing the ramifications of each army's advanced Saga abilities so he could know what to expect. As us veteran Ancients players have done so many times in the past teaching new players, Bob coached Keith to victory over his Last Romans. 

    Keith's Irish, including their champion and war dogs, race forward to take on the Last Romans
The statistics for the first round games:

  • Andy S's Gauls defeated Allen S's Vikings in Battle of Heroes (no score, game conceded)
  • Lee P's Scots defeated Jenny T's Vikings in Clash of Warlords, 18-8
  • Keith F's Irish defeated Bob B's Last Romans, 24.5-19
  • Dave E's Romans defeated Anthony B's Anglo-Danes, 25-19
  • Mike D's Moors defeated Jason S's Romans, 27-26
  • Thomas M's Crusaders (Levantine) defeated Daniel M's Norse-Gaels, 33-19

    2nd Round action: Jason's Romans press forward to clash with Daniel's Norse-Gaels
The second set of games went VERY quickly. I let the "Next Generation" (Jason, Daniel, Thomas) choose the matchups. They decided that the Crusaders were the best chance to stop my Moor's winning streak. So, I would play Thomas and Daniel would seek redemption against Jason's Romans. I pulled out a Moorish battle board for Thomas to keep an eye on while we played (and also got out a copy of the Crusader board so I could remind myself about what he had queued up on his board). 

    Thomas' Levantine Crusaders are urged to charge into battle by a priest
I find it VERY useful to have on hand a copy of the opponent's battle board. After their order phase finishes, I always confirm with them which abilities they have activated so that I can know what to expect. With Saga, it is also a good time to double-check and make sure you both agree on exactly what those abilities can do! The last thing you want is arguments in the middle of a melee or turn. I try to be a gracious opponent, and would often point out abilities on my board to Thomas that he should plan for -- such as the Moors move of Long+Short with "Horses of the Maghreb." 

    Banners waving in the wind, the Scots surge forward in a riot of tartans, checkers, and stripes
Thomas surprised me by not playing his fanatic pilgrim heavy Levantine Crusader version. He said he wanted to try the Baltic Crusaders. I flipped to their entry in the Age of Crusades book and we discussed what changed for him on troop makeup. He wanted to try out Levy crosssbow, so I made sure he understood how the rules worked for shooting for them. On one turn, I stopped him as he was getting ready to move them to remind him to shoot first, THEN move if he wanted to get closer. That way, he could then fire a second time after the movement (as long as he didn't mind the extra fatigue!). I could swear I saw one of my Moorish spearmen crane his head around towards me quizzically, as if to ask why I was helping their enemy shower them with a second round of crossbow bolts!

Jenny and Anthony try to maneuver their way out of the straits their opponents' have placed them in
Here are the results of the second round of games (expect me to cover my game in detail in another blog post):

  • Jason S's Romans defeated Daniel M's Norse-Gaels, 19-16 in Battle of Heroes
  • Mike Ds' Moors defeated Thomas M's Baltic Crusaders  (no score, game conceded)

 I was happy with a dozen players in our first round back, especially since a bunch of our regulars had other commitments that weekend. It wasn't as many as Dragon's Guildhall's 18 two weeks ago, but I have a feeling we will be reaching those numbers very soon. Hope you enjoy the pictures as much as we enjoyed being back to playing Saga in Columbus!

Thursday, April 22, 2021

Moors Battle a Carthaginian Enemy from the Distant Past


    My Moors faced a new & dangerous opponent - Carthaginians from Age of Hannibal
Word had come to the court at Cordoba of a landslide high in the mountains that had exposed a hidden valley. Villagers in the area complained of raids by a strange people who plundered them, then retreated back into the valley. The emir was concerned, and ordered his trusted commander, Majik Ibn Battuta al-Waqaa to march his company to investigate these stories. Majik advanced cautiously, sending scouts on foot and mounted ahead of his forces. They found the raiders in a bleak area of hills, not far from the entrance to the valley. They wore bronze armor, some on foot, some on horseback. There were even troops riding atop an elephant! These were definitely a foe that Majik had never faced before.

I spent the first round of our initial Saga game day at the Dragons Guildhall helping pair up opponents, and answering questions from our newer players. It had been more than six months since we had met, so even the relatively experienced players were rusty on the rules. I had originally intended to record interviews for Saga Ohio at the game day, but the players needed my help with the rules more than they needed me pestering them with questions!

    Mike S examines his battle board as our armies are deployed for a Battle of Heroes scenario
As players were finishing up, my friend Mike S urged me to get in a game. He was playing his brand new Carthaginian army, having barely lost a slugfest with Andy S's Gauls in round one. To be honest, I was a little leery of taking my Age of Crusades army against what I'd heard were very potent Age of Hannibal opponents. I had not really read the Age of Hannibal book all the way through, but it is set up like the others. So, I figured that I could mull my way through things. I had already considered how my army would deal with an opposing elephant. So, it would be fun to see if my plans would bear fruit.

    A closeup of part of Mike's gorgeous, new Carthaginian army deployed for battle
Mike chose Battle of Heroes and wanted to use the "Considered" option. That meant we rolled or each of the five variants, one at a time. I won the first roll and was "first player" for terrain setup. I chose "Bleak Moor," which uses the standard setup method. I started with a large gentle hill in the center of the board, so my cavalry would have room to maneuver. Mike countered with a rocky area on my half of the table along the right board edge. I needed to place one more piece, so I chose a Marsh, but tucked it away on the far left hand corner of his baseline. He chose to move that piece a Medium distance closer towards the center, and so our battlefield was set.

Next, he won the deployment roll and chose "Vanguard." That meant we placed our troops in alternating groups, beginning with our mounted troops, then foot troops. He placed his elephant and mounted hearthguard and Tarantine mercenary cavalry on his left, facing the gap between the large hill and the rocky area. I placed my mounted hearthguard and warlord near my baseline, behind the hill. All subsequent troops must be placed within a Short distance of previously deployed troops. I walked my foot troops to the right, placing both foot warriors to the right of my cavalry, and finally the levy archers in the rocky area. Most of Mike's army ended up behind his mounted troops.

    I was worried about facing an Age of Hannibal army, as I'd heard their boards were very powerful
I won the next roll, too, and chose "Cautious" for game length. This meant our game would last only five turns (we were getting a relatively late start, and I figured that would help speed up our game). It also meant HE had to move first, and no unit could move more than one activation on turn one. I won the roll for "Special Rule," as well. I chose "A Dash of Nostalgia" because it meant his mercenaries would not generate a Saga die, and our warlords would generate two. Although it left him unchanged in total dice, it would give me one more. My Moors thrive on their maneuverability, so I could use the extra command dice. Finally, Mike won "Show of Force," which meant we'd be counting Survival Points and score bonus for getting a unit within a Medium of the opponent's board edge.

    Mike's Elephant had effective firepower with the "Eagle Eye" ability on the Carthaginian board
Mike opened the game by moving his elephant forward towards my archers in the rocky area. I noticed he had the "Eagle Eye" activated on his board with a Rare dice. Not only would this give him 4 extra dice in a shooting attack, it meant no cover bonuses for the target. Uh-oh. Oh well...there are 12 archers -- they can take a few casualties, I figured! I was surprised that he moved forward so aggressively with his four-man unit of mounted hearthguard, though. They were supported by a unit of citizen foot hearthguard, but I felt they were pretty vulnerable with an Armor of 4.

On my turn, I sent both of my 6-man mounted hearthguard units dashing forward. They tossed their javelins. Twelve shooting dice later, and extremely poor saving rolls by Mike, and his mounted hearthguard unit was eliminated. My levy archers tried to get in ojn the act and shot at the approaching elephant, but Mike had cleverly positioned a contingent foot warrior unit with range of them. With the "Blood Price" ability, he could push casualties inflicted on the elephant onto their "escorts." 

    
    The Moorish battleline prepares to advance against their ancient foes

The elephant lumbered forward into range of my levy with their composite bows. Their normal two dice were boosted to six with Eagle Eye and three of my levy fell, riddled with arrows from the elevated vantage point of the howdah. In the center, Mike saw the danger his foot hearthguard was in, so sent a citizen foot warrior unit forward to support them. However, Mike is an aggressive player, and saw that the hearthguard were also within a double move of one of my mounted units. Wanting payback for his dead cavalry, he ordered them in. I used his fatigue to raise my armor to 5. His rolls were poor, and the hearthguard were driven back with casualties. My Moors saved all but one of the hits he rolled, and were ready for the counterstrike.

Although I had my "Torrent of Iron" ability activated on my board, I guessed that I could destroy the Foot hearthguard with shooting alone. Majik waved his cavalry forward again. Javelins flew, and another of Mike's hearthguard units lay dead on the hillside. My levy were not having the same luck, though, and his elephant took only one fatigue from my sole hit (he considered it not worth playing Blood Price). My foot warriors, though, edged away from the elephant, making sure they were outside of a Medium + Short of the elephant. We were winning in the center, why jeopardize things with unreliable things like dice rolls?

    Majik Ibn Battuta al-Waqaa orders his cavalry forward to pepper the enemy with javelins

Mike began to furiously try to bring up the rest of his army, but the citizen foot warriors were exposed. On my next turn, I sent both units forward to shoot again, whittling down their numbers. I followed that up with a Torrent of Iron charge (my Moors signature battle board ability), which completely eliminated a third unit of the Carthaginians. On Turn 4, I switched targets to his elephant. He had advanced the pachyderm and crew towards my warriors, hoping to find someone he could charge (entering the rocky area to charge the levy he considered too dangerous with too little reward). 

    After each advance, Majik would pull back his cavalry and out of range of counterattack to rest up
The final volleys of the game flew. My levy, and both units of cavalry hurled their javelins at the elephant. He was out of range of his elephant escorts, and my multiple attacks quickly used up his Resilience. The great beast fell. At this point, Mike conceded the game, having only his warlord, the contingent warriors, and his Tarantine mercenaries (who had dashed back and forth, not sure where to commit themselves for most of the game) left to face my entire army. Unlike my last game, which I won with charges, this game my Moors triumphed with shooting. 

I know this was only Mike's second game with his Carthaginians, while I had played the Moors half a dozen times. So, he will get better with them. Still, I really like this army, and love the flexibility of my two 6-man, mounted hearthguard cavalry units. They can skirmish or be an armored fist. With Torrent of Iron inflicting a fatigue on the enemy unit when I close, it means I can raise my armor class from its vulnerable 4 to make them more survivable. I really look forward to playing more games with them!

    A look at the board at the end of the game

Wednesday, April 21, 2021

A "How to" Guide for Beginners for Painting Miniatures

Having painted miniatures for decades, I think some of us long-timers in the hobby forget how beginners may not know how to start painting. So, I decided to create this "How To" picture-heavy post in case it might be helpful for novices to see how one veteran, journeyman-level painter does it. We will be following painting a batch of 8 Dark Ages archers from start to finish.

Step 0: How big of a batch to paint?

When I began painting "armies" back in my teens (for Wargames Research Group Ancients rules), I thought that you should paint all of the figures at once. Over the years I have learned that painting all the flesh, all the armor, all the shields, etc., on dozens and dozens of figures can become mind-numbing. I know some people still paint that way, but I paint in batches. For 28mm miniatures, I usually choose 4-8 figures. Why that number? Well, I feel that is small enough that one stage for that many figures won't take too incredibly long of a session. However, it is more efficient than painting each figure individually. With acrylic paints, the first of the eight may be somewhat dry by the time you finish the eighth, allowing you to do multiple stages in one setting. I would certainly recommend beginners start out small, though.

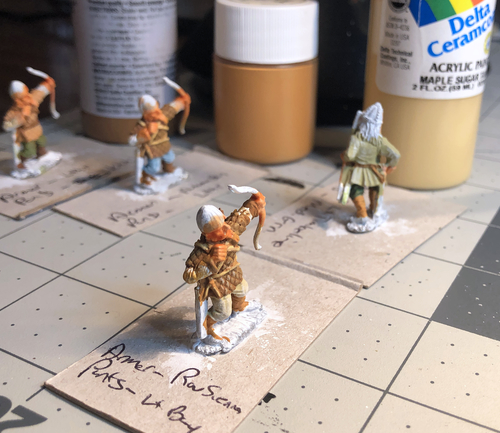
    The excess metal has been trimmed off with an X-acto knife and the figs are glued to cardboard
Step 1: Cleaning the figures and attaching them to cardboard

By cleaning, I don't mean scrubbing them or soaking them in vinegar (like was recommend many years ago). I simply mean taking an X-acto knife and trimming off the excess metal underneath arms, legs, etc. Also, scrape away mold lines (these may be particularly apparent on flat surfaces like shields). Once the figure looks like (you feel) the sculptor intended, I then use ordinary white glue and affix them to a cardboard square. Why a cardboard square? Well, it allows me to write down colors that I plan on using, or even draw a mockup of a shield or pattern I intend to use.

    The miniatures have been primed with white paint (note the planned colors written on the cardboard)
Step 2: Priming the figures

There are a number of ways you can prime figures. You can prime them with spray cans, or as I do, with brush-on paint or primer. Honestly, I use simple white acrylic paint as my primer. These gives the colors -- especially lighter, translucent ones -- a good base to shine. It also gives a surface for the paint to adhere to easier. I use a large, stiff-bristled brushed and essentially scrub the white paint on, as you can see above. You don't need a solid white look. Remember, this is just a base coat to help your later colors shine and to let the paint affix to it easier than smooth metal. NOTE: There are a number of very good miniature painters who prime with black, rather than white. They use a dry brushing method (discussed below) so that any recessed areas show through black as shadows. I have tried this method and don't like the results, but it is a personal choice. 

    My 8 Dark Age archers have their flesh tone base coat painted and darker wash applied
Step 3: Painting the flesh tone

Many people feel you should paint a miniature from the lowest, most recessed area and build outward. In most cases for minis depicting human beings, that's going to be the flesh. There are exceptions to beginning with the flesh. If a miniature is depicted with an overwhelming amount of surface area in one type of material (let's say a medieval knight in plate armor), I may do that area first, instead. This is especially true if only small areas of flesh are showing. It may be easier to do the big area first, and go back and do the flesh after it is done.

For my flesh, I use a simple Delta Ceramcoat acrylic craft paint flesh tone. If this is your first step after priming, don't worry if you slop it over onto some of the armor or clothes. You're going to paint over that. So, you can use a bigger brush and do it quickly, just make sure it gets into all the recesses and doesn't pool too thickly. Oh, and be certain what is flesh tone and what is pants, for example. It's annoying to discover later that the pants are actually the leg and have to go back and redo steps. 

Next, I paint a wash of a darker skin color over the flesh area to sink into the recesses (between fingers, in eye sockets, etc.). I create and mix up a bottle of this wash so that I don't have to remix it every time I do a batch of figures. I use a simple plastic bottle purchased from the craft store. Into that bottle, I empty an entire dropper bottle of Vallejo Matt Varnish. The next step is the tricky part. You take a darker version of the flesh color -- I use a deep orange -- and add it to the plastic bottle. My formula is 10 drops of the color to an entire one of the tiny matt varnish bottles. I recommend starting with less and testing it out on a figure. Once you have your recipe set, shake up the plastic bottle and simply paint it on. It settles into the recesses nicely and gives a nice shadow effect.

    Next step is blocking on the major colors
Step 4: Blocking in the Major Colors

Now, we're really painting! At this step, I paint in the pants, tunics, etc., on the figure. If the figures are part of a uniformed army, then it is easy to pick out what colors you're going to use. If they are more irregular -- like these Dark Age archers -- I will use a variety of colors. It makes it easier to keep track of everything and ensure no duplication if I write down what colors I'm going to use ahead of time. I often will use faded colors for poorer, ordinary troops and brighter colors for nobles or elites. So, it is good to have a variety of tones in a particular color. I easily have half a dozen more more of blues, greens, reds, etc. For these figures, I painted just the pants and tunics at this stage.

    An example of how I do a dry brush
Step 5: Dry-Brushing the Major Colors

So, new folks may or may not know what I mean by "dry brushing." At this stage, you are applying a lighter highlight to the major colors you blocked in above. For example, if you painted a tunic a pine green, you may do the dry brushing in a light or pale green. Khaki is a great highlight for medium browns, light grays for dark grays, and so on. If your base coat above was already a pale color, then white is always a good choice.

    If you look closely, you see the lighter highlights applied at this stage
So, how do you do it? Take a square tipped brush, as large as will work for the area you're dry brushing that won't cause you to slop it over onto every other areas. Dip it into the paint, and then scrape it across a paper towel or Kleenex tissue. I usually do this three times to ensure the bristles of the brush are coated with tiny amounts of paint. Take this brush and slide it lightly across the tunic or pants, aiming for the highest area that light would shine on - shoulders, knees, chest, back, etc. Dry brushing is a skill that you get better at as you paint more. Start lightly. You will need to replenish the paint on your brush, but always make sure you scraped off most of the paint with the towel. Too much on there and you get a big blob of the lighter color. If that happens, "erase" it with a clean brush and water.

    Now it is time for equipment like leather

Step 6: Equipment

Now it is time to paint some of the equipment - especially harder to reach things like straps, belts, and so on. I usually do a darker leather color as a base coat and a corresponding lighter one for highlights. Note that this isn't a dry brush. I paint this on full strength on top of the lighter color, leaving a solid outline of the darker color beneath it. I recommend picking out a palette of four to five leather colors, from a medium brown to a orange-like leather to a lighter tan. Arrange them from dark to light. Use the next shade lighter (or two shades lighter) for your highlighting, if that makes sense.

    Looking closely, you can see the lighter leather colors I have put in as highlights on the equipment

Step 6: Adding More Details

Next, you begin adding in bits of details. For example, I did the shoes or boots for the archers. There really isn't an exact order to doing this. You could easily save the shoes for towards the end. However, I consider it more like "clothes," so often do these before painting larger things like their bows, quivers, and helmets. Once again, I pick a darker base color and then dry brush a lighter highlight color.

    Start adding in more detail - here I have painted the shoes, boots, or leggings

    Shoe and legging highlights can be seen in this photo (hopefully!)

 Step 7: Weapons or Equipment (like quivers) and Hair

For the archers, I picked their quivers as the next part of the miniature to paint. Like I did with so much else on these figures, I also did a base coat and dry brush on these, too. I like to mix up my colors, too. Once again, if you are doing a uniformed army, you may want to make this equipment a similar color. However, for my Dark Age archers, I figured quivers are an individual piece of equipment. So, they can be a variety of colors, too - just the like the tunics, pants, etc.

At this stage, I also did the archer's hair. If historically accurate, I paint the hair colors in a variety, too. This can be a range from black to dark brown, medium brown, a mousey tan, blonde, and even auburn or orangish "red". Once again, I highlight the hair with a lighter color. Miniatures usually do a good job of giving strands of hair depth of carving on the figure, which makes it rewarding to dry brush.

    Here I have added in the base coat of the quivers

Step 8: Weapons

Continuing outward on the figures, it was now time for the bows. I use a medium brown even though I know bows or spears could be much lighter in color, too. For some reason, I like the look of brown wood. Like I did with the leather, I will do a full strength highlight in a lighter brown. I will put a line of this color where I think the light would shine on it. Same with spears. Less is more here, do just a couple streaks of color here.

    The bows were the next thing I painted on the archers

    Close up showing highlighting on the hair and bows

Step 9: Helmets, Sword hilts, etc.

I will often do helmets or sword blades or hilts towards the end of the painting. I recommend a two-tone approach here, too. My favorite base coat is Iron Wind Metals Steel. I paint the object in this color, and then either dry brush silver over it, or paint full strength silver or bronze. If bronze, I will even add in a tiny spot of gold as a highlight on top of that.

    The base coat of steel on the helmets of the archer

I think that at this point, beginners should get the picture of how I paint a batch of figures. However, I should touch on a few other points. Number one, I glue all equipment like shields or weapons on BEFORE painting. I feel the extra coating of primer and paint act as another coat of glue holding the equipment onto the figure while handling a game. If you glue a painted piece of equipment to a painted surface of a figure, it IS going to pop off. The only thing holding it on is the paint's adherence to the miniature, which is not strong enough.

    Washed, flocked and finished - my Dark Age archers!
After the figure is painted, I will usually give it a wash. Remember the flesh wash I described earlier. I do the exact same thing with brown and black. I mix up a bottle of brown wash and a bottle of black wash. Brown goes on flesh, light tans, and yellows. Black goes on browns, brighter colors like red, blue, and green. It also goes on any grays. I tend not to wash chainmail or other armored surfaces. I like them being brighter and not subdued. 

Once the figure is washed, I finally pop it off of its cardboard base. I then use either two part epoxy or tacky glue to affix it to its base. I use bases from Litko Aerosystems, but MDF or even plastic are good materials to use, as well. To affix the flocking, I first paint the miniature's base with a 50/50 mixture of white glue and brown paint. While it is still soaking wet, I dip the base in a tub of Fine Brown ballast from Woodland Scenics. Once this dries, I paint the base with a 50/50 mixture of white glue and water (which I keep pre-mixed in an old glue bottle). While wet, I dip the figure's base in a brown turf colored flocking from Woodland Scenics. 

    Another look at the flocking method I use, and the placement of the tufts and flowers
At this stage, I give the miniature it's first spray clear coat. My favorite brand is Testors Dullcoate, though a less expensive Krylon Flat clearcoat can be used at this stage. Once dry, I will paint on irregular splotches of full strength white glue. I sprinkle (not dip) the Woodland Scenics Blended Green Turf onto the glue. Once all the figures have their grass, I add in commercially purchased "tufts" of taller grass or even wild flowers. All that is left to at this point is one final spray of Testors Dullccoate, and the figure is ready for the tabletop!