Showing posts with label Ancients. Show all posts

Sunday, July 26, 2020

Count Drogo's Franks Drive Off Viking Raid

Count Drogo waves his banner, urging his Carolingian warband to attack the raiding Viking force
Jenny wanted to get some more practice with her new Viking Saga army, so we decided to take advantage of a Saturday evening with no plans and get in a game. I had been interested in playing Carolingians, so what better matchup for Vikings than their favorite punching bag on the continent? I had been close to buying figures for a Carolingian Saga army a couple times, but hadn't pulled the trigger. Maybe this would make me want to finally make the purchase...or not!
The Viking army deploys for battle, with its deadly 6-man hearthguard units in the center
I studied the battle board and read the Age of Vikings section on the army. The most unusual thing about this army is the Proelium aspect of its board. You can have 0-3 Saga dice in this section (one of each of the three faces of the dice -- common, uncommon, and/or rare). They remain there until you either play Combat Bonus (when you lose one) or play Vides, which allows you roll them and place them on your battle board. I never used Vides, which I see as a last-ditch attempt to repopulate the board before a potentially calamitous opponent turn. By turn 2, I had three dice in the Proelium section, and they remained there until the final turn when I used Combat Bonus and dropped to two.
Count Drogo plans an advance on the right headed by the warrior bows, while his center and left will echelon back
So what that means is your are playing with fewer command and control dice -- five instead of eight. However, it is worth it, I think, simply by the Ardor ability -- which allows you to move or shoot as many units as you have Proelium dice...and these activations DON'T cause fatigue. This would be a crucial part of my strategy in the upcoming game. I played Ardor all but one turn (the first), which means those three Proelium dice gave me three movement or shooting activations every turn. It seemed a fair tradeoff to me!
The Carolingian right wing - a unit of warrior bows in the woods, supported by a unit of foot warriors
Seeing how I needed to stock the Proelium quickly, I decided to go with small, standard sized units. I chose two 4-man mounted hearthguard units, two 8-man foot warrior units, and two 8-man warrior bow units, along with my warlord, Count Drogo. Why foot bows -- and especially two of them? Two advanced abilities on the Carolingian board, besides Ardor, jumped out at me immediately: Vinco and Potentia. Vinco allows you to inflict a number of automatic hits in either shooting or melee equal to half your Proelium (3 dice = 2 hits). Potentia allows you to reroll a number of attack dice in shooting or melee equal to twice your Proelium. Although some may see the potential devastation in hand-to-hand, I saw the potential for it to be very deadly with missile fire.
The Viking Levy prove resilient, and cause far more casualties (and take fewer) than Count Drogo had expected
What's more, the Domine ability allows the Carolingian player to trigger any Shooting, Melee, or Shooting Reaction advanced Saga ability a second time. So, yes, you can hit somebody with Vinco and two automatic hits -- in addition to what you roll -- a second time. What's more, since Ardor's actions don't generate fatigue, you can shoot the same unit twice and end the turn with zero fatigue! Now, perhaps you see why I chose not one, but TWO foot bow units. The question was -- would my tactic work? I had never used foot bows in Saga, and in fact, always scoffed at players who chose them. Eight guys that fire with only four dice? What a waste! Take Levy that fire with six dice for the same points, right?
Things begin to unravel on the right as the Viking hearthguard exact revenge on the depleted warrior unit
Jenny and I were playing Clash of Warlords, and I deployed first. Our battlefield had two medium sized woods on either flank, a gentle hill in Jenny's half of the central sector, and a farmer's field with crops in between the center and right. I concentrated my two bow units on the right where her own Levy archers were located hoping to overwhelm them and drive them off. My foot warriors were placed in support of their bow brethren, and the mounted hearthguards in the rear in reserve.
Things aren't much better in the center where another Viking hearthguard unit has killed half of the supporting warriors
We began a slow advance on the right, while keeping back our center and left in echelon. My archers on the far right entered the woods for cover from Jenny's levy bowfire. Jenny took the first shot and it was a good one -- killing two of the warrior bow in the woods. Our return fire on the next turn did little, even with tossing in Vinco and Potentia. She had lost only about four figures out of 12 -- hardly devastating. My backup plan was for a foot warrior unit to charge the levy, who had moved into the field for cover from our archery. The warriors charged and drove the Viking archers out of the field, but at a stiff cost -- we lost three figures. She lost only another four figures, and my depleted warrior unit was in danger of being countercharged by one of her large, 6-man hearthguard units.
The Viking hearthguard appears unstoppable, slaughtering Frankish warriors and chasing the Carolingian bow
Jenny saw the opportunity and took it, slaughtering the remaining warriors to a man. Things were beginning to unravel on the right where I was attacking in force! I have learned that in Saga, the dice are fickle. Momentum shifts. Don't be discouraged -- if one method of attack is not working, try another! Jenny brought up here other 6-man hearthguard unit and charged my second warrior unit which had advanced in the center to support the archery. Luckily, we lost only four of eight this time, so the depleted unit was still generating a Saga die. However, this left the Viking hearthguard exposed in the center of the battlefield. My archers concentrated on them, with my full strength unit taking two shots and the one in the woods one shot.
But perhaps not! Archery fire depletes the center warrior unit, who are then ridden down by the Carolingian nobles
The Viking Huscarles had lost one of their number in the battle against my spear. They lost three more to the archery, leaving them with just two. That was enough to tempt the Carolingian nobles to charge. They galloped around the archers and smashed into the side of the remaining Viking hearthguard, eliminating them to a man. Perhaps Jenny had baited me just as I baited her with the foot warriors. She double timed her Shield Maiden unit into my mounted hearthguard, tossing in Thor, Loki, and a Combat Bonus Saga abilities into the melee. It was a bloody battle, but in the end, two of the maidens stood tall, while the four Carolingian mounted nobles lay dead at her feet.
The Shield Maidens charge, slaughtering the Carolingian nobles. It look grim, but can our archery save the day?
Jenny could have guessed what was coming next, though. More Carolingian archery, and soon the last of the lady warriors lay bleeding on the ground, pin-cushioned by arrows. Undeterred, she advanced her remaining hearthguard unit which had destroyed my warriors. However, I used their fatigue to shorten their move which meant their charge fell short of my bow unit in the woods. Half of the hearthguard unit protruded from the woods. Once again, Lord Drogo ordered his archers to loose their hailstorm of arrows and soon all of the Viking elite warriors lay dead.
Had this charge struck home, the answer probably would have been no, but a fatigue caused them to fall short
At this stage, Jenny was left with only one 8-man warrior unit, two Levy archers, and her warlord. I had two units of warrior archers (13 figures total), one unit of 4 warriors, one unit of 4 mounted hearthguard, and my warlord, Lord Drogo. She decided that the day was lost, and withdrew her troops back to the far side of the hill. The Franks cheered at the departure of the raiders - they held the field and had driven off the feared Northmen!
Two turns of devastating Carolingian archery and all the Viking hearthguard and shield maidens lay dead -- victory!
We counted up the points and though it looked one-sided, 23-13, the score did not reflect how the Vikings were winning through the early part of the game. If her Shield Maidens and remaining hearthguard unit had been able to shrug off our archery, things would have ended fairly differently. Did my strategy work? Definitely. Ardor more than makes up for keeping three of my Saga dice in the Proelium. The deadliness of Vinco and Potentia ensured my archery fire was effective. All in all, I feel the Carolingian list is a very deadly one. Now, I admit things would have been different if Jenny had used the Odin ability on her Saga board. She chose not to do so on the first turn, and then didn't roll the proper symbols on the second turn. By the third turn, she was seeing the need for melee abilities to follow up her successes. By the fourth turn, she had lost too many units, and couldn't afford to use Odin, or didn't have the rolls. So, we were fortunate with how it worked out. A forewarned opponent may not be so obliging at letting the Carolingians riddle them with arrow storms. Still, I look forward to having Count Drogo ride forward into battle again, and see if we can follow up our initial success.

Friday, July 24, 2020

Banners and Bases

A new banner created for a preivously-painted Pictish spearman
While I continue to paint my first Andalusian mounted unit for my Saga Moorish army, I thought I'd do a quick blog post on some other banners I recently made and my new flocking scheme for the Moors. I have to admit that I have had a variety of flocking schemes ever since I stepped past the "paint the base brown and put green flocking on it" stage.
Here's the latest. Step one is to paint the base and its edges with a craft paint from Folk Art called 939 Butter Pecan. I wanted a color that reflected the arid land of southern Spain, but could also not look out of place for "desert" troops (since these are essentially Arab figures, after all). I know some may wonder why I bother to paint the base after seeing all the layers that are going to go on top of it, but I feel this prevents any base material from somehow escaping and peeking through when it is all finished!
Step two is to glue small rock piles in two places. I use Woodland Scenics Medium Buff Talus. I will dab the area with some white (PVA) glue with an old paint brush, and then use that glue-soaked brush to "pick" up 2-4 pieces of the tallus and move it to the base. I use the brush to arrange the rocks how I like and dab more glue some the pile is completely surrounded.
After the glue has dried, step three involves painting the base (but not the rock piles) with white glue. I then use a small plastic spoon to pour Super Fine Basing Grit (picked up at the local hobby shop) all over the base, tapping off the excess by flicking the bottom of the base with my finger.
After Step 4, with the Citadel Sand added -- not the rock pile at rear of base
Once this is dried, I paint the basing grit with white glue in step four -- once again, trying not to cover the rocks. If you get a little along the edges, though, it is fine. It makes the rocks look like they've been exposed by erosion and are peeking through the soil. Here is where readers can help me. I am looking for a new container of my next flocking material as this one is almost empty. Yes, I know it is old, but it is Citadel Sand. If anyone knows where I can get more of this, please let me know. Or if you have a spare container, I'd be willing to buy it off of you. Like with the basing grit, I pour this over the white glue with a small plastic spoon, tapping off the excess. It is usually after this stage that I do my first spray of clearcoat -- I prefer Testors Dullcoate.
After Step 5 with the grass and tufts added
Step five once more involves white glue -- seeing a trend here? I paint two irregular shapes on the base on opposite sides, covering anywhere from 1/3 to 1/2 the base. I then sprinkle Woodland Scenics Blended Green Grass onto the base, tapping off the excess, again. While that is still wet, I apply two tufts to the base of foot figures (I will use more for the upcoming mounted figures). One tuft is a darker, mottled gray green like you would see in plants in an arid climate. The other is a brownish-red tuft of dried out vegetation. There are so many different makers of tufts and I have them from several sources, so if you are following my method, use which ones you have available.
One of my Moorish spearmen with his base completely flocked and Dullcoated
Once the tufts and green grass is dry, I apply one final coat of Dullcoate. Believe it or not, I am not actually done at this stage. The final step, six, involves me trimming the tufts with small sharp scissors. Sometimes "hairs" of the tufts are sprouting off in wild directions or are too long. I trim these to give it a more uniform appearance. One final tap and blowing on the base to dislodge those trimmed hairs and the flocking is finally complete!
My Pictish spear unit's banner created in Photoshop
I created two new banners in Photoshop when I was doing the banners for the second batch of Andalusian spearmen (see my previous entry). I create these by finding images with Google searches to use as my base. I usually add the word "clipart" to the search, so for the Pictish banner I used "Pictish" + "symbols" + "clipart." I thought it would be fun to use a Pictish deer because in Saga, the rare side of the command dice (the "six", so to speak) is a stag. I paste the image into a new photoshop document set at 300dpi and with a transparent background. I then use the Quick Select Tool (sometimes called the "magic wand") to select white or black areas of it. I change the color of those areas in Photoshop to color the banner. Once the banner is done, I copy it, paste it into a new document and "Flip Horizontal." This gives a reverse image of the original, and I combine the two together into a new banner.
Shield maiden with banner by me, figure painted by Ted Bender, shield done using decals, I believe...
I had decided to add a banner to one of my large Pictish spear units because I saw how useful they could be playing against Jenny's Shield Maidens in her Viking army. Since none of the six figures in the unit had a banner, she chose a likely spear-armed one and I created this banner for it using Photoshop. I probably should have made it larger, but I was going by her specifications. I will include the base images in case anyone wants to use them.
My banner for Jenny's shield maidens -- yes, the Viking runes say "Woman Power!"


Tuesday, July 21, 2020

Moorish Spearmen - Second Batch Finished

My second batch of Gripping Beast Andalusian spearmen for my Saga Moorish army
I was so excited with how the first batch of Andalusian spearmen for my Saga Moorish army turned out that I went out and bought more paints! I am doing most of the robes in pale, almost silk-like colors. There were a few colors were I simply didn't have a paler version in that tone, or I wanted a more medium shade than the pale color I did have. So, I stopped by JoAnne Fabrics (who carries the Delta Ceramcoat craft paints I use for most of my colors) and picked up four new colors to use on this batch.
This batch of eight figures included two bannermen - and no, that banner isn't hand-painted!!
The first things I noticed when I got the eight Gripping Beast Moor "Hashdid Warriors" out to clean them up was that two of them were actually standard bearers -- not ordinary spearmen. They had both hands gripped on the place where you would add a spear with no weapon or shield. Okay. Nothing wrong with that! Banners always make an army look more impressive on the tabletop! The Gripping Beast Moors clean up easily and have very little flash. As mentioned in my first post on the Moorish army, these figures have the shields cast on and open hands for you to put in a wire spear. And that's the way I like it! No drilling out fists that are too small to hold a weapon and break apart. No epoxying anything together other than the spear in their hands -- woo-hoo! Makes my job easier, as I am super glue challenged. To ensure the spears have a firm attachment, I glue the figures to the base first so that they have two points of contact -- the hand and the base.
The overhand jabbing or throwing post is different from the rest who hold their spears resting on the ground (base)
However, the batch of eight also had two who were in a throwing or jabbing overhand pose. That meant the spear could not be attached to the base and would have only one point of contact - the right hand. Hopefully, this would be enough and I wouldn't have them popping off. In addition, I glue the spears on first before priming or painting. I figure all those layers of paint are just like extra layers of glue.
This pose had a different shield than the others (North African, I would guess), which were mostly tear drop shaped
Once all figures were cleaned, epoxied to their base, and spears put in, it was time to prime them. Unlike most other painters ( I think?), I don't use a spray primer. I brush on ordinary white paint with a thick brush as primer. I have tried black priming and simply haven't mastered the art of painting over black prime. The only thing I consistently prime black are buildings and terrain. I think the white primer makes it easier to see the details and doesn't require additional coats to cover when using lighter colors.
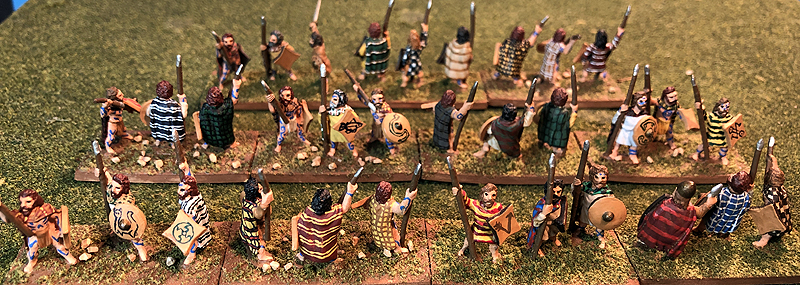
The robe and cloak patterns of my second batch of Andalusian spearmen -- two of my six army points are complete!!
The next step was to sit down with a Post-it Note and figure out what I wanted to do for each figure's robe pattern. I labeled the base of each figure A through H, and made corresponding sections on the note. Some of the patterns I'd used on the last batch I used again (but with different colors). I also came up with some new patterns for this batch. I have to tip my hat again to my friend Joe, aka Neldoreth of An Hour of Wolves and Shattered Shields blog fame. His gallery for his Moorish army was my primary inspiration. Of course I used my four new colors -- a pale, almost turquoise blue, a light terra cotta orange, a pale pink, and lavender. I am a big proponent of planning what you want to paint beforehand. Normally, I glue my figures to squares of cardboard which are marked up with colors for tunics, cloaks, paints, etc. Since the Moors are glued to their actual 1" square bases, I don't have the room, so fall back on a Post-it Note.
This spearman exemplifies the "medium" leathery shade and highlights rather than drybrushing I did on the skin
Another thing I do differently on these Gripping Beast Moorish spearmen than usual is NOT paint the flesh first. I actually do the robes first, because I dry brush the robes and it would be a pain to make sure that doesn't slop over on the skin. After the robes are dry brushed, I paint the flesh. I really do need to get a better brush for my dry brushing. I have one incredibly tiny one, and one rather big brush for this technique. I need a medium sized one. I prefer stiff, square cut brushes for dry brushing, and the last time I was at Michaels I simply couldn't find an acceptable medium sized one. Time to get off my lazy butt and find another one!
This is the lightest flesh shade of the three I used on my Cosmopolitan Andalusian army
On this second batch of spearmen, I simplified the flesh tones down to three. I got rid of the lightest shade I'd used on the first batch, and went with a medium brown, leathery color, and light tan. I decided to try highlighting the flesh rather than dry brushing it with this batch. In this case, I use the next shade lighter and brush it on in a watered down consistency on the nose, cheeks, knuckles, and other high points. I do like how the skin turned out better on this batch, so will probably stay with this method for the Moorish army.
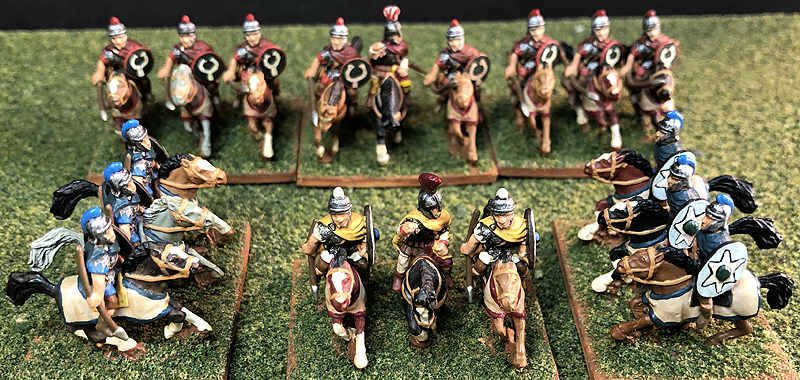
Two of the poses had cloaks in addition to the tunics, so I would paint one with a pattern and the other with a border
The most time-consuming part of painting these eight figures is applying the robe patterns after the base coat is done and dry brushed. I use my lighted magnifier and tiny, golf pencil sized brush and spend several hours on this stage. I need to take a couple breaks, as my back gets stiff nowadays when I paint too long. I was really happy with how the patterns turned out. I tend to do about half with patterns over the entire robe, and the other half with fancy borders on the hems, cuffs, and sometimes neck. Not only does this give variety, it also cuts down on the number of time-consuming patterns I have to paint! The bordered hems tend to look very nice -- every bit as good as the dots I used for the patterns.
I like the way the decorated hem borders look, too -- between them and the patterns, they give a nice varied look
I also made it a point on this batch to plan to paint some turbans in contrasting colors to the robes, and others the same color as the robes. This adds to the color of the army, and variety. The next step after the robes and turbans was to paint the colored sash that these Moorish figures have in lieu of a belt. At this stage, I like to line up the figures, open up my paint drawer, and look at the figures and say, "Hmmm...." Once I choose a paint I take it out of the drawer and sit it behind that figure in line.

Another thing I like about these Gripping Beast figures is they have a minimum of equipment, which cuts down on painting time. My 28mm Native Americans were festooned with so much equipment that it seemed like I would never finish a figure! These are much more clean -- some figures don't even have a knife or sword...just their spear.
The six shield patterns I painted for this batch -- I am pleased with them, for the most part
The second-most time consuming step is the shield patterns, of course. I pull out another Post-it Note and label boxes for each figure. I will usually take a break at this point and go online and look at various Google images for inspiration. Or Neldoreth's gallery, though with this batch, I leaned on his shields less heavily. Some may wonder why I don't use decals for the shields. I know I should probably give them another try, but my first go at using them was a miserable failure. So, in general, I hand-paint all my shields in every army. I guess it is a badge of honor if it turns out nicely, but it DOES take longer. I was very happy with how the six (yippee...two standard bearers with no shields meant two less to shields to paint!) turned out. My favorite is probably the green shield with black stripe containing Arabic calligraphy -- although the rose looks nice, too.
Photoship and Google Images are my friend when it comes to creating my own banners for my armies!
Once the shields are done, I'm heading towards the wire with the only thing left being the spears, sword and knife sheaths, shoes, and...oh, yeah. The banners. Haha...payback time. So, here's how I do banners. I unabashedly use Google Images and Photoshop to create them on my laptop, then print them off on heavier weight paper at the local office supply store. Sometimes I will find an image I can rip off, er, I mean use "as is." Most times, I create them myself, often with a base black and white clipart image I downloaded. For these two, I did a little research on the excellent Flags of the World website, which not so usefully told me the Andalusian banners were probably "green and white."

I decided rather than a simple, boring half-green, half-white flag that I would use a zig-zag pattern and a band at the top and bottom with Arabic calligraphy. I always tell my students who are struggling to find something they can draw to add the word "clipart" to their search. Following my own advice, I came up with a cool template for my banner. The second banner I decided would be more ornate. I Googled "Islamic patterns" and found a really cool background image. I added in a black and white central scroll with more Islamic calligraphy. It took me about an hour to do these two images in Photoshop, then I export them (correctly sized)  to a flash drive.

The banners are cut out with scissors and then one side of them is painted with white glue and wrapped around the spear. At this stage I mold it into the curve of "flapping in the breeze" shape I want. Once it is dry, I paint the white edges of the trimmed paper in the border color. While I was at it, I also decided to do another banner for my Pictish spearmen and (because I am a nice guy) a banner for Jenny's Viking Shield Maidens. Incidentally, her banner took as much time as the other three combined, but I'll save them for another post. I will also do another post about the flocking look that I am using for this army. In the meantime, I hope you enjoyed my long, rambling post and the pictures of my second batch of Moorish spearmen! Stay tuned for more!!


Sunday, July 12, 2020

Armies for Sale! 15mm Ancients

The best 15mm Ancient army I ever painted -- my Caledonian/Pictish -- is one of eight that I have up for sale
I have decided to clean out my inventory of painted 15mm Ancient and Fantasy armies. So, I am listing them here rather than making individual posts on various forums or Facebook pages. Hopefully, it will make it easier for potential buyers.

Prices are listed with each army, though feel free to contact me if you want to "make a deal"...ha, ha! This is especially true if you are considering buying multiple armies. You will be responsible for paying for shipping, of course -- but I will not gouge you on that, I promise! I will box the miniatures up sturdily and charge you only what I paid at the post office. I live in Columbus, Ohio, if you want to look ahead of time and see an estimate of what shipping may cost. I prefer PayPal for payment, though could do Apple Pay or other online forms. Contact me by email here:
mikedemana@earthlink.net

Ancient armies are listed on this page, my Fantasy armies (built for Hordes of the Things rules) on another page.

Here are the list of armies I have for sale, listed alphabetically.
  • Avars - SOLD!
  • Briton/Celtic
  • Caledonian or Pictish
  • Early Byzantine - SOLD!
  • Germanic Barbarans (Franks, Saxons, etc.)
  • Huns - SOLD!
  • Persian - Parthian & Sassanid  - SOLD!
  • Vikings - SOLD!

 Avars - SOLD!

$90 (19 stands)
- 7 stands of heavy cavalry (3/stand)
- 12 stands of light cavalry (2/stand
)

7 stands of Avar Heavy Cavalry
12 stands of Steppe Light Cavalry usable for an Avar or other similar army

 Briton / Celtic

$82 (18 stands)
- 8 stands of heavy cavalry (3/stand)
- 4 stands of light cavalry (2/stand)
- 6 stands of warband (3/stand)

8 Stands for a Briton/Celtic army - painted to be used as post-Roman period Britons
6 stands of warband-style Celtic foot -- could also be used as Gauls

4 stands of Briton light cavalry
  

 Caledonain or Pictish

$174 (49 stands)
- 7 stands of light chariots (2 horse, drive, warrior)
- 2 stands of heavy cavalry (3/stand)
- 8 stands of light cavalry (2/stand)
- 23 stands of warband (3/stand)
- 8 stands of skirmishers (2/stand)
- 1 DBA camp

7 stands of Pictish, two-horse light chariots
8 stands of Pictish light cavalry
2 stands of Pictish heavy cavalry plus one stand DBA camp or baggage element
The first half of the 23 stands of Pictish warband
The second half of the 23 stands of Pictish warband
8 stands of Pictish skirmishers -- half bowmen, half Pictish crosswbowmen


Early Byzantine / Late Roman - SOLD!

$114 (28 stands)
- 8 stands of heavy cavalry (3/stand)
- 4 stands of light cavalry (2/stand)
- 6 stands of legionaries (4/stand)
- 6 stands of Anatolian/Slav auxiliaries (3/stand)
- 4 stands of skirmishers (2/stand)

 
Command stand and Byzantine lancer heavy cavalry (that's dust from the tissue I keep the command stand wrapped in!)

6 stands of Byzantine/Late Roman heavy cavalry

4 stands of Byzantine / Late Roman light cavalry
6 stands of Byzantine / Late Roman legionary heavy infantry
4 stands of Byzantine / Late Roman skirmishing foot
6 stands of auxillary Anatolian Slav foot

German Barbarians (Franks, Saxons, etc.)


$211 (53 stands) -- I will split off and sell by half or third
- 12 stands of heavy cavalry (3/stand)
- 6 stands of armored heavy foot (4/stand)
- 20 stands of heavy foot (4/stand)
- 5 stands of Germanic foot archers (3/stand)
- 10 stands of skirmishers (2/stand)

The first half of the 12 stands of Germanic barbarian cavalry
The second half of the 12 stands of Germanic barbarian cavalry
Four of the 20 stands of Germanic barbarian foot
Six of the 20 stands of Germanic barbarian foot - here are the armored, heavier ones
Five more stands of the 20 stands of Germanic barbarian foot - noe the Frankish topknots and throwing axes
The remaining masses of the 20 stands of Germanic barbarian foot
10 stands of German archer skirmishers

Huns - SOLD!

$84 (17 stands)
- 5 stands of heavy cavalry (3/stand)
- 11 stands of light cavalry (2/stand)

- 1 DBA camp or baggage element
5 stands of Hun heavy cavalry
11 stands of Hun light cavalry
1 baggage element or DBA camp for Huns or other steppe army

Persian - Parthian & Sassanid - SOLD!

$168 (36 stands) - I will split the Parthian and Sassanid portions and sell individually, if requested
- 11 stands of armored cataphract cavalry (3/stand)
- 11 stands of light cavalry (2/stand)

- 1 Elephant stand with crew
- 2 Eastern Levy Hordes (7/stand)
- 6 stands of tribal foot (3/stand)
- 4 stands of skirmishers (2/stand)

- 1 DBA camp or baggage element
5 stands of armored Parthian cataphract cavalry

6 stands of Sassanian Persian cataphract cavalry
11 stands of Persian or Asiatic light cavalry

6 stands of Asiatic tribal foot
2 stands of Eastern Levy hordes and 4 stands of Eastern skirmishers
1 Elephant stand with crew and one DBA camp or baggage element

Vikings - SOLD!

$66 (22 stands)
- 19 stands of Viking foot (3/stand)
- 3 stands of Berserkers (3/stand)


First half of the 19 stands of Viking foot - including a uniquely based element you can use as a command stand
The second half of the 19 stands of Viking foot
3 stands of Viking Berserker foot