 |
Some 3-D printed zombies pick through scatter from my Terrain Crate uber box - Campbell Heights
|
Since painting the
first batch of 3-D printed zombies recently, I thought I may as well do a second batch while how I did them was fresh in my memory. They are the same 10 poses as before, but I tried my best to change the colors so that they weren't identical. Also featured in this entry are a handful of urban scatter that I picked up at a flea market a year and a half ago. They are from the
Mantic Games Terrain Crate line. I had been wanting to get them ready for the tabletop for months, and finally got around to prepping them a few weeks ago.
 |
Flea market purchase 'Campbell Heights' Terrain Crate contains tons of modern scatter!
|
All the pieces are from the
Campbell Heights mega box that I bought from my friend Bryan's flea market table. The huge box contains the Crystal Peaks Camp, Abandoned Office, Two Trees Mall, and Survivor's Stronghold boxes. After picking it up and looking through it, I remarked that I should be set for quite awhile on scatter! If you're looking for similar things, Terrain Crate items are available in just about every hobby store, nowadays. They're made of hard plastic and I feel they paint up nicely. With this batch, I wanted pieces that I could use as location markers where players might find salvage in either my post-apocalyptic campaign that I've been running or upcoming
County Road Z games.
 |
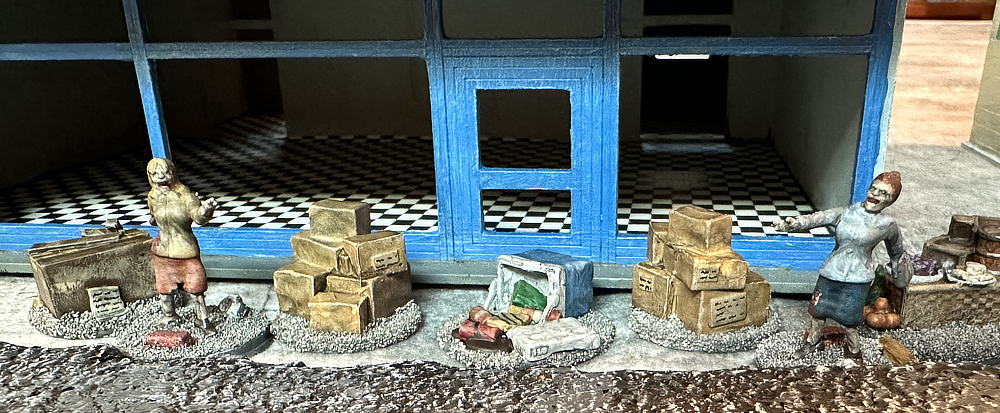
Piles of boxes, crates, and picnic items were just some of the many things I picked up to paint up
|
With both the scatter and the 3-D zombies, I spray painted them black first with Krylon Fusion matte primer. I followed that up with a 50/50 mix of acrylic black paint and water. Especially on lighter shades, the black shows through a bit, and has the overall effect of "toning down" the colors. I like how this gives it a bit of a dirty, abandoned look. All of the pieces received a dark black (or for a couple, brown) wash to dirty them up even more. I'd picked out the pieces from the mega box that I thought worked well for piles of potential salvage, or pieces that will look good in a variety of modern-esque games.
 |
I thought the small propane tank and trash bin were clever items, so were definitely ones I picked out
|
I'd already picked through the set last August for the really small pieces of scatter, such as backpacks, med kits, briefcases, and small boxes of canned goods, etc. I don't think I ever did a post including them, so I found the pictures I took and am including one of them here. I wanted them for my post-apocalyptic campaign, pieces that I could set up next to the figure who had grabbed them. I particularly like the backpacks and the briefcases/medkits.
 |
The smallest scatter from the Campbell Heights box that I picked out and painted last August
|
When figuring out how to paint some of the various items, I reverted to what I currently own or have owned. The large cooler was painted blue and white (just like the one in my basement, now). The tackle box atop the styrofoam cooler was green and tan like one I have somewhere around here. Of course, the gasoline can was red.
|
|
|
 |
I actually have a large cooler like the blue and white one and a tackle box like the green and tan one
|
All of the pieces of scatter were glued down on various round or rectangular bases I had laying around. Some were plastic, some MDF, and others birch wood discs I pick up at craft stores. I flocked them like I have been doing the zombies, though without the added details. I chose bases so each piece of scatter barely fit on it -- mostly to give me something to hold onto while painting. I think the mixed gray ballast with a black wash over it looks fine, and blends into the tabletop.
 |
| Boxes and crates were easy to paint -- I added scribbles as writing on the paper labels |
Probably the easiest to paint up were the cardboard boxes. I used a darker tan with a dry brush and wash. I painted the paper labels affixed to the boxes a bone color and used a black Micron pen to add scribbles to simulate writing. I was tempted to add Amazon swooshes but figured Billionaire Bezos didn't need any more advertising from me...ha, ha! Plus, that would "date" the boxes and I wanted this modern scatter to be as generic as possible. The wooden crates were easy, as well, and I followed my usual wood recipe for base coat, dry brush, and highlight (followed by a black wash).
 |
Close up of the 'picnic' scatter, along with a tumbled cooler and the gas tank and rubbish bin
|
I found that the more colors involved in painting up the scatter, naturally the more time they took. The tumbled small cooler probably took the most time of any of the pieces. I wanted to paint all the different packages a jumble of colors so that it actually looked like things from a grocery store shelf. The wicker box with the preset picnic is fairly unrealistic, of course. All the food would have long since rotted away in most of the game settings. It looked fun, though. So, I painted it up as if just set up and the picnickers had stepped away for a moment.
 |
The pile of duffel bags & cooler in the middle were nice, I thought - perfect scavenge material
|
The ultimate goal of painting up this scatter was to use as objective markers in my post-apocalyptic or County Road Z games. To that end, I really liked the pile of duffel bags and cooler, above. It was the last piece in this batch and unfortunately I feel I was rushing it to get done. The straps could have been done a little better, I think, and given some highlighting in a lighter blue. Oh well -- considering how much attention they'll actually get on the tabletop, that's probably not something to beat myself up over!
 |
Do you dare risk fighting the zombies to pick up this freshly-painted, Mantic Games scatter?
|
I am going to take a break from scatter and zombies for my next batch. I'm not 100% sure what it will be. Likely choices include painting two Saga warlord stands to donate as prizes for the upcoming Origins tournament. Another possibility is begin working on the vehicles my players will be using for their County Road Z "road trip" across America. With this batch of zombies, I am now back in the "plus" side of Painted Miniatures vs. Purchased. Woo-hoo! And that's not even counting scatter terrain or similar things...!
 |
The scatter will be used in more than just post-apocalyptic games - it will work for any modern ones
|
Miniature Painting & Purchasing Tally for 2024 - Miniatures acquired in 2024: 64
- Miniatures painted in 2024: 67


Really good work on this batch of zombies, they really look the part, and the scenic scatter is very well done and loads of it too!
ReplyDeleteGreat job on the terrain. You should try some Warlord/Wargames Factory zombies for variety.
ReplyDeleteCompletely off topic question... but did you ever publish your addenda for Tanks, planes, helicopters and the like for Wars of Insurgency?
ReplyDeleteBest Regards,
Arrigo Velicogna
Hi Arrigo! I replied to your LAF message. Feel free to email me and I will send out my latest draft of helicopter and fixed wing rules. Donnie and Jason -- thanks a lot! I am afraid I may have pigeon holed myself into using these 3-D prints. I think they are going to be too small to mix with other manufacturers for variety. I *may* decide to use the small ones I have painted up as "Passive Zombies," and new (larger) ones I paint up as the Aggressive ones. In County Road Z, zombies usually start in passive mode and then switch when triggered by player activity.
ReplyDelete