Saturday, February 15, 2014

Snowed in? Build a temple! (Part 5 - finished!)


At 10 inches tall, this temple is definitely the centerpiece of a gaming table
So, the big temple is now complete. I have to say that I am very happy with how it turned out. This build has to be up there with my Dark Ages Saxon church as one of my all-time favorites.  Is it my best work? Not sure...but it is certainly not my worst!
Some of my 28mm Pulp figures gathered around the entrance to the temple
All patting myself on the back aside, when I left off in the last article the temple outside was complete. All that remained was the flocking and the interior. I painted the styrene base with white glue and poured medium ballast over the glue as a first coat. Then, I painted the ballast (when dry) with a mixture of white glue, water, and brown paint. I poured sand over it while still wet. Then I painted straight white glue in large patches, sprinkling this with Woodland Scenics blended green turf. Once it had dried, the areas left brown I painted with 50/50 white glue and water and sprinkled lightly with Woodland Scenics brown turf. I added three different colors of clump foliage here an there, as well as some wire plants, flowers, or bushes.
Eric Bylan and his native guides investigate the rear of the grand temple
 At this point, I had a decision to make: Do I flock the roof to represent plants taking roof up there, as well? I went back and forth on the idea, and finally decided to do it. First, I painted the area with straight white glue and sprinkled on blended green turf. I then followed it up here and there with clump foliage atop the green. I even added a couple flowering plants or bushes on top of that. Once everything was dry, I sprayed it with Testors Dullcoate, and then followed that up with a 50/50 white glue and water. I am glad I decided to flock the roof. I think it adds that extra bit of "lost in the jungle" feel to the temple.
Looking down at the roof of the temple -- I think the flock added to the roof really makes it appear like it as stumbled upon, hidden deep inside of a jungle
 For the interior, I downloaded some images from CG Textures -- a free website with great pictures of stone, brick, cloth -- you name it! I resized then in Photoshop and printed them out. I decided to have the interior of the temple made of reddish blocks of sandstone. The floor is an almost-mosaic like rock floor. Once they were trimmed to fit perfectly, I painted the interior with Ceramcoat Spice Tan (the same color as the base coat for the temple surfaces). That way, any join between the walls or floor that doesn't fit perfectly has a nice, dull background to blend it in. Once dry, I painted it with a thin layer of white glue and affixed the images of the walls and floor. I know the images look less three dimensional than the outsides, but I think they look nice as interiors. I used the same technique for my other temples, as well as the interiors of the jungle huts. Using these images is a quick, easy, and nice looking way to finish the interiors of buildings.
The interior of the temple, which is simply covered with images printed off in color and glued to the inside walls
I'm not 100% sure my pictures do the temple justice -- it is simply so large of a build. Its final measurements are about 7" wide, by 5" deep, and 10" tall. As I mentioned earlier, the roof comes off, and the second story and stupa atop the roof come off the roof, as well. This makes it easier to store, of course. So, with this build, I think I am done with Southeast Asian temples for awhile. If I do anything else, they will likely be small stupas to place here and there to fill out a larger board.
A closeup of the false second story, which is detachable and lifts off of the roof for easier storage
I hope you enjoyed the series of entries detailing its work in progress! Feel free to leave a comment, or ask questions...! Thanks.

Monday, February 10, 2014

Snowed in? Build a temple! (Part 4)

The build is essentially complete after this stage. Only the flocking and interior need to be added.
 For some reason, I was really worried about this stage. I had a feeling that the styrene brick pattern would be difficult to paint and make it look realistic. I planned on painting the mortar a light tan color and then dry brushing the reddish-brown for the bricks. Just about all the dry brushing I'd done before typically featured a lighter color atop a darker one. This would reverse that, and I wasn't sure if my dry brushing would fill cover the mortar. I even read up some on painting patterned styrene brick on the Lead Adventure Forum. The advice I gleaned was to hold the brush at a 45 degree angle and to do successive lighter coats instead of bearing down and try to cover it all in one coat.
The styrene brick pattern was not nearly the pain to paint up as I worried that it might be!
The advice worked like a charm, I was relieved to discover. I painted the mortar the same shade as the highlight layer on the sandstone -- Ceramcoat Dunes Biege. I figured this might work with the eye to tie the color scheme all together. I let it dry overnight, and then sat down and began my dry brushing experiment. The advice also said to turn the pattern around and dry brush both "up" and "down." I was very pleased with how the color -- Iron Wind Metals Red Brown -- stayed inside the lines of the bricks, for the most part. I tried to do a highlight color atop it but it simply wasn't showing up. So, I decided to see what it looked like with an ink wash. Wow! It transformed it completely, and made it look so much more realistic, I thought. It really brought out the different tones I'd tried to do with fewer or more layers of red brown dry brushing.
Sand glued to the surface of the bricks represents the original outer surface of the temple which has fallen away in many places
I was so pleased with how it looked I almost abandoned my idea for the next stage -- attaching plaster to the brick walls in fragments as if most of it has fallen away. After staring at it for awhile, I decided to give it a go. I painted the surface of the bricks here and there in an irregular pattern -- covering maybe 25% of the surface, at most. I then poured sand across it, which stuck nicely to the glue. After drying for a few hours, I primed it black and let it dry overnight.
Another highlight of "Dunes Beige" was given to the columns and the top trim, as well as the Hirst Arts stone pieces
The next day, I replicated the sandstone color scheme with Ceramcoat colors "Raw Sienna," "Spice Tan," and "Dunes Biege." After completing this step, I decided to go ahead and do another highlight on select areas of wood trim and Hirst Arts pieces on the temple. They had gotten a tad darker than I wanted with the ink wash, and felt they needed to be lightened up a bit. I dry brushed "Dunes Biege" over the upper portions of the Hirst Arts stone pieces, the wood trim, columns, and finally, the guardian statues and their pedestals.

Only two stages remain in this build. The next will be the flocking of the ground around the temple. The final step will be to print off textured paper to glue on the inside of the temple to represent its floors and walls. Who knows? Maybe I'll even construct and paint up a Buddhist or Hindu altar to be placed inside. Either way, the actual construction part of this temple is now complete! Stay tuned for the final touches...!

Thursday, February 6, 2014

Snowed in? Build a temple! (Part 3)

Where I left off -- the temple black primed...but will those smooth surfaces look good once painted?
 As I sat looking at my black-primed temple, I realized I had been in too much of a hurry. I should have found a way to put brick on the sides of the false "second story" so that it better matched the main level. It looked cool, but once I started painting it, I had a feeling that the paper mache sides of the second story would look less than impressive. The best way to salvage the temple, I felt, was to give those sides some texture. I decided to give it a rough, sandstone look. Many of the temples at Bagan in Myanmar had a stone facing that has fallen off after centuries, revealing the brick core. So, the lower level of my temple would be exposed brick, but the upper level would be standstone.

I took white glue and painted all the exposed pieces of paper mache, as well as the entire roof except for the foam block that the paper mache box fit around. This included the tin bells and acrylic rod decorative railings and the mini-stupas on each roof corner. It did not include the Hirst Arts stone pieces or the statues, though. I then poured sand across the surfaces that had been painted with glue, which stuck on nicely, giving it a rough texture.
White glue painted on the smooth surfaces and sand poured over them to add texture
 I let it dry overnight. Then I watered down black acrylic craft paint 50/50 and painted it over the sand. I was really surprised how easily and thoroughly the watered down paint covered it, making it all black again. I had expected to have to fight to get the paint in the nooks and crannies of the sand surface, but the watery paint flowed well over the surface and into every bit of it. I'd been dreading this stage, but it was actually a breeze. In addition, this glue, sand, and paint coating has likely cemented the whole build together. I shouldn't have to worry about pieces popping off again.
A base coat of brown, with two dry brushes of "Raw Sienna" and "Spice Tan" have been applied at this stage
I pulled up my travel website to look at pictures of Bagan, again, to help me choose the colors. I decided to go with a brown base coat that had just a hint of red tone to it. I took a large, flat brush and wet brushed this over fairly thoroughly, but leaving some of the black undercoat showing through. The next day, I did my first dry brush of a Ceramcoat color called "Raw Sienna." It is an orangish-brown color. I followed that up with another Ceramcoat color called "Spice Tan." This is a lighter, more yellowish color, but in the same tone as the Raw Sienna. Finally, I did highlights with "Dunes Biege." The effect on the Hirst Arts stone pieces and the wood trim and columns was slightly different than on the sand, but they don't look jarringly dissimilar.
The final dry brush of "Dunes Beige" lightens the temple up considerably
The one thing I mulling over in my head is whether to do an ink wash over this. Looking at the stone pieces, columns and wood trim, I definitely feel a black ink wash would enhance how it looks. I'm worried that putting it over the sandstone parts will hide some of the layering of the four different colors, though. I'm also afraid it will darken it up too much. I will probably wait to make that decision until after I have done the brick surface, which is next.
A close up of the roof (which comes off of the main temple), and the false second story (which pops off also, held in place by the snug fit of the paper mache box around a piece of foam.
So far, I am very happy with how this temple is turning out. Architecturally, I think it is very sharp looking. I'm hoping once the brick is done it will "tie it all together," looks-wise.


Sunday, February 2, 2014

Snowed in? Build a temple! (Part 2)

A row of tin bells glued along the roof trim made for a nice, final architectural flourish for the temple
Not a whole lot new to report on the build, so far. I finished the "construction" phase of the temple by deciding upon what decoration I wanted on the roof trim. I'd glued a piece of wood with raised rectangular sections that looked perfect to have some decorative bead or architectural flourish on them. So, I headed down to Michaels craft store and perused through the bead aisle. Nothing really jumped out at me, so I kept browsing through the store until I came upon a pack of 30 tiny, tin bells. I measured them and they would fit in the rectangular areas of the roof trim almost perfectly. The only thing I wasn't crazy about was the tab with hole at the top -- doubtless meant to tie or hang them with. Then I got the idea to thread a tiny dowel through the lined up holes. It would make a perfect decorative railing. I stopped by Hobbyland for a length of acrylic dowel small enough to fit through the holes.
Close up shows the length of acrylic rod threaded through the lined up holes in the tab at the top of each bell
Once I got them home, I found out I needed to yank out the ringer to get them to sit flat. This didn't take long, and then I simply used Tacky glue to affix each bell in its row. First, though, I threaded them along their length of dowel and lifted them up as one to the trim piece. The long sides took 7 bells each, the short sides four. It worked like a dream, and I thought I was ready for the next step -- painting. However, I hit upon an unfortunate snag. I discovered, much to my frustration, that Tacky glue does NOT stick to styrene. At all. Whatever is affixed with Tacky glue pops back off at the first jostle. I had nearly every piece that had been glued to the roof pop back off. And the top molding on the lower level popped off on all four sides. Lesson learned. I scored up the styrene to try to give is some grip, and then re-affixed them with 5-Minute Epoxy. Hopefully, this will make them hold long enough that the layers of glue, paint, and texturing cement it into place!
The temple after being spray primed black, and then gone over with an additional coat of brush-on acrylic black paint
Since it was still relatively cold here in Ohio, I set up a large cardboard box in the garage to spray prime the three temple pieces. The first day that it got warm enough to do so, I sprayed each piece down with flat, black acrylic paint. After it dried, I then brushed on Ceramcoat black acrylic craft paint over the entire surface. And that is where I am, now. The next step will be to add some texture to the non-brick surfaces of the temple.

Stay tuned for more!

Monday, January 27, 2014

Snowed in? Build a temple! (Part 1)

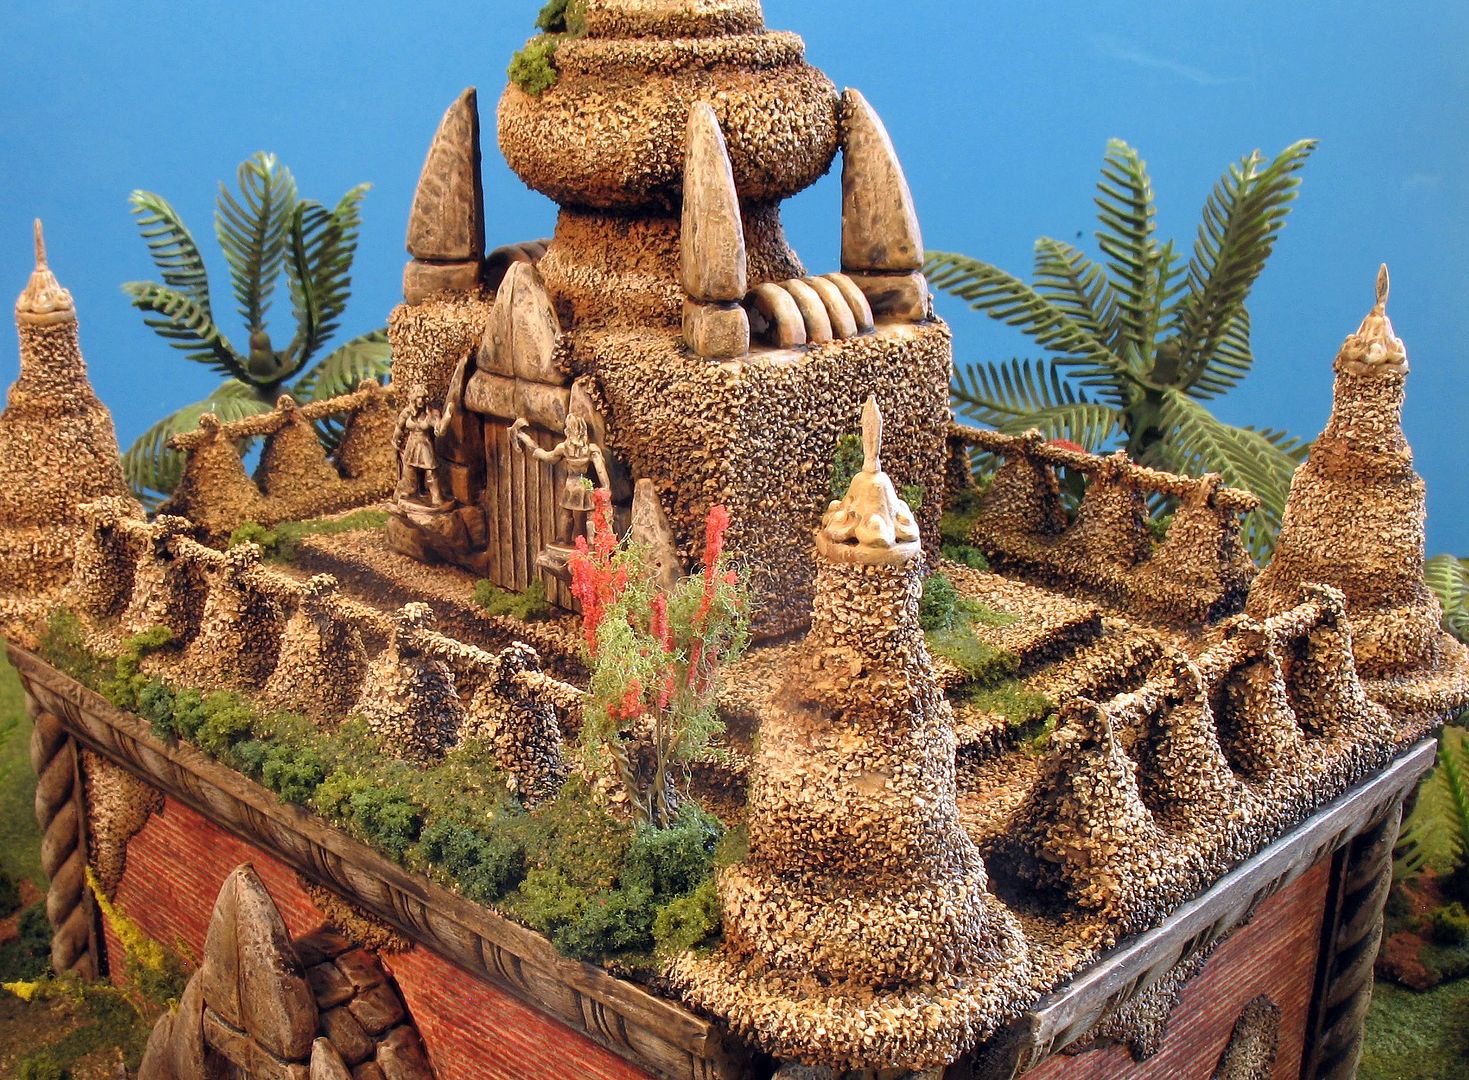
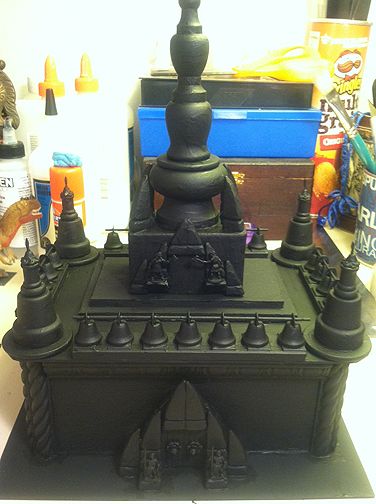
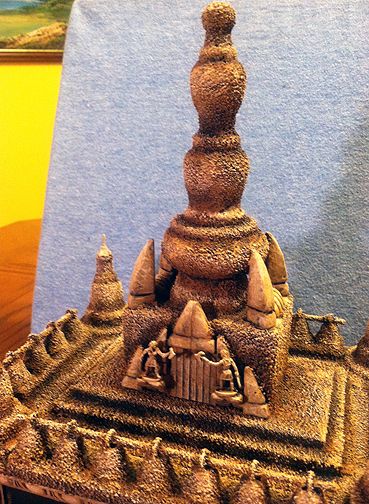
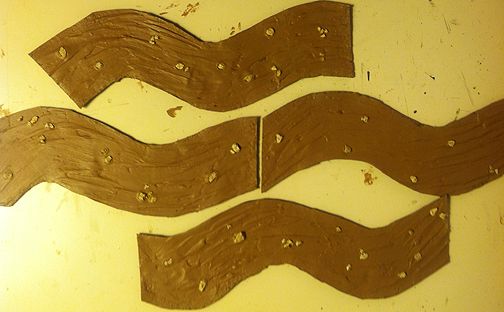
The big one -- at least as far as my Southeast Asian temples will go -- after two days of construction. The only thing left before painting is to find some sort of fancy bead to put along the roof edges inside those squares on the wood trim.
What do you do when snow cancels gaming, and the next two days of school? Why, build something as far away from Midwestern snowscapes as possible — a temple in the steamy jungles of Southeast Asia! I’d planned all along to build a big temple to go with the two smaller ones and the stupa I’d constructed last year. And I guess it was “next” in line for terrain I’m building for my 28mm Pulp games — Dakota Smith’s Oriental Adventures. So, as I sat around the house Sunday night moping because there was no gaming, I figured I may as well get started on it.
The walls of this temple would have a brick pattern, courtesy of a great find at Hobby Lobby!
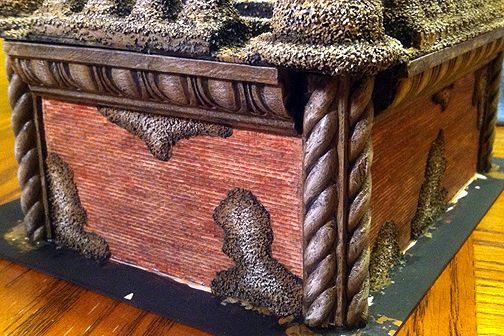
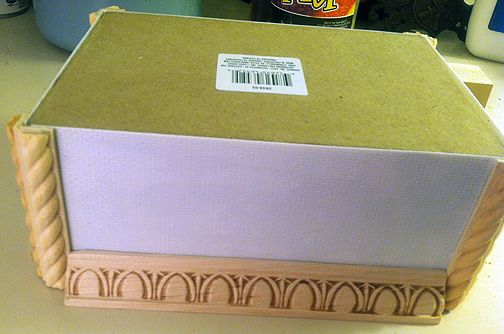
I had a 4”x6” paper mache box to use as the core of the temple. Unlike the other boxes I used for the temples, this one did not have a patterned surface. Instead, this was plain because I was going to give it brick walls. Many of the temples at Bagan in Myanmar (the inspiration for my temple complex) are made out of brick. The plaster or other surface has worn away on many, so when I visited the complex back in 2003, you see a lot of reddish-orange brick. What’s more, I’d picked up a half dozen patterned, styrene sheets on clearance at Hobby Lobby earlier last year. They included two sizes of brick ones.
A 4"x6" paper mache box with rectangles of brick-patterned styrene epoxied onto it
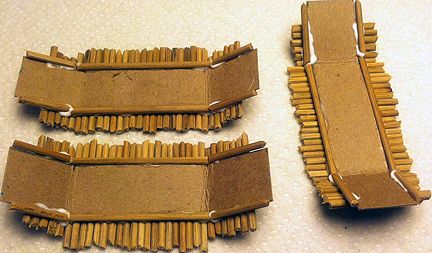
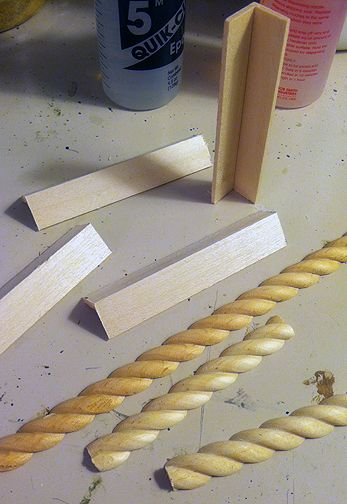
I chose one with the smaller bricks and cut out four rectangles to cover each face of the box. I used two-part epoxy to attach it to the paper mache because I was worried about the styrene not sticking with white glue or Tacky glue. I attached one face at a time so they would not shift on me. The problem with simply gluing a patterned sheet to a box is, of course, the corners. How do you cover up the place where two sheets are supposed to join up? I decided to use an “L-shaped” piece of bass wood and attach it to each corner. That way, it would cover up the seam (or lack of a seam) completely. It was actually hard to find the L-shaped bass wood, and I had to resort to the somewhat pricey local Hobbyland.
How do you cover up those ugly joins between the four pieces of brick styrene? First cover them with L-shaped bass wood...
...and then you decorate it with wood trim to look like half-columns!
Each side of the bass wood is 1/2” long, and I decided to decorate that blank space with some fancy wood trim. I’d picked up a large back of various styles of decorative wood trim at Hobby Lobby when I made the first batch of temples. I found two pieces that were perfect and looked like spiral half columns once glued to the building. I actually, put the trim on the L-shaped bass wood first, before I affixed it to the building. That let me use gravity to keep it from sliding while the Tacky glue dried. I took another piece of decorative trim and lined the top edge of the building on all four sides, too. I liked the look of the temple so far, so set it aside to dry while I began working on the roof.
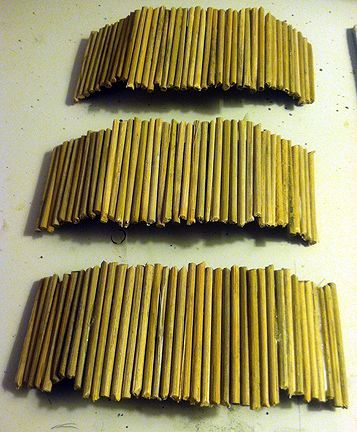
The core of the temple upside-down, so the top trim can dry flush and level
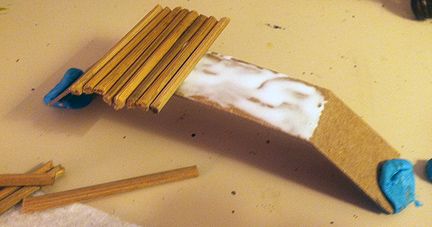
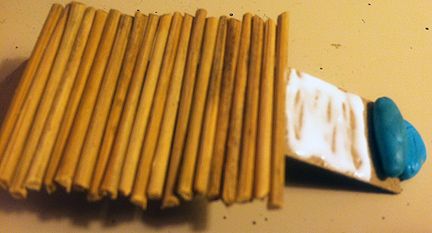
The base of the roof would be a simple sheet of black styrene. To keep it in place atop the temple, I cut out a piece of balsa wood the exact size of the four walls and glued to the bottom of the roof. The balsa projects down into the walls keeping it from sliding around while the styrene sits atop. While that was drying, I began working on the decorations for the roof. I wanted a bell-shaped projection atop each corner. So, I dug out my miscellaneous wood bits. By assembling an upside down flower pot, spool, disk, wooden wheel, a bead, and a 15mm spear, a very nice looking corner “mini-stupa” was created. The central, bell-shaped decoration was started, as well. It was a bit simpler and consisted of a filial, upside down wooden pot, and a disk.
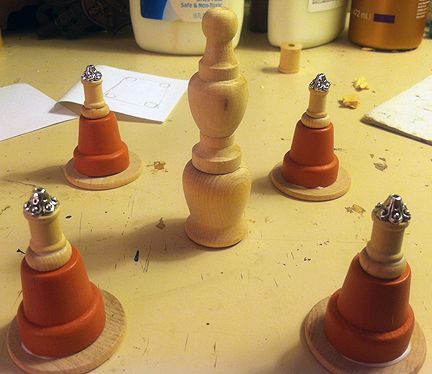
The decorative bits for the roof: Four mini-stupas for each corner, and the central stupa (which will get another layer and grow even taller the next day when I find a piece to go beneath it at Hobby Lobby...!)
The next day, I took another look at my favorite picture of Bagan, and decided the roof needed to get even fancier. I decided to have a small, false upper level complete with door and roof. So, it was back to Hobby Lobby for their smallest paper mache box. I also picked up another decorative layer to add to the roof’s stupa — a flat-topped doorknob shaped piece of wood that the filial and disk would fit perfectly atop. I used Tacky glue to attach the corner mini-stupas to the roof, and cut two telescoping “levels” of balsa wood for the false second level to sit atop. I had to weight the balsa wood with glue bottles and other miscellanea to keep it flat, though, as balsa tends to warp. It was thickest material I had, though, so I decided to use it. While that was drying, I cut four more sections of decorative wood trim to go along the edge of the roof. It has a square pattern on it, and I hope to find some kind of bead that will look cool in the middle of each square.
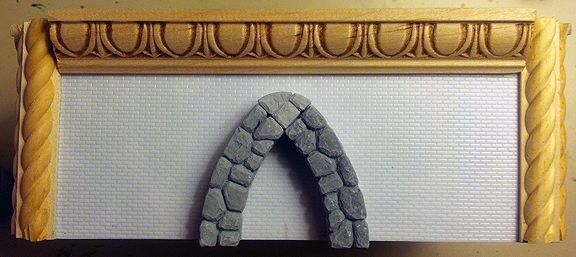
The beginning of the entranceway -- a stone archway made from Hirst Arts curved wall pieces
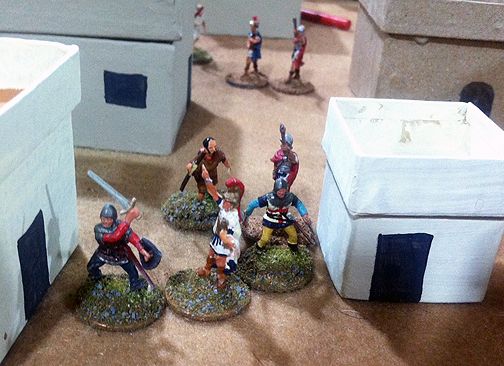
 Next, it was time to begin work on the doors themselves, the false one on the second level and the main entrance. I had cruised the aisles of Hobby Lobby when I bought the box, hoping for inspiration. I hadn’t seen anything that struck my fancy, though. Eventually, I pulled out my leftover Hirst Arts blocks from when I built my Pictish broch years ago. I fiddled with various bits until something finally game to me. I would use two curved wall sections to form an arching entranceway. Attached to their front would be the door, and some flaring, decorative stone work. Many of the entrances at Bagan have pointed, decorative, arch-like entrances. I was trying to give the effect without exactly copying one. Serendipity struck when the piece I used to get it all together had a projecting stone on either side of the doorway. I looked at it, and said, “Hmmm….a statue would look great there!” I rummaged through my unpainted lead pile until I found two Khmer Maiden Guard figures. They fit perfectly on the stone ledges. The door itself was simply “scalloped” balsa wood. The ornamental door knockers were a couple beads and a pin head glued to the wood.

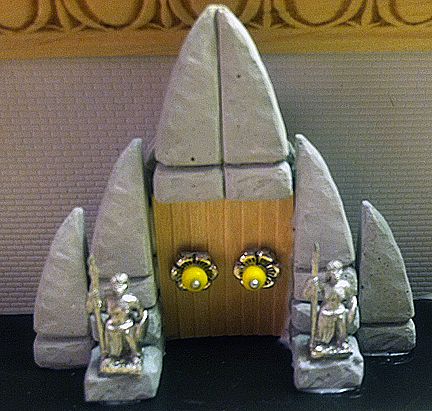
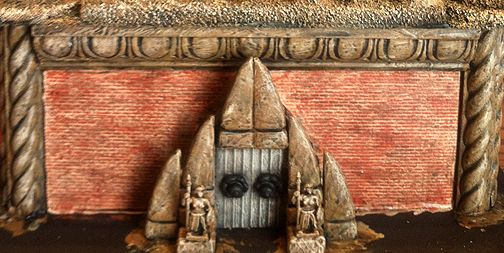
More Hirst Arts pieces attach to the carved stone entranceway (hidden here). The door is a piece of scalloped balsa wood with two beads and a pin head attached. The statues are 15mm Khmer Maiden Guard figures.
 I decided to do a smaller version of the fancy entranceway for the false second floor, too. I left off the door knockers, since the door was only decorative. I used smaller Hirst Arts pieces and was able to give them a stone ledge, too. I dug through my figure box and found — believe it or not — two female zombie hunter figures with axes to guard this entrance. So much of a project like this is work on something, set it aside to dry, and work on another phase or section of the build. I was bouncing between the main temple piece and the roof piece with regularity.
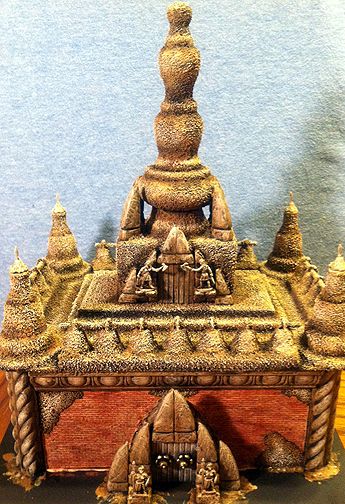
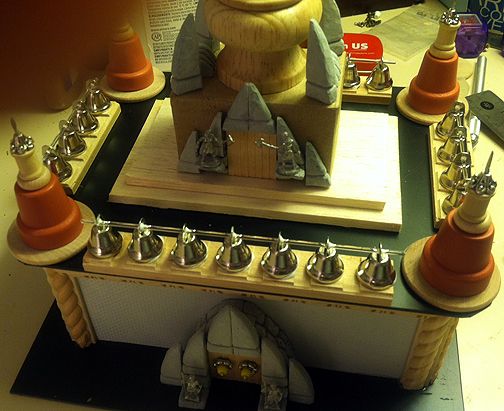
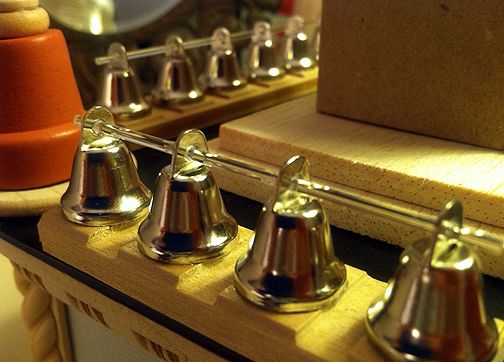
The roof with most of its construction done. The false level attaches to that block of foam core snugly, allowing me to remove it and store it on its side. The tower mini-stupas have their 15mm spear points glued inside the bead. The only thing missing is some sort of fancy bead in each of those rectangles on the wooden trim along the edge of the roof.
Once it came time to finish the main entranceway, I had to glue the entire building down onto its styrene base. The roof was progressing well, too. One key consideration is that I want these buildings to fit in the 13”x13”x4” snap-together boxes I use to cart my terrain around. The tough part is always the 4” high part! So, I designed this temple to be three separate pieces. there is the main building, which is about 3” tall. The roof comes apart in two sections. The false second level and the stupa tower atop it pulls off, and can be laid on its side in the boxes. The roof itself is only one layer styrene, two layers of balsa, and a layer of foam core that the false level snugly fits around. It is just a little over 2” tall — most of that being in the corner, “mini-stupas.”
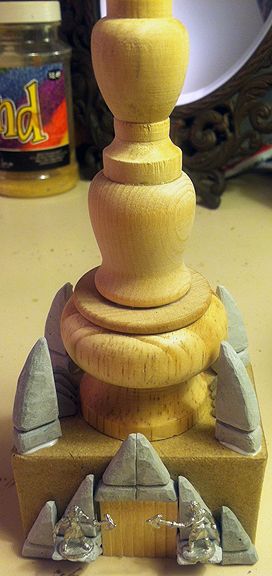
And here is the more than 6" tall false level and stupa tower. I love how you can stack a bunch of these wood pieces on top of each other and it really looks like a stupa from Bagan! A small paper mache box forms the core of the false level, decorated by Hirst Arts pieces and a fake door. Two axe-wielding women guard the fake door.
All three pieces have been set aside to dry. The only thing left, construction-wise, is some form of decoration on the wood trim on the first level of the roof. I plan on going to Michaels craft store tomorrow and find some cool-looking bead to glue along the roof…well, make that 20 of them!
   

Forest or Jungle Paths

Pathways for jungles or forests made out of acrylic caulk. The colorful flower foliage is also newly created, using the same technique I did for the "Jungle Pieces".
The last terrain pieces that I wanted to have for my next installment of my 28mm Pulp adventure were jungle or forest paths. The board for this game will be mostly jungle (as will later ones). So, rather than put a lot of variously-shaped pieces out on the table, plop trees on them and say, “This is jungle”, I figured to do it the opposite way. I would say the entire board is jungle EXCEPT designated areas. These areas would include pathways through the jungle that explorers could follow and move on more quickly.

I did a lot of searching on the internet (as well as soul searching!) to decide how to create them. Obviously, the cheapest, simplest, and least attractive way would be to cut out pieces of brown felt and say, “Voila!” Next in line, I could look for a suitable material — such as suede or other fabric — that had more of a dappled look to it. Another idea would be to cut them out of thin styrene and flock them. The one I actually settled on was an idea I found on The Lead Adventure Forum and The Miniatures Page. It involved using paintable acrylic caulk to create the roads — which would easily translate for me into forest pathways. I read several tutorials on it, which I will link at the end of this post. The material seemed to be very similar to what the maker must have used for the latex river pieces that I’d bought at Historicon. The thing that excited me the most about trying this method was that I could translate it into other types of terrain. I could use it to make that swamp or bog that I’ve been wanting to do. I could use it to make wider rivers than the ones I created. I could even use it to create a pond — heck, anything I really wanted to make with it!

The tutorials all used the caulk in slightly different ways. The biggest variation seemed to be whether to use a base material or simply use the caulk itself as the terrain piece. One tutorial advised using a fabric base and to spread the caulk atop it. Another advised using a plastic mesh (called “granny grate”) — similar to what I used as my window panes on my Saxon church. Still another advised using it without any base material. I decided to go with a felt base because I was worried about the latex sticking to flocking and picking it up off other pieces. I would doubtless end up stacking them up and I didn’t want the flock I was going to put on the pathway surface to be pulled off by the bottoms of the pieces piled on top of them.
Various shapes for path sections drawn on white paper, cut out and traced onto the felt
With that decided, I drew out the shapes I wanted for my pathways on a sheet of white paper. I cut it out and traced it onto a piece of brown felt with permanent marker. This was cut out with fabric scissors — sharp scissors are a must, I’ve found, if cutting a lot of felt. I picked up a 5.5 ounce (162 ml) tube of “Premium All Purpose Elastomeric Sealant” in the cedar color. This is a medium tan which would be a good base for the pathway color. The brand name for mine was “White Lightning,” but what you are looking for is paintable acrylic caulk. Do NOT get silicone caulk — it repels water and you will hate yourself (I read) when you go to paint it.
Paintable acrylic caulk in "cedar" color -- the material that would form the surface of my paths
The tutorials also recommended to cut a slice of cardboard to put inside of a large ziplock bag to use as your working surface. The caulk peels right up off of the ziplock bag once dry — and it IS quite messy. I squeezed out 5 lines of the caulk onto the first, 2-inch wide pathway. I then took a half inch wide strip of cardboard and smoothed it out. Don’t worry about overlapping the edges, as you’ll trim it up later. I found that using the cardboard in the opposite direction from which I went to squeeze the caulk onto the felt helped keep it from lifting the line of caulk off of the felt. I got better at it as I went on to other pieces. As the tutorial instructed, I gave it about 20 minutes to begin setting, and then took a wide, soft brush, wetted it with water, and smoothed out the caulk. If you are doing a road instead of a forest path, this would be where you would add in ruts and cart or wheel tracks. Since mine is a footpath, I went for a smoother surface. While it was wet, I sprinkled on a number of smaller pebbles to represent rocks buried in the path surface. I pressed them down slightly into the caulk with the other end of the paint brush. I would add smaller gravel at a later stage. These were the big stones that I wanted partially buried in the path’s surface.
Lines of caulk squeezed out onto the felt base, which itself sits atop a ziplock bag with a piece of cardboard inside to stiffen it as a working surface
I let it dry about six hours (as the tutorials recommended). Then I peeled it up off of the ziplock bag and was pleased to see it worked to perfection as a surface. I took my sharp fabric scissors and trimmed up the edges, eliminating any rough edges. Then I took my reddish-brown earth color that I use on bases and watered it down so it was only about 1/4 to 1/3 paint. I painted this over the tan surface of the road. While it was wet, I sprinkled on Woodland Scenics coarse and medium ballast — hoping the mixture would “grab” it, and affix it into place. The wash of reddish brown settled into the lower places of the road nicely. It was at this point that I “fell down on the job” and forgot to keep taking photos. My apologies. Once it was dry, I did a very light dry brush of khaki over the surface of the road and ballast. I hit the embedded stones a bit heavier with the dry brush to make them pop out more, visually. Then, I took my normal ink wash and diluted it by half with distilled water. I painted this over the surface of the road — trying my best not to pull off the tiny pieces of ballast that would represent scattered pebbles or gravel on the surface of the path.
A wet paint brush smoothes out the caulk. This is where you would add any other embellishments, like wheel ruts, potholes, etc., if you wanted.
Once it was dry, I took straight white glue and applied it to patches here and there, mostly along the edges of the pathway. I then sprinkled the glue with Woodland Scenics blended green turf. I followed this up with beads of more white glue which would each receive a piece of Woodland Scenics clump foliage. I bought three different green tones awhile back, and mixed them here and there on the path surface. Once the white glue was dry, I mixed up a batch of 50/50 white glue and water and painted it over the entire road surface. This is to “cement” down the flocking. A light coating of dullcoate spray followed to take off any sheen, but not so heavy as to give it a thick enamel surface. I wanted the pathway to be flexible and be able to be take handling without cracking. I’m not sure if that would make it crack, but since the white glue would provide the primary coating on it — and white glue is slightly flexible — I needed the spray only to give it a nice matte appearance.
The pathway pieces, dried and with edges trimmed up. Note also the stones embedded in the surface of the road.

Saturday, January 25, 2014

"I Predict a Riot...!"

Keith discusses the action in the game with Allen and Mike S. His ancient city tabletop is in the foregound.
My friend Keith was interested in another variant of the "Song of Blades and Heroes" engine from Ganesha Games that we use for many of our skirmish games. It is set in the ancient world and focuses on rioting in cities. So, he assembled a layout of a Mediterranean city from paper mache boxes and various other pieces. Since his ancient figures are still unfinished, Keith dusted off his 1/72 scale plastic medieval ones. Our riot was set in the Outremer -- the Crusader kingdom of the Middle East. A Byzantine tribune is visiting a city to woo the town elders over to supporting them. The Templars and the Normans of Tancred are not happy with this, and would like to capture the tribune -- or at worst, kill him.

There would be four players. Mike S controlled the tribune and his three bodyguards, Joel controlled the town militia, Allen the Templars, and I had the forces of Tancred. The victory conditions hinged on whether the Byzantine tribune made it through the city streets safely to his ship waiting to take him back to Constantinople. Unfortunately for the crusaders, the town militia was on his side, and we lost victory points for killing them. We also hated each other, and I got points for killing Templars, and vice versa. All of us controlled fairly small forces, and the table was also covered in ordinary citizens (who could be drawn into the fight), and a handful of stubborn, vicious mules.
My Normans belonging to Tancred move towards the piers, hoping to reach the docks before the Byzantine tribune escapes
My sergeant and his four men-at-arms left our headquarters and raced to the piers to cut off the tribune from his escape. When we arrived their, the Templars had split their forces to flank the tribune. A couple militia archers had taken pot shots at the Templars. My archer thought it'd be funny to take a shot at the mule and spook him towards the militia, which actually worked to perfection (except that the militia man promptly brained the mule with his bowstave). A couple townsman began to mob the Templar, and one of my men went over to discomfort our rival (not attacking, but giving the Templar a negative modifier in his fight with the townsfolk). The Templar sergeant raced over to help his brother, and they both dispatched the rabble. Unfortunately, they did not see the humor in my ploy and promptly slew my man-at-arms. My archer took offense, and put an arrow in the eye slit of the Templar sergeant, which caused a momentary leaderless panic in the knights. My archer would prove to be my killer in this game, as he racked up several bullseyes on the enemy.
My forces block off the alley leading to the piers. We find a Templar bowman and a militia archer engaged in an archery duel when we arrive.
With Allen's leader out of the fight, I had to step in and press an attack against the Byzantines and militia, or they'd overwhelm him and turn on me. The battle swelled to a four-way scrum in the center of the town. Things began to get hot for the tribune -- so much so he fled to the other side of the board to circle around behind us. When his bodyguards succumbed, the tribune fortunately failed a morale check which gave him a two-move scamper towards the boat. We all raced to the pier, where a lone mule blocked the tribune's path to the pier. With a flurry of blows and curses, the tribune recoiled the mule, opening his path. A templar raced towards him, coming up just short. My sergeant did the same, and also just missed engaging the tribune in combat. On Mike's next move, his tribune activated enough to run down the pier (screaming like a girl, I conjectured) and into the boat. We just missed bagging the bastard, and Mike was the clear winner of the game.
All four players have forces converging on the main square of the city, as things get a bit hot for the Byzantine tribune's bodyguards
It was a fast-moving and fun variant of the system. "Rabble" types are dispatched when beaten in combat, and the modifiers make the archers a bit deadlier in this game. Either way, it'll be worthwhile entertainment to enter the world of riotous cities again, some evening...
This little Byzantine piggy goes to the docks screaming "Weee, weee, weee" all the way home. Templars and Tancredis come up just short in their efforts to snag the tribune.

Wednesday, January 22, 2014

Cliff Sections, "step-down" pieces

The large "step down" piece created to give an entrance or exit from the biggest of the cliff pieces
So, I needed more entrances and exits to my three cliff sections I'd built for my French & Indian War games. Originally, I'd made only two. I wanted the pieces to be more versatile, though, and that meant having more places for figures to climb up or down onto them. This became especially important as the cliffs are seeing double duty in my 28mm Pulp games, too.

I used the same method as I did for the cliffs. Black styrene plastic served as the base. The boulder or rock sections were recreated using pine bark. When I'd created the cliff sections this summer, I'd dried them out in the sun, first. The bark pieces that I didn't use I bagged up and put in the garage. I simply pulled this bag back out, and sorted through it to find flatter pieces that stacked up well. This became quite a challenge on the large piece. The very reason pine bark works so well as a stand-in for boulders is its irregular surface. So, it was kind of a three dimensional jigsaw puzzle to assemble the largest piece.
The medium sized section...you can see one of the wire trees fairly well in the foreground of the image
The pieces were glued down onto the styrene or on top of each other using Aleene's Tacky glue. Just a few days after finishing these, I finally broke down and bought a hot glue gun (needed it for another project). In the future, I'll probably use this as it dries much quicker and doesn't drip as much. However, Tacky glue served me well on these -- and on the cliffs themselves. Once the glue was dry, I took them outsides and spray painted them with flat, black acrylic paint. As I sit here with the temperature well below freezing, it is hard to imagine that less than a week ago it was warm enough to go out and spray paint these in the corner of the yard! Ohio weather...don't like it? Wait a bit, it'll change...!

After the paint was dry, I squirted white glue everywhere that bare black styrene was visible. I poured over Woodland Scenics coarse ballast to start the ground surface up. After this dried, I watered down a large batch of Ceramcoat acrylic black paint (a bit stronger than 50/50). I painted this over all of the pine bark pieces and the ballast. I let the pieces dry overnight. Then I put a base coat of either dark gray or medium brown over the pine bark pieces. Like on the cliffs, I wanted some rock faces to be gray, and others to be more brownish (like they are here in Ohio). This was followed up by a light gray or khaki dry brush.
The smallest of the three pieces I created to give miniatures access to the cliffs. Note the two-color rock tone of gray and brown, as you can find here in Ohio.
And here's where the hot glue gun comes in. A friend of mine had given me a bunch of small wire trees, bushes and flowers made for model railroad terrain. I put one of the trees on each of the medium and larger sized step down pieces. I also put on one of the flowers. The hot glue gun worked great to hold them into place. With only a thin wire stem, I knew I'd need something strong to keep them in place. I followed this up with my normal flocking procedure, and was very happy with how the pieces came out. They look nice and should add a lot of options to how I use the cliff pieces, now.

Speaking of which, the cliffs (and these step down pieces) will see action this weekend in my third Pulp scenario, which I am hosting at my place. So, you should see more pics of them soon on this blog. In the meantime, it was fun to get my 28mm Conquest Miniatures out and photograph them scrambling up and down the cliffsides on them...!

Wednesday, January 15, 2014

Star Wars skirmish

The Rebel Alliance enemy, Keith and Steve, and our Imperial co-commander, Joel
 We use the Ganesha Games rules, "Song of Blades and Heroes," for a number of periods. Their modern one, Flying Lead, was adapted by Mike S to use in Star Wars skirmishes. We'd play-tested it once before, and Mike was itching to do another game of it. He cooked up a scenario that featured an imperial raid on a rebel base. Intelligence reported that the leadership of the Rebel Alliance was meeting on the planet, and we were sent in to capture them.

Mike set up a nice board with lots of scratch-built, futuristic terrain. Our favorite was the radar dish made from a plastic champagne glass. We also noticed immediately, as he passed out the command, that we would each have a freaking HUGE force. I think Mike looked at the recommended point level per side and interpreted it as per player. With six players total, that meant our battle was three times the recommended size - ha, ha!

This led some of us to attempt only one action per figure, so as not to "crap out" (two failures or more on an attempt). If a player rolls two or mroe failures on the same roll, their turn is over and the remaining figures in their command do not move. This would be my lot for much of the game. It seemed whenever I tried more than one activation, I crapped out. But rather than have you read about my typical, awful dice rolling, I thought I'd plug in a couple of After-Action Reports that others who were present emailed to each other.
Imperial Scout trooper finds a nasty surprise around the corner -- a whole pack of rebels!
First up, is the report sent out by my fellow Imperial commander, Joel Sams:

Star Wars Skirmish - GM: Mike S
Team Rebel:  Allen, Steve, Keith
Team S'Troopers: Mike D,  Tom, Joel

"...Juliett Platoon, right flank! Storm Troopers assault!" Fanned out moving smoothly toward the village. We encounter worker droids amongst a tank farms.


Pvt. 'Joker':  "Hey Sargent are these the droids we're looking for?" Then that ambush hits Papa Platoon hard.  The rebels are all over them like ugly on a wampa.  Our preplanned memory bank kicks in...
Sgt. HardKor:  "AMBUSH! SPREAD OUT -- MOVE, NOW! Third squad take rear guard  position by that radar dish. Pvt. Joker, take point!  Get across that pipeline...move, NOW!"

Our squad moves as a unit across the pipeline and our body armor is pressed hard against an adobe shanty.  We see Gunner Thompson of Papa Platoon is dropping grenades everywhere BUT on the  rebels.  The firefight is intense Papa Platoon holds up in storage tanks uses the cover and their body armour helps holds off the rebels.

Sgt. HardKor arrives at the adobe. "Is this structure secured?"

We repeat the question aloud to ourselves,  Is this ..structure...secure??" Suddenly we are under small arms fire from INSIDE the building. Then the adobe from across the dusty street also erupt with small arms fire.  Sgt. HardKor directs traffic. "Moon and Rok around back- look for a back door!"

Five minutes of firefight, then Pvt. Joker looks up and pauses, "I love it when they RUN!" Three streets away a herd of rebels (20 or more?) are running like gazelle, with move and shoot tactics.  Their unit moves fluidly and quickly overwhelm Motel Platoon on the left flank.  It is a sight to see and we are in awe of their ability.  Papa Platoon falls back just before Motel Platoon bends, and it is Papa Platoon that stops those Runnin' Rebels. 

Things aren't much better on this end of the battlefield as my leader (in red hair) is about to be overwhelmed, but go down fighting...!
 Next up, is a post from the other Rebel commander, Tom:

It was indeed a trap! The 4th Antares Legion had deployed a battalion of Storm Troops flawlessly from their transports at extremely close range to the rebel hive of scum and villainy, known as the Sar-Lor Industrial Complex (SLIC). We advanced on a search and destroy mission intended to decapitate the rebel leadership in this sector of empire.

It appears that the rebels were aware of our plans and had laid an ambush for us. As we approached SLIC a large number of rebels appeared immediately to our rear and opened fire on us. If we had been deployed on different sides of the village as had been the original plan proposed, any one of our Companies might easily have been annihilated, but as the operational commander I had 'altered' our line of embarkation to minimize friendly fire casualties and the rebels were facing three times the troops that they likely expected.

Police Commander Smythe was the first to go down as he was the furthest in the rear of our forces and many of us were caught in the open. However, the rebel scum, were as usual, unprepared for a firefight and when the initial surprise was over the  massive firepower returned by our battle line proved devastating.

Our left and right flanks put forward advance guards toward SLIC to probe for further enemy forces and they very quickly found them lurking in many of the buildings of the town. In addition they reported additional rebel reinforcements were being brought up through the worker's slum.

The right flank held well, engaging rebel forces in the slum, but the left flank seemed to be unmotivated and once engaged with the rebel scum quickly decided withdraw was the better option. A huge rebel thrust on the left almost broke through our  lines to the waiting evacuation ships, but the left flank managed at the critical moment to stiffen and hold off the rebels.

A number of experienced rebel pilots were killed or injured, but the high level commanders slipped the noose.

General Moose
Commander Antares Legion

Look out behind you! One turn after we march onto the board, a massive force of rebels sprints on behind us and opens fire...thankfully, Allen wasn't hot with his dice or we'd had an even rougher time of it...!


Monday, January 13, 2014

Small, rustic bridges

28mm Sikh infantry cross a scratch-built, bamboo bridge over a jungle river...doubtless hunting down reports of pygmy cannibals in the area!
Having just finished 8 feet of rivers, it follows that I'd need some crossing points, too. I wanted to make these as generic as possible, though. The first time they'll be used is for the upcoming installment of Dakota Smith's Oriental Adventures. The players' objective will be on a river island, and I wanted to have a number of crossing points so that there isn't a bottleneck at one lone bridge or anything.

Since they'll at least initially be used for southeast Asia, the material of choice was naturally bamboo. My thinking was that the more simple the bridge, the better. I planned for a plain arc with no handrails. However, once they were halfway constructed, I decided to go ahead and add a handrail after all. Still, these are not fancy by any stretch of the imagination. The fact that I did three at once shows that they were simple and straight forward to build.
Simple card stock forms the base of the bridge, folded into the shape I want
I started with a folded piece of cardstock. I sized it to be about 2/3's of the width that the final bridge would be. I folded an angle one inch in from each end to be the part that sloped down to the ground. It was actually more difficult than I thought it would be getting the angles -- and thus bridge slopes -- to be roughly the same. I had to use blue tack to affix the cardstock to the desk temporarily. Next, I cut up a bunch of bamboo skewers using a wire cutter. Each piece would lay horizontally across the cardstock and be roughly equal to the 1 1/2 inch width I'd planned. It looks good to vary the length of the bamboo pieces -- so don't stress out about being too exact! Each bridge uses about 40 bamboo planks, so it requires a lot of cutting!
The top portion is loaded up with its bamboo planks, and the sloping side is glued up in readiness for its to be placed along its surface
I covered the top, flat section of the bridge with Tacky glue and then simply placed the skewers astride the cardstock. Once they'd dried, I put another lump of blue tack at the bottom of each slope and covered it with Tacky glue as well. The bamboo planks were added to the sloping sections of the bridge. I had to turn it upside down after it was dry to get the last couple end pieces on. In my original plans, the construction phase of the bridge was supposed to be done at this point. However, I felt the cardstock was too flimsy and would be weighed down by the 28mm figures. The glue and bamboo did not stiffen it as much as I'd figured it would. This was solved easily enough by flipping it upside down and adding in supporting bamboo pieces running where the edge of the cardstock joined the bamboo. Once the glue dried, the bamboo would provide a truncated arch support for any weight placed on the bridge.
The bridges are flipped upside down to add bamboo "arch" support
This was how I'd envisioned the bridges, before I got the needling urge to add handrails
 It was at this point that I also decided to add handrails. Thankfully, I thought ahead enough to paint the underside of the bridge first. That way, it could lay on the flat bridge platform surface while I painted the bottom a base coat of Ceramcoat Dark Burnt Umber. Once dry, I dry brushed it in Howard Hues Camo Brown.
The bottoms of all three bridges with their Dark Burnt Umber base coat, and Camo Brown wet brush highlight
So, what to do about the handrails? I ended up sorting through my odds and ends boxes for inspiration. I could come up with nothing better than cutting craft sticks as two main post supports, filing them to a point at their top. Then, I drilled a tiny hole in each with a pin vice. This was filled with a cut down straight pin. I left about 1/4 to 1/2 inch of metal protruding from the posts. I constructed the hand rails from thick craft sticks and bamboo skewers. They were cut to size, then drilled with the same pin vice to accept the needle protruding from the post. I hoped this "pinning" would help support the hand rails themselves. As you can imagine, this was by far the most "fiddly" part of the build! I constructed each set of hand rails completely before attempting to glue them to the bridges. I'm glad I did, because they were relatively balanced and a blob of Tacky glue ended up holding them upright in place while the glue dried.
The fiddliest and most time-consuming part of the build: creating the handrails. After holes were drilled through the posts and rails, straight pins were trimmed up to pin them in place to help the glue hold.
Once the hand rails were in place, I was glad I'd done them. They added quite a bit to the look of the bridges. From this point, it was a simple matter to base coat them in Dark Burnt Umber. This was followed up by a "wet brush" of Howard Hues Camo Brown. A further dry brush of Howard Hues "Colonial Khaki" was next. Finally, a blak ink wash was brushed over the entire upper part of the bridge (I did not bother washing the underside). A spry of Dullocate, and they're ready for the table!
The three bridges, after construction, but before painting
As at the end of all my builds, I asked myself if I'd change anything. Perhaps. I'd like to find something more sturdy than card stock to be the base of the bridge. There has to be some odd or end around my house somewhere, or something cheap at the craft store, that can be the truncated arch shape. It was a real pain to keep the angles of each slope on the bridge the same. I also would probably find a different material for the post and hand rail. Maybe brass wire for the handrails -- so it only had to be threaded through the holes in the posts, and then bent into shape? For the posts, something more sturdy than the craft sticks would be nice, too. Maybe I can insert a bamboo skewer vertically into the planks of the bridge when I am gluing the bridge surface together? Bamboo is much stronger than the craft wood. Other than that, I'm happy with how they turned out. They're not as flashy and dramatic as the "Indiana Jones" rope bridge, of course! But they are cheap, functional, and look the part.
Close up of one of the finished products on the tabletop with 28mm figures