Sunday, August 31, 2014

Dinosaur Hunt in East Africa

My Italian paleontologist's plane crashes in a large tree, and we disembark to explore the valley
 It had been awhile since Keith had hosted one of his wild and woolley Dino Hunts. He was going to be running one at Advance the Colors 2014, so wanted to get back in the swing of things. Although he plans on using the Pulp Alley rules for the ATC game, he fell back on Saurian Safari for this game to get back into the swing of things.
Almost immediately, we encounter a Spinosaurus and the Italian scientist and his native guides flee for their lives
 The scenario had my Italian paleontologist trying to evade capture by both British and German forces sent to apprehend him. Meanwhile, I was investigating this thick, bamboo forest in East Africa for evidence that the Egyptian gods were inspired by prehistoric creatures that might still be alive. It was a fun game, with my Italian scientist and his two native guides cinematically running from one dinosaur encounter to another.
With more deadly dinos in our path, we turn around and flee the other direction!
In the end, we were snagged by the British, mainly because our direction of flight always seemed to be taking them towards their side of the board. The Germans -- played by Allen and Mike S -- blasted away at every dino that came near and left a swath of destruction in their wake. Their only loss was of their machine gunner to an "Apex Predator" giant toad. Allen continually bemoaned the loss of his machine gun, and insisted he should be able to recover it through the tons of toad blubber that it lay beneath.
One of the native guides flees straight into the jaws of a lurking carnivore
As always, it was a fun game. I look forward to Keith using Pulp Alley for the next game. In the meantime, this was a good warmup!
We were slippery for the whole game, but eventually were collared by the British force and marched off to do their bidding

Monday, August 25, 2014

Battle of Manzikert

My center Turkish command after the heavy cavalry passed through the skirmisher screen, with the Byzantine center force in the background
 Steve V is running his Battle of Manzikert game using Hail Caesar rules in a few weeks at Advance the Colors 2014, in Springfield, OH. So, though we'd play tested it before, he wanted to get it out again and blow the dust off of it and make sure it was ready to go. Hail Caesar seems to be the rules of choice for big battle Ancients games, lately -- ever since we tired of De Bellis Antiquitatis (DBA). There is a lot of dice rolling, so games are fairly fluid and units can be fragile. The morale tests seem to be what causes most units to disappear, which seems to be fairly accurate, in my opinion.
Mike S commanded the left and overran Joel's Byzantine flank command
Mike S and Keith made me play Alp Arslan, the Turkish commander. Opposite Mike on my left was Joel, while Allen was ranged across from Keith. I was tackling Steve V, and I was a bit worried in the first turn when his dice were hot and mine were not. However, he went cold quickly, and my dice picked up and remained fairly steady throughout the game. The battle is meant to be more of a historical refight and less of a complex scenario. Steve deploys the troops for the players (which I am not a big fan of, by the way), and there is no terrain on the tabletop. Players make grand tactical moves and then tactical ones to decide when to shoot, charge, etc. So, it is a straight-forward game.
Keith's Turkish command on the left had twice as many horse archers as the Byzantines did in their skirmish screen
There were some hesitant moments on our side, but we pretty much bowled over the Byzantines across from us. All three of us ended up breaking the opponent's command (or were about to), with the loss of only one unit on our side. The Turks outnumber the Byzantines if you don't count their reserve command, which may not enter the game at all, depending on the events of the game and some random chance. I wouldn't say the Byzantines have no chance in the game, just they will have to have some pretty interesting tactics and some pretty spectacular die rolling to change history. As it was, our game pretty much repeated history with the Turks smashing the Byzantine army in what was pretty much its most disastrous defeat in the empire's thousand year history.


Thursday, August 21, 2014

French & Indian War Fort

    Some of the wall sections to my 28mm Acheson Creations French & Indian War fort
What looked like an insurmountable project once I saw it all collected together in 28mm Acheson Creations resin, is being chipped away at steadily. I finished the first 10 log palisade sections today. I also have the 8 extra wall sections spray painted, along with the 4 corner pieces and the main gate. What's more, two nights ago, I decided to convert 6 of my extra wall sections into staircases leading up to the fighting platforms with wood pieces from the craft stores. All that, and more, in this Lead Legionaries update!

    The inside of the wall sections
First off, the 10 log palisade wall sections took considerably less time to finish than I thought they would. As frequent readers of my blog know (is there such an animal?), I normally like to paint in small batches so I can see progress and keep me inspired. However, this French & Indian War fort is such a huge terrain pieces I felt I needed to do it in larger chunks to actually see progress! It contains:

  • 10 wall sections with fighting platforms
  • 8 extra sections without fighting platforms (unbeknownst to me -- bad camera angle on the photo on the Acheson website)
  • 4 corner sections
  • 1 main gate
  • 2 stockade towers
  • 2 artillery bastions
  • 2 interior buildings

If I did that in small batches, I might feel the progress was too glacial. Thus, the big chunks.

    Close up of the log palisade wall sections
For the wall sections, I followed my usual formula for Acheson Creations terrain:

  1. Wash in dishwasher to remove release agent
  2. Spray paint black
  3. Paint with 50/50 acrylic black paint and water
  4. Wet brush medium brown
  5. Dry brush khaki
  6. Dry brush light gray
  7. Ink wash
  8. Flock

    Close up of the insides of one of the wall sections
 I think they turned out nicely. The circumference of this fort, when it is done, is going to be enormous. In fact, I intend to run a scenario where the battle takes place within the confines of the fort -- not an attack on the outside. It is inspired by an incident at Michigan's Fort Michilimackinac during Pontiac's Rebellion. The Indians surprised the defenders by staging a field hockey game outside the fort -- allowing large numbers of men to gather. A few Indian women entered the fort with weapons smuggled beneath their robes. Suddenly, one of the players tossed the ball through the open gate of the fort, and the Indians all surged through it after the ball. They snatched up the weapons from the women and attacked the soldiers defending the fort. The ruse was successful, and I think it will make an interesting scenario.

    Some of the wooden odds and ends I used to convert 6 of the extra wall sections into stairs
As mentioned above, I ordered 8 extra wall sections. I was disappointed and surprised when I received them, though, because they did not have fighting platforms like those that came with the fort set. They match the height and look of them, but have two angled beams braced against the wall on the inside instead. One night, while looking at them, I was inspired to see if I could convert these pieces into staircases up to the platforms. I dug out my miscellaneous wood bits and experimented. Sure enough, using a corrugated pattern bass wood and wood cubes, I was able to easily and quickly construct a stair case that my figures could ascend. The space between steps was high enough I could slide the front of the base into it, holding the miniature in place. It took only a few hours one evening to make the six staircases. The next night I trimmed up dowel pieces to make the fighting platforms on either side of the stairs.

    Before conversion on the left, after conversion on the right
One thing about the Acheson fort set -- which I love, mind you -- is that there are no visible staircases or ladders up to the fighting platforms. So, these six pieces will improve the look and game-ability of the fort. Already prepped were the 4 corner sections and the main gate. So, I will probably do all 11 pieces together next, considering how quickly I finished the 10 wall sections. Once that is done, I'll probably work on the two stockades and artillery bastions. The goal is to get the whole shebang done in time to use at Advance the Colors 2014, Sept. 19-21. I am running my "Ohio Frontier Aflame" scenario, and would love to use the fort as one of the vignettes in the game.

Monday, August 18, 2014

Java by Request

 We were down to four of us for Sunday evening's gaming, and Joel being the host, declared we would play a board game that we hadn't yet this year. Suggestions flew back and forth in the email conversations in the week leading up to Sunday. There are a lot of good board games out there that have a max of four players, so this was a chance to play them again. Our normal crew is 5-6, sometimes even 7 players. Java, by Rio Grande Games, is one of those four player games. It was requested by both Tom and Allen, so I dragged it and a few other games along.

After catching up on the not-so-good news of our friends (get well, soon, Mike S...hope your luck turns around soon, Steve!), we broke out Java and I explained the rules, again. I played my usual strategy of building up temple complexes as fast as possible, while trying to stay competitive on the points garnered from irrigation tiles. Joel maxed out on the irrigation tiles, as usual, but threw a new wrinkle in his strategy. He flooded the board with his developer pieces -- most of them lurking in the fields. Since he'd chosen red as his color, we laughed that he was the VC out in the rice paddies. Tom's strategy also focused on temples, while Allen played a middle ground between building and getting pieces on the board.
Joel's contemplates his next move, while Allen and Tom look on...
I jumped out to an early lead, with Tom close on my heels. Once we ran out of space for new cities and temples, I started to run out of steam and Tom passed me up. On one crucial turn, I earned no points as I took back a temple from Allen that I'd already scored. Tom widened the gap. Joel closed his red army into the cities. Allen was also positioned thickly all over the board, but Tom and I had been very clever about maintaining position to control (or take over) cities. In the end, it was a race between Tom and I. He edged me out by about five points.
Tom's secret weapon in Java: The sage advice of Brutus the Weimaraner
It was a great competitive game, and we had a good time, as usual. Lisa brought home a mixed six pack of beers in a variety of tempting flavors. So, it was good times, good drinks, and good snacks -- especially Joel's black bean dip which Allen practically licked the bowl to clean out. Joel and Lisa's Weimaraner Brutus kept us entertained for the price of mooching a snack or two. A good Sunday evening with friends!

Thursday, August 14, 2014

French & Indian War Blockhouse by Acheson Creations

    28mm Militia rush towards an Acheson Creations Block house. This comes in three pieces -- bottom narrower section, upper section with windows, and roof.
As I sorted through the mountain of resin that was my order for French & Indian War era terrain, I picked out the 25mm Blockhouse as the first piece I would paint up. Plus, I wanted a "test piece" before I tackled the fort, which would take a lot more work. This would enable me to test the paint scheme I was planning on using and make sure I like it. Also, it consisted of only three pieces, so it was a much smaller job than the fort, which contains nearly two dozen separate pieces.

    The interior of the middle section, with the roof removed. You can see the rare earth magnets I epoxied onto the top of the wall corners.
I did my usual method for painting Acheson Creations terrain pieces. After washing it in the dishwasher to remove the mold release agent, I spray painted it black. Then I brushed on a 50/50 mix of acrylic black paint and water. My scheme consisted of Howard Hues Camo Brown wet brush over the black (leaving black in the cracks and joins), then a HH Colonial Khaki dry brush. For the pieces that would be in the sun -- the exterior walls and roof -- I then added a HH Rebel Gray dry brush to give it the sun-bleached gray look old wood tends to have. I finished if off with a black ink wash to bring out the wood grain. The base piece was flocked with Woodland Scenics flocking and the painting part was done!

    This piece went together very quickly, and will make great terrain for a French & Indian War scenario
I used rare earth magnets and 1/2" square metal bases to hold the three pieces together. The magnets went on the middle parts "facing up," so to speak, while the metal bases on those facing down -- like the roof and the bottom of the middle piece. These hold together very nicely and allow you to take it part for storage, but keep it firmly in place on the tabletop. This piece went together extremely quickly, and I was happy with how it looked.

Next up, the wall pieces of the fort!

Monday, August 11, 2014

Black Hats have a 'Bonanza'

Mike S had a hankering to do a 28mm Cowboy game, so after raiding Keith's Old Glory Western terrain, he set up a White Hats (good guys) vs. Black Hats (bad guys) scenario. This episode feature myself as the Cartwrights seeking to chase off some outlaws who have been trespassing on our ranch. Joel was the Texas rangers, come to help us round up the scofflaws, while Keith and Tom played the bad guys.

Mike had made some changes to Ganesha Games' "Flying Lead" rules to better reflect the Hollywood Western. Essentially, every character was "Tough," which meant taking a wound merely worsened their Quality by 1 to 3, depending on how badly they were hit (beaten, doubled, or tripled). Once a character's Quality rose to a "6", he was out of action, or dead. In general, the rules worked well, though Mike had some changes he'd like to see, and we had some we suggested, as well. One odd feature -- more of a random aspect of cards and dice -- saw 5 of the first 6 turns the player whose card was drawn last had his drawn first in the following turn. The infamous "double move" before your opponents can respond is one of the reason I dislike card activation games. I prefer an established turn order, and feel you should win or lose based on your tactics (and dice, perhaps) -- not a fluke of the cards.
"Pa" and Cain find good firing positions near the fenced-in chicken coop
We deployed first, and I foolishly focused only on where my own troops were, ignoring where me ally Joel had deployed. Both Tom and Keith deployed near one corner of the battlefield, directly across the table from me. I had my Cartwrights dash across the field to take up good firing positions and fill the bad guys with lead as they attempted to cross the battlefield and escape into the mesas on the opposite edge from them. I was successful in putting Pa and Cain inside the fenced-in, chicken pen, while my other three dashed into a two story house that overlooked the bad guys. I was the first to benefit from the "double move," so blasted away at Keith's gang of outlaws, all of who were named Bob. Since an abnormally high number of my hits were "retreat" outcomes rather than wounds (depended on whether my die score was odd or even), we laughingly called them the "Running Bobbs." Even worse, they lined up for cover behind the outhouse, which provoked howls of laughter saying they all had the "runs" and were scrambling for the outhouse.
The rest of my gang find a great firing position in the two story house overlooking the bad guys' position
What I had not noticed, though, was that Joel deployed his troops "a fair piece" away from mine. In fact, they couldn't have been in a worse position to support my attack -- they were hidden away in the mesas, and it would take a number of turns for them to advance to where they would be a factor in the battle. We have a saying on Sunday nights, and it proved true again this night: "Tom's winning!" Tom cleverly deduced they could gang both of their forces up against mine, and he proceeded to move his entire force into the house I'd holed up in, or blasting away at me through the windows. My three Cartwrights inside were cut down relatively quickly.  And when Keith woke up from his die rolling slump ("crapping out" twice in a row on activations, early on -- which meant none of his troops were able to act at all for two turns), the Cartwrights began to drop like flies.
And here's why it wasn't such a good idea...Tom's entire gang uses his "double move" to race around the side of the house and rush it, outnumbering my guys 6-3...
The Texas rangers did race in impressively when Joel got the double move, firing at the hip as they came. However, with my men whittled down to essentially just Cain -- and he was bleeding badly -- it was now Joel's turn to ganged up on by Tom and Keith. Tactically, the White Hats blundered this game. Joel deployed too far away, but worse, I stuck my neck out too far and the Black Hats were only too glad to slip a noose around it. We went down kicking, though, and shot up Keith's "Running Bobs" fairly heavily. However, it was obvious that the Cartwright Ranch would be under new ownership come sundown.

The game worked well enough that I'm sure we will see another Western episode on Sunday nights. Hopefully next time the good guys will prove to have a little more between their ears than a big white hat...!

Thursday, August 7, 2014

Small Bridge and Graveyard

Two of my "too many" projects are complete...!
 As mentioned in my "Too Many Projects" post, I have been juggling quite the handful of projects, lately. Well, here are two of them completed -- both items I intend to raffle off in the silent auction I will hold at Advance the Colors 2014 next month in Springfield, Ohio. I am auctioning them off for charity, which will go to help pay for my students' expenses on the trip to Italy I will be leading at the end of the school year.
Small resin bridge I painted and based for a silent charity auction at Advance the Colors 2014
The bridge is a resin one that is just the right size to pass for either a medium-sized bridge in 15mm scale, or a small one in 25mm scale. I based it up on two separate pieces of black styrene. The arch of the bridge hangs over open space so it can be placed atop whatever type of river you use. In the picture, you see one of my latex rivers that I painted up last year. I spray painted it black, then brushed over that with a 50/50 coat of black acrylic paint on water to ensure thorough coverage. Next, I wetbrushed it a medium gray, followed by a light gray dry brush. The roadway part received a medium brown and then khaki dry brush. A final black ink wash brought out the highlights of the stone.
Close up of the flowers and flocking added to the base of the bridge
The flocking on the styrene was done by painting it with white glue and dipping it in Woodland Scenics medium ballast. This was actually done in the beginning before the black spray paint stage. The ballast was wet brushed with an earth red, and then dry brushed khaki. Next, I got out my hot glue gun and attached the three flowers or flowering bushes. I painted sections of the flocking -- and the bridge -- in white glue and sprinkled on Woodland Scenics blended green turf. I followed this up by gluing in light green and dark green pieces of clump foliage as bushes and weeds. The whole affair was sprayed with Testors Dullcoate. Afterwards, it was sealed with a 50/50 mix of white glue and water, and given a final spray of Dullcoate. I was very pleased with it, and hope that it goes for a good price!
The small 28mm scale graveyard, assembled from various bits and pieces
Much more elaborate (and going for a higher price, I hope) is this small graveyard. I assembled it from various bits and pieces that I have. The three tombs and the entrances are resin ones from my favorite, Acheson Creations. The walls are ones I picked up at a giveaway the widow of a gamer was holding awhile back. The tree is a Woodland Scenics plastic one. The decorative bits on top of the stone walls use pieces from craft stores and the points from some lead spears. Once it was all assembled, I painted everything but the walls and entrances with white glue and dipped it in Woodland Scenics medium ballast. The entire affair was spray painted black, which I went over with a 50/50 mixture of acrylic black paint and water.
A creepy, overgrown graveyard is perfect scenery for just about any period from the Middle Ages on up to the present! Put in your bid for this one at Advance the Colors in Springfield, Ohio, Sept. 19-21!
The walls and entrances were done exactly like the bridge, above. The tree was dry brushed medium brown, followed by khaki, and then light gray to give it that creepy dead look. The flocking was done exactly like the bridge, above, too. I put lots of Woodland Scenics clump foliage around it so it looked suitably overgrown and abandoned. I was really happy with how this one turned out. It is not as big as my own 28mm Graveyard I built last year, but I think it is the perfect piece of eye candy for just about any battlefield from the Middle Ages on up!

Tuesday, August 5, 2014

Combat Cards Sci-Fi Playtest III

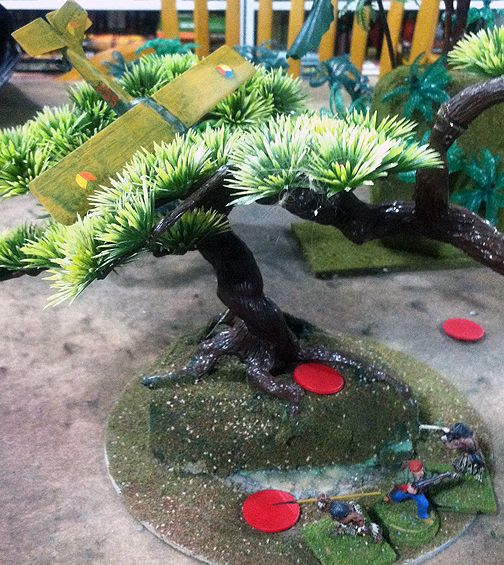
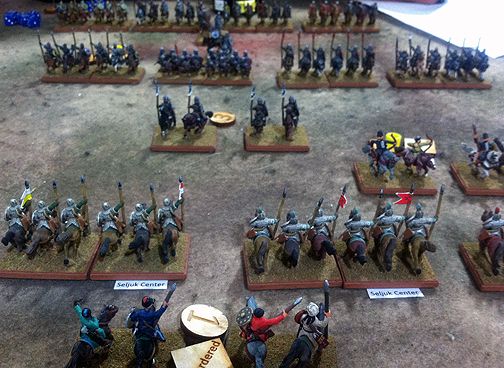
"Those about to die, salute you!" The attackers consult their hand of tactical Combat Cards after dropping in to assault our industrial installation
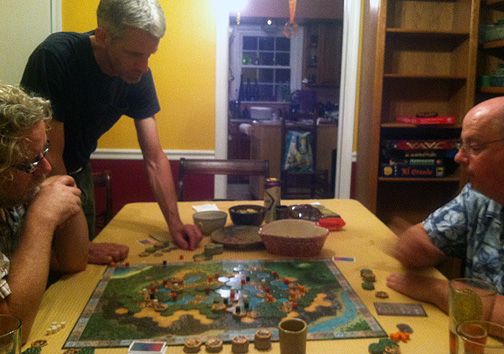
 The first two playtests of the Combat Cards rules that Keith had downloaded hadn't gone particularly well, in my book. After the last game (a WW II scenario), I had lobbied hard for significant changes. There had to be more shooting, in my opinion. Otherwise, we have this several hour battle and no destroyed or significantly damaged units. Keith agreed, and we instituted a couple rules changes this time that had the desired effect.

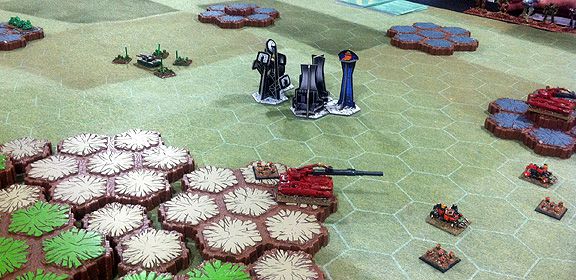
The scenario was a Sci-Fi one, with three commands per side. Joel and I represented the force guarding an important industrial installation. Keith, Allen, and Mike S's friend Eric were the rival corporate force dropping in from space to wrest control of it from us. Mike S was the rapid response drop force coming to assist our defense. The effect of this was Joel and I deployed first. We chose to deploy our commands back-to-back, with the installation between us. There was a clever mechanism for the enemy's space drop. The player would select a unit and designate a target hex. He would then pull the top card from his stack and consult the "Drift" instructions. This could be Dead On (never happened), 2 hexes towards the nearest friend or enemy (2 separate cards), or 4 hexes off (towards nearest friend/enemy). The drop was humorous, as forces scattered or drifted way too close for their own comfort towards our deployed troops. Mike S dropped in a conservative distance off, and we were set to begin.
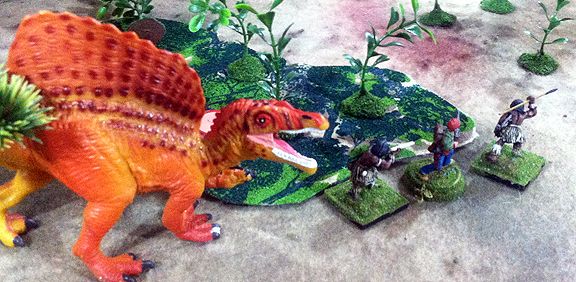
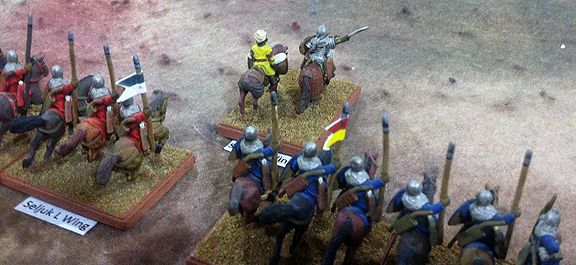
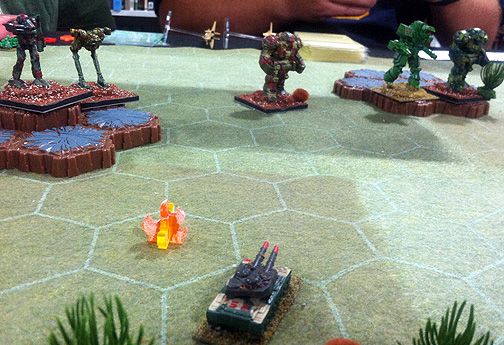
Joel's troops on the left and mine on the right, deployed back to back, guarding the industrial installation from hostile, armed corporate take over
As I mentioned before, I did not like how there was very limited combat going on in a modern or futuristic game. Previously, the only time you could shoot was with an "Open Fire" card, or in response to enemy unit with an "Opportunity Fire" interrupt card. Keith changed this to troops being able to fire on ANY movement card, which meant there'd be a lot more things blowing up around the table, which is what gamers like to see! Keith had decided to randomize movement, and we gave him a lot of grief on the first turn as it turned out all three enemy players moved before we did. We should have been happy, though, that they moved fast. All three of us had our hand of 8 cards full of Opportunity Fire cards. When the enemy started moving, we blasted the snot out of them. Keith lost a unit immediately to Joel's deadly shooting, and one of Allen's units fell victim to mine, as well.

It helped us that Joel and I began the game with nearly all of our units dug in and in cover, as per the scenario rules. The return fire did not do much to us because tactical modifiers adjust the damage shooting inflicts on the target. If you have an advantaged shot, it makes the damage more deadly, if disadvantaged, less effective. When you shoot, you count up the net shifts up or down, and then flip the top card of your deck. Results range from Eliminated, Out of Action (misleading, you can recover from it), Shaken, Fall Back, or No Effect. So, our dug in and in cover modifiers made their shots do little to us. I had two units with "Shaped Charges" which move the level up 2, plus I was shooting from elevation, which shifted up. So, my attacks were eliminating Allen's units ranged against me, while his were just making my go Shaken, or less.
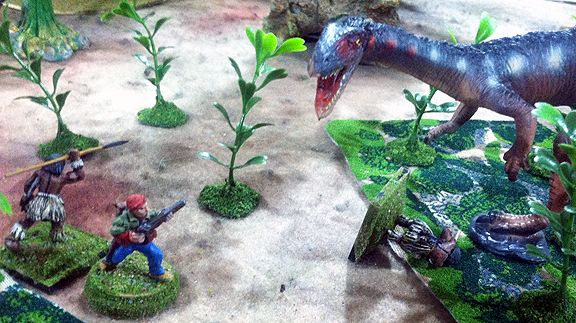
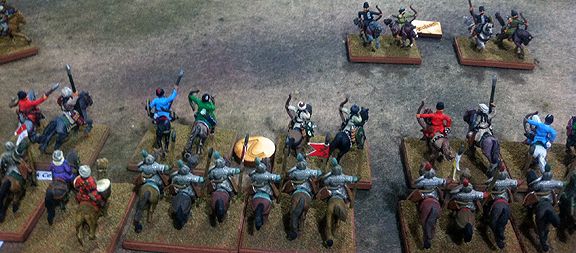
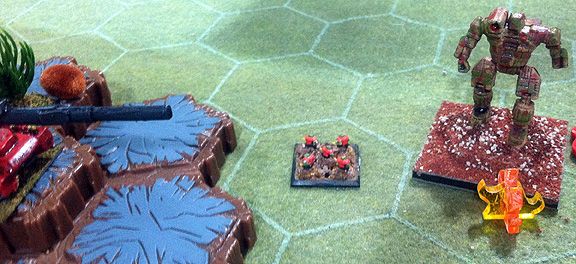
Joel blasts away ineffectively against the three big giant robots, at left. Dug in and in cover, with advanced damage control, they were impossible for Joel to damage no matter how many tons of explosives he threw their way!
The one foe we couldn't dent was Eric's contingent of 3 giant robots, Keith classified as Behemoths. Not only did Eric keep them in cover or dug in much of the battle, they also had a special damage control modifier that lowered the effect one level. Joel launched several air strikes and pounded away at him, but caused no losses. Meanwhile, Keith was taking shots from both Joel and Mike S's advancing troops. He ended the game with only one or two units left. On my flank, I was receiving fortunate "Opportunity Fire," "Open Fire," and movement cards. So, after his advance was blunted, I closed in for the kill. My big killing machines were my mechanized units with the shaped charges. However, even an infantry unit got a kill in a close assault against a unit the my Fire Support had softened up.
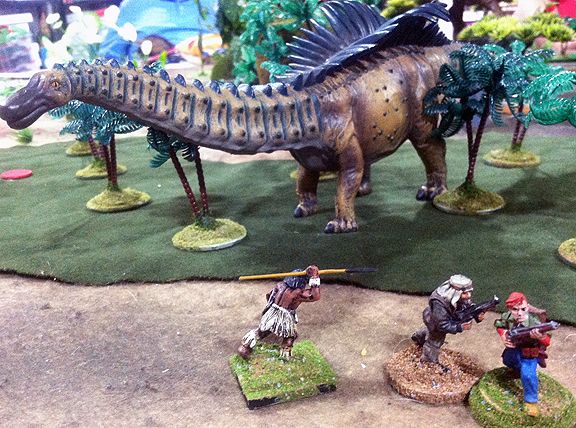
One of Allen's robots bursts into flame as my infantry close assault it (after the fire support unit on the hill softened them up). Fortuitous cards? Or good, combined arms tactics? Guess which *I* will say!
With each Keith and Allen down to one or two units each, and the defending forces having taken only one loss, we decided to call the game. I enjoyed the game much more -- not because we were doing so well. Instead, you were able to actually cause losses to the enemy side. I think Mike S said at the end of the game that of the 10 units we destroyed, maybe only two would have been under the original rules. I told Keith I think the tactical situation -- with us starting in cover and dug in -- gave us too big of an advantage. He didn't seem to think it was as important. Part of it, he said, was that we got the right cards from our decks at the right time. I agreed that did happen, but when coupled with our tactical advantage in damage shifts, it produced a bloody nose for the attackers and a resounding victory for us.
Joel's battery fire of smoke cover -- meant to mask the robots and make them leave their cover and fortified positions to shoot (but off target) -- obscures the battlefield as we call the game. One of Keith's two remaining units is out of action near the installation, while the other hunkers down on the reverse slope of the hill.