 |
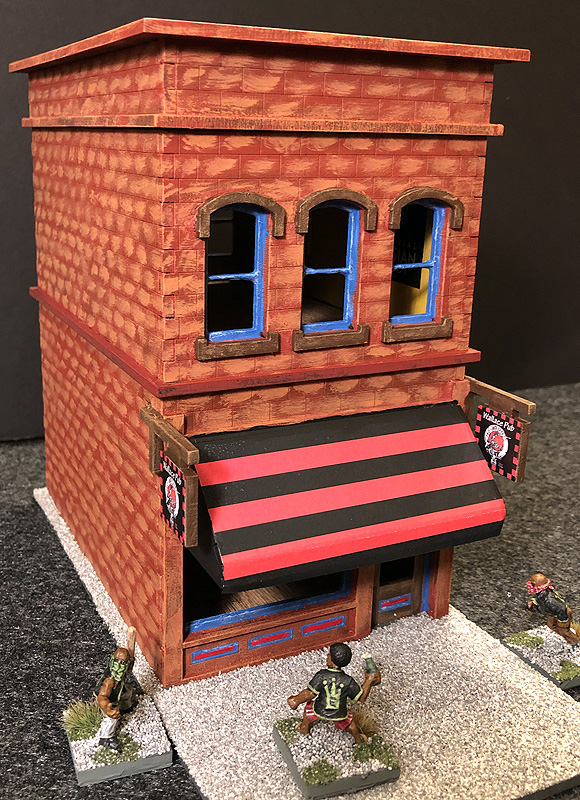
| The newest addition to my miniature city -- Wallace's Pub, a microbrewery named after on of my home-brewing friends |
I started naming and putting signs on the 28mm MDF buildings that I've been making for my modern city games. So, when I decided to make the next Sarissa Precision building a brewpub, it was only natural that I name it after my friend, Mike W. He is our usual host for our Sunday evening gaming. This is not only because of his spacious downstairs and excellent lighting, but also because he always has two home brews on tap!
 |
| The first floor interior - note the travel posters, pub sign, and posters advertising their Scottish Export Ale |
The first thing you notice immediately about the building is all of the signs and posters that I've printed off and glued onto its surface. I've realized there is no way my hand is steady enough to hand-paint signs and logos. And why do it, really? Printed things off in color and gluing them onto it is so easy -- not just to make but to customize. The brewpub's sign, for example, is a combination of several images and some tweaking in Photoshop. One part is the Clan Wallace crest, surrounded by a red and black checkered border, along with the pub name.
 |
| The brewpub is a narrow, 2-story, brick building from Sarissa Precision in which the roof and upper level separate |
The travel posters on the walls were simply found doing Google Image searches, and then resizing them in Photoshop. I print the images off at the local Office Max on their color laser printers. The posters for the individual beers I found online, and then Photoshopped and modified them with the Wallace name. It took a couple hours of work one evening to do it, and was a lot of fun.
 |
| The posters in the upper level (Highland Ambush is my favorite) -- the floor is also printed off and glued down |
As always, putting together the Sarissa Precision MDF buildings was easy. They truly do go together well with a minimum of parts. I did my usual prime with Krylon Acrylic matte black, followed up (oh, about 3 months later, it seems!) with a 50/50 mix of black paint and water. This base accepts paint well, but the black means you have to do two coats on the walls to fully cover. The interior walls of the building I painted with a warm yellow gold color -- incidentally, similar to the walls of my house! I thought it would look really good with the brick red color of the outer walls.
 |
| The Eastmoor Kings check to make sure the coast is clear before breaking in the back door (note door window transom) |
The rectangular, brick-like pattern was incised on the outer walls. Although the dimensions of the blocks were a bit large for true bricks, I wanted the pub to be brick, so painted it that way, anyway. I started with a red-brown base coat. Letting the base coat dry overnight, I next dry-brushed Howard Hues Middle Eastern Flesh in the interior of each block. One drawback of MDF over resin buildings is that no real 3-dimensional details can be incised on them. So, this is my standard attempt to give the illusion of 3-D with Sarissa buildings. It tends to turn out well, and this one did, as well.
 |
| I had fun putting the images in Photoshop and changing the brewery names to "Wallace" |
The highlights were painted a medium blue, including the doors and window trim. I painted the upstairs moldings above and beneath the windows in dark brown. I wasn't sure what color to do. I felt mirroring the medium blue of the other trim would be too much. Dark brown seemed to be a good, muted color to go with reddish brown brick. For the roof, I've taken to painting them gray, and then brushing on white glue followed by coarse, blended gray ballast from Woodland Scenics. I like the effect it gives -- a bit of 3-D in a mostly two-dimensional facade.
 |
| A good look at the dry-brushed brick effect to complement the incised lines (perhaps I should have washed them?) |
One of the touches I tried this time was the transom window above the door. Rather than leaving it empty, like I usually do with MDF windows, I printed out a colorful, stained glass pattern and glued it into place over the rectangular opening. I like how it looks. Of course, I cheated a bit and did both in regular writing, rather than have a reverse on the opposite like you would see in a glass window!


Looks good. The posters are a nice touch.
ReplyDelete