Tuesday, September 12, 2023

Three Warlords of Saga


    My first warlord prize stand for the Saga Age of Melee tournament, a "Welsh-style" general

Last year, I painted up a handful of warlord stands as prizes for the Advance the Colors 2022 Saga Tournament. I wanted to do the same thing again, but figured that doing them in several batches, rather than all at once, would be easier. I am running two tournaments this year, so picked out one batch of figures for the Ancients tournament and one for the Age of Melee (all historical periods). I would be painting at third warlord stand for myself at the same time. With three figures per stand, nine figures wouldn't be so bad, right?

    Using Gripping Beast's "Aetius" figure, I created a warlord stand for Roman-style armies
Wow...these three stands seemed to take FOR EVER...FOR EVER (channeling the movie "Sandlot")! Granted, the warlords themselves were mounted while their standard bearer and bodyguard were on foot. Still, that shouldn't take that much longer than a normal batch of 8 miniatures, should it? Apparently so. Being general or heroic figures, they did have a lot of detail. And being prizes, I wanted to make sure I did a bang-up job on them. How embarrassing would it be if the painted warlord stands were the last prizes chosen? Last year, they were some of the very first chosen, which I found gratifying. I received a lot of kind words and praises for them, so I had to make sure these were up to the same standard.

    I would have to say this stand is up there in my all-time favorite warlord stands I've painted for Saga
The Age of Melee stand would use as its base a mounted general from Gripping Beast (I believe), called "Mounted Welsh Warlord." It is an incredibly cool figure with scale armor and a dashing half-cloak over his shoulder. The horse is rearing majestically and it is simply a great pose. I decided to alternate silver and bronze scales, and was happy with how those turned out. I crossed my fingers and did a tartan for the cloak, which came out great, I felt. The yellow squares at the intersection of the blue and green "grid" really set it off. The shades of green and blue colors gives a nod to current Scottish tartans, so I felt they looked believable.

I added a bard figure to the stand that has been sitting in my unpainted lead drawer for more than a decade. I am no longer sure where this figure comes from, but it is a beautiful casting. I love his sweeping gesture as he points out the subject of his praise. I gave him lots of decoration so that he is dressed to befit his lord's status! The standard bearer was simply a well-armored dark age warrior who I thought fit the look of a Dark Age British style warlord. I want these stands to be relatively generic and useful for at least several or a handful of warbands. In that vein, I made the banner a Celtic-style boar which I found with a Google Image search. I put it in Photoshop and switched out some colors and added a nice border. I made it match the color scheme of the warlord and feel it really stands out.

    I really like how the bodyguard's and standard bearer's shields came out on this stand
Next up was the warlord for the Age of Ancients tournament. I chose Gripping Beast's Aetius, Magister Militum figure for the general. Not only are there Roman armies in pretty much every Saga "Age of..." book, there are other warbands that might have Roman-style equipment in Age of Invasions that it could work for, I feel. Of course, since he is Roman style, I had to go with deep reds for the color scheme, with a dash of purple here and there. I went with a yellow cloak for contrast and think it works well overall with the banner and accents on the clothes. I Googled "Roman Legionary Banners" and sorted through the dozens of images before deciding on the rampaging bull. I added a border of tiny SPQR eagles around it, hoping that it wouldn't date the warlord to one particular period (such as Christian imagery might). You have to remember, Age of Caesars will be out before too long (hopefully), so I want him to be usable for that book's Romans, as well.

    Aethelflaed Alfreds-daughter, Lady of Mercia, is believed to have actually led armies
Finally, the third stand that was for myself -- Aethelflaed, Alfreds-daughter, Lady of Mercia! Ever since watching The Last Kingdom series on Netflix, I thought it would be amazing to have an Anglo-Saxon army with the redoubtable Aethelflaed as a warlord. This daughter of Alfred the Great was raised at court and is lauded by historians both modern and medieval. It is certainly within the realm of Saga to have her as warlord (perhaps even subbing in as a "Legendary Warlord" for her dad?). The miniature (I believe) is from Reaper Miniatures Bones line, but I had long since thrown away the box and had the figure sitting on my desk for years.

    I like this little diorama for Aethelflaed, and I think the plastic Reaper figure turned out well
Another touch I really liked was the Saxon warrior holding his shield over his head, blocking arrows from hitting his Lady. The Saxon comes from the Gripping Beast's Ceorl Shieldwall pack. When I saw the figure, I got the idea to use him as a bodyguard catching arrows intended for his lord (or lady). So, I saved the figure until I was ready to paint up Aethelflaed. Actually, I thought I had two, but could find only one. I originally wanted an arrow catcher on either side of the horse. I drilled out the Saxon's shield and pushed brass wire through. I added "green stuff" to the end of the wire as the arrows' feathers. It came out okay. I am sure others could do better, but I am still learning with green stuff. I wanted a royal deep red and dark blue color scheme for the Lady, and echoed it on her attendants. The casualty figure at her feet was actually a last-minute addition. I had painted it up for something else, but just loved how it looked, so placed it on the base during the flocking stage. As a final touch, I used Aethelflaed's supposed banner from the Bernard Cornwell novels of the goose holding a cross in its mouth.

All in all, I am VERY happy with how these turned out -- even though they took me about three weeks worth of work! Stay tuned for another batch of warlords over the next month...!


Thursday, August 31, 2023

Thracian Javelinmen - 2nd Batch Finished

    My latest batch of 28mm Thracian javelinmen showing off their colorful, geometric-design cloaks
I've had these guys finished for almost two weeks, but just haven't found time to take pictures of them and post them up till this evening. I am close to finishing this Saga Ancients army, with only two batches left to do before they're complete. I plan on having them done in time to loan them out to someone for the Advance the Colors 2023 Saga "Age of Ancients" tournament on Friday night, Oct. 13. So, if you want first crack at commanding this fun, tactically interesting army, send me a message!

    Each of the packs of 8 Crusader Miniatures javelinmen come with 4 different poses
This batch of eight 28mm Crusader javelinmen turned out very nicely, I think. Of course, I'm pretty happy with how the whole warband is looking! Hopefully, this will be another eye-pleasing army on the tabletop. I think it will definitely be up there with my Moors, Picts, and Mongols! Maybe once these are done, I'll have folks vote on which one looks the nicest...ha, ha!

    Because I am inept at using decals, all of my Thracians feature hand-painted shields
As always, I replaced the lead spears that come with the miniatures with North Star Miniatures brass wire spears from Brigade Games. Another thing I try to do when attaching the spears is to make sure each has two points of contact with the figure or base. If you epoxy or superglue a wire spear into a hand with only the palm being the point of contact, it seems you are just asking for them to get knocked off while moving them around during a game. So, I make sure the front of the spear contacts the shield or something similar. If you look closely in these pictures, you should see the second point of contact. When doing this, I tend to lose very few (if any) spears during my games. Of course, dropping them...that's another story!

    I really like how both the flowered green cloak and the blue on blue shield came out on these two figs
Like with the other batches of Thracians, I tend to select lighter colored tunics to offset the more colorful cloaks. I'll use pastel, faded colors for these -- light greens, blues, tans, grays, pinks, etc. Since the Greeks of the time remarked on their colorful cloaks, I feel justified historically in using a brighter palette for those. I do mix in duller colors on cloaks to represent those that have faded over time. I'm assuming they wouldn't buy or make a brand new cloak every time they went to war.

    As always, the fine detail work is a mix of brushwork and using colored micron pens
For the Thracians' fox-skin hoods, I use a range from dark red-brown through ordinary browns to faded leathers. I figure that, like the cloaks, some members of the warband have newer hoods while others have old ones that have been through rain and sun to bleach their color. I do the same with their boots, using a mix of colors. I tend to plan out my tunic and cloak color -- writing what I will use down on the cardboard base I attach them to for painting. However, the rest of the clothes are improvised. I will set out the three colors I will use for the hoods, for example. And then I will look at each closely and decide which figure goes with which color at this stage, lining them up next to the paint bottles.

I like how the "Eye Shields" turn out, but I don't want to overuse the design  
Thracians were known for their reddish hair, but I assume there was a mix of other colors, too. So, I mix in browns and blonds, as well. I switched the bright blue I was using for their eyes on this batch and liked it much more. I'm not sure if that is something you can really notice in the photos, though. Eyes are kind of hit or miss for me, too. I'm very happy with how some figures' eyes come out, and other times I'm disappointed. I don't know whether to blame my close up vision fading a bit, my hand's steadiness, or the sculpting of the figure. The latter IS important to having good eyes come out on a figure. If the eye is detailed enough and accessible enough, I can usually do a decent job on them without ending up with "googly eyes"...ha, ha!

  I'm very happy with how this batch of Crusader Miniatures -- actually the entire army -- is turning out
So, what's next? Well, I am taking a one-batch break from Thracians. I am painting up three warlord stands. Two of them will be prizes for the Advance the Colors Saga tournaments. For those who didn't know, we are running one tourney on Friday and another on Saturday, too. So, if you're a big Saga buff and live within driving distance of Springfield, OH, you really should consider attending. We had 24 players in our 2022 tournament, and turnout looks like it is going to be great again, this year. I have players driving in from as far away as Canada and South Carolina already. So, come join the Saga fun!


Tuesday, August 29, 2023

Coal Miners & 'Detectives' shoot it out at the Battle of Matewan, 1920


    Miners and passengers waiting for the 5pm train out of Matewan, WV, wait for action to unfold
Summer was waning, and I decided to plan one last gaming weekend out of town. Four of us headed north from Ohio to Michigan to meet up with Jim W and his gaming crew at his Blissfield, MI, Clubhouse. Last summer, I went up to see and game in Jim's building he had purchased to house all his gaming stuff (and host his weekly or so get-togethers with his crew in Southeast Michigan). I imagine there are quite a few miniature gamers out there who have a pipe dream of having their own building for their private gaming clubhouse. Jim has done it, and it is a cozy place for a game.

    Locals eye the armed miners warily, wondering if gunfire is about to break out in their WV town
We drove up Friday after work and met Jim, Ted, and their wives for some tasty Mexican food. Saturday morning, we reconvened at Jim's Clubhouse -- or "Toy Box" -- as he sometimes calls it. On tap was his second playtest of the Battle of Matewan, 1920. This "massacre" -- as it sometimes is called -- was a gunfight between coal miners in the area trying to unionize and the detective agency thugs hired to put them down. Jim had visited Matewan this year, walked the streets, toured the museum, and even chatted with the director about his game to their enthusiastic response. He's been painting up figures for the scenario, as well as constructing period buildings, for a good part of 2023.

    Jim's Matewan tabletop is very eye-catching, and has been modeled to look like the town he visited
Jim was using Fistful of Lead Core Rules, which are the same set I use for my post-apocalyptic games. Most of the Ohio crew (Jenny, Mike S, Jason S) were playing the miners. I joined Jim's friends Ted and Gene to play the Baldwin-Felts thugs. I like to tease Ted about his bad luck (mainly because it is nice to know someone is as inept at rolling dice as me). So, perhaps putting both of us on the same team wasn't my brightest idea of the day! Jim explained the scenario to us, we divvied up our troops, and dealt out the cards for our first turn.

Baldwin-Felts Detective thugs round the corner on Railroad Street to see armed miners gathering
Much to my chagrin, we deployed in a double-deep line, out in the open, at the end of the street. Many of the miners were in cover on the streets or well-positioned in windows or on rooftops with a bead on us. Well, the rifle-armed ones would have us in their sites! Those miners armed with shotguns and pistols would need to close the range -- just as our guys would. In that vein, I decided to bolt right across the railroad tracks for cover. One by one, I sent my guys over the railroad tracks and ducking behind one of Jim's many fine die cast, period automobiles. The last to move was my rifleman, who would be in range of any nearby miners. He took a potshot at one of Jenny's miners who was running along the station platform and gunned him down! Jenny was okay with that, though, as she had been steadily picking off poor Ted's men and would continue to do so against him and Gene all game!

    The first of my agents darts across the tracks to the cover of an automobile
Jason's miner who had been taking cover on the other side of the car fired once at my guy, missed, and then retreated to cover at the corner of the building. On the second turn, I had much higher cards. I moved my shotgun armed detective to point-blank range of Jason's miner and blasted him, knocking him out of action. Two shots, two enemy out of action! No one could accuse me of having "Ted dice" today!! I continued to move all four of my figures around the back of the train station, chasing off the couple of miners who had been lurking back there. If I remember correctly, we gunned down another miner before my shooting luck began to cool. The miners didn't run away, but backed steadily into cover and awaited the incoming reinforcements.


    Jason's pistol-armed miner backs up to the corner of the train station as more thugs head his way
One feature of the game that was slowly making itself felt was Jim's rule for Miner Reinforcements. When Jenny, Mike, or Jason lost a figure out of action, they were immediately given another miner to bring in anywhere on the board edge on the next turn. When we lost a figure, no such luck! We had already taken a number of casualties on Railroad Street to the hot dice of Jenny, Mike, and Jason. Gene and Ted were shortly down to two figures, and then a single figure each. Fortunately, I had taken no losses, yet. Meanwhile, the miners were staying at their starting numbers. Their numbers were beginning to tell.

    It is to no avail as...BOOM! A shotgun blast rings out and my boys have killed their second miner
However, Ted had a great shot on our target for the mission -- Sid Hatfield, Matewan's police chief. He fell wounded just outside the entrance of the train station. I decided it was an opportunity that I couldn't pass up. My shotgun-armed detective dashed through the train station and pounced on Hatfield, defeating the wounded police chief in melee and taking him in custody. We pulled him into the train station. I told Ted and Gene we should concentrate all our resources here to hold on for the 4-5 more turns we need to before the 5pm train arrived and we could hop on board with our prisoner and skedaddle out of town.

    We begin to swarm around the back of the station -- avoiding the killing fields on Railroad Street
It was a forlorn hope, though. Man by man, our detectives were shot down by the miners' superior numbers. It felt a little like that situation from Black Hawk Down when the rangers realize they've riled up the whole city and are facing off against overwhelming numbers. My shotgun armed detective was killed, so I moved up Lee Felts, one of our leaders, to take over control of the police chief. Steadily, our detectives fell, one by one, though. My leader, Lee Felts, went down, too, and we lost control of the police chief. Before long, my rifleman who was trying to hold off the swarms of miners outside, was the sole survivor. 
    My detectives move around the back of the train station, searching for the police chief to arrest

My rifleman was doing well, though. However, the movie changed from Black Hawk Down to Dawn of the Dead. As each miner he killed fell, another one popped up in its place. Though my rifleman had been hugging the cover of a car nearly the entire game, the miners able to show up wherever they wanted. He was outflanked repeatedly. Finally, hearing the sound of gunfire inside the train station cease, and seeing miners closing in on all sides, the rifleman through down his rifle and held up his hands.

    Our high water mark of the game! My detective defeats Chief Hatfield in melee & cuffs him!
My crew of four detectives had put up a heck of a fight. We had defied the odds more than once -- especially in driving back the miners in melee inside the train station. Jason's rolls with his 12-sided die were more apt for a 4-sided one. I don't believe he ever rolled above a "4", and quite a few came up with "1's!" Throughout the game, my forces knocked half a dozen or more of the enemy out of action. That was way more than I'd lost. So, I felt Lee Felts' boys held up our end of the battle. Ted and Gene? Sigh. Well, they had "Ted luck"...ha, ha! Still, we had a blast playing the game. It moved fast, looked great on the tabletop, and had very interesting twists and turns in the action.

    The tide is turning, though, as more miner reinforcements arrive and one of my thugs goes down
Thanks to "Captain Jim" for hosting a game for us. It was great to see the Southeast Michigan crew, and I look forward to seeing them at Advance the Colors 2023 in Springfield, Oct. 13-14. Jim will be running the Battle of Matewan (tweaked after our playtest) there. So, if you want to get into this historical wargame set not too many hours (or years) away, I encourage you to attend and play. His games are always a blast!

    It's 'Alamo time' inside the station as Lee Felts tries to hold onto the cuffed & wounded police chief

    On the other side of the street, bodies of detectives (tan crosses) litter the sidewalks

    My rifleman did a solid job holding down the flank before surrendering to overwhelming numbers

Monday, August 7, 2023

First Star Wars Skirmish Using Galactic Heroes

    Keith dug out his old Wizards of the Coast Star Wars Miniatures for a game of Galactic Heroes
We have been using the Wiley Games rules for a number of different miniatures games. After watching Rogue One the other night, and reading some really cool threads on the Lead Adventure Forum, I was itching to give it a try. The only problem was I have zero Star Wars miniatures, and only a handful of Sci-Fi ones.

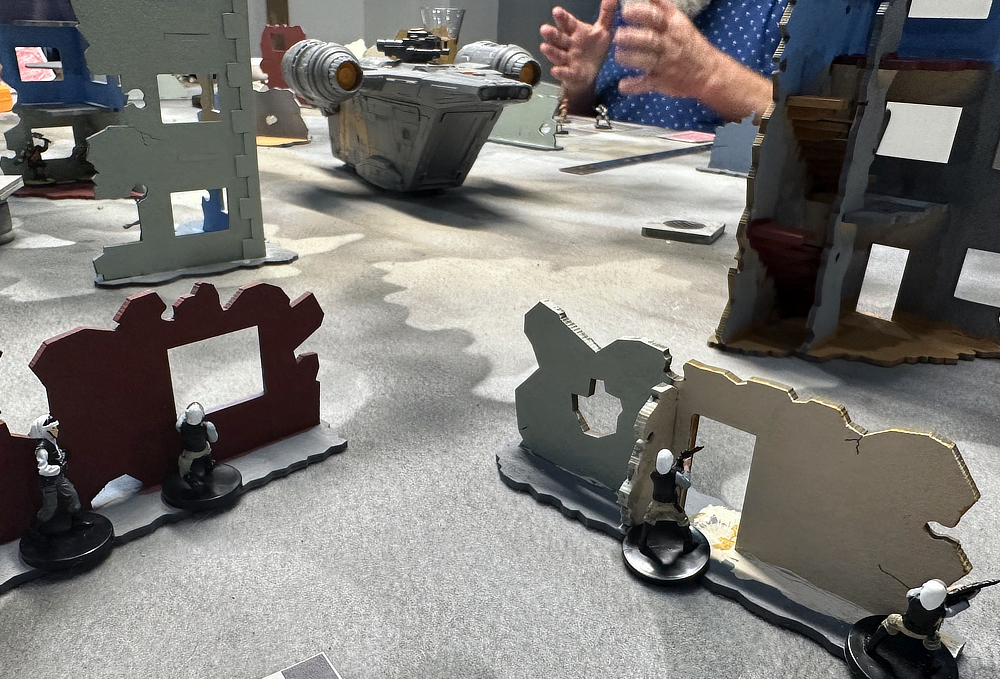
    My four Rebel troopers deployed on the edge of the ruined spaceport overlooking our goal
No problem, though. Keith has Star Wars figures. Keith has everything! So, all it took was a casual mention of how, "Gee, I really think we should give it a try..." and Keith volunteered to run a game of Galactic Heroes (Wiley Games' Sci-Fi skirmish using their Fistful of Lead engine) for us. Success! It HAD been awhile since he ran a game, so doubtless he was ready to give it a go. Plus, he said he has dozens and dozens of the prepainted plastic figures produced by Wizards of the Coast back in 2004. Keith was obviously the right man for the job, and he emailed out that he'd be running a game for us on our normal Sunday evening gaming session.

    We had six players -- two Rebels, two Imperials, and two "Mercenary Scum" spaced across the table
Mike S also has dozens of the figures, too, and brought his along, as well. However, there was no need for his reinforcements, as it turned out. Hmm...if BOTH of them have way more than they need, maybe I should see if either would be willing to part with a few? I could jazz 'em up a little and...well, I did say that I don't have any Star Wars figures, didn't I??

    Mercenary Scum player Joel sent his Gomorrans to investigate the ship, getting a jump on the others
There were six players on the evening of the game, and Keith divided us up into three factions: Rebel Alliance, Imperials, and Neutral Mercenary Scum (somebody said...not sure if it was Keith or another player disparaging the mix of droids, aliens, and leaders who had "Force" powers. Keith gave each of us a mission. I was a Rebel player, and me and Mike W were to get to the starship that had set down in the center of town and see what useful technology we could scavenge from it. The two Mercenary Scum players, Allen and Joel S, had a similar goal. The Imperials -- Mike S and Jenny -- were to patrol the ruined town looking for ne'er do wells, criminals and rebels. 

    We were having none of that, and drew a bead on the pig men, firing off blasters to no avail
Keith had us toss down a bunch of cardstock ruins to simulate a war-torn spaceport somewhere in a galaxy far, far away. Keith DOES own miniatures for every period ever imagined. However, his terrain is definitely in the "quick and simple" category. Still, this was a playtest, he reminded us. I'm sure he has more fancy terrain squirreled away somewhere in his basement that will see the light of a "G Class" star someday! I know I have a handful of buildings from Miniature Building Authority in their Middle Eastern line which would certainly fit the desert planet theme of many Star Wars films. Now...does that mean I will be painting them up soon...? Well, er...I mean -- Keith has everything! Well, we'll see...

    Thankfully, Joel's Assassin Droid & Trash Can Droid were blasting away at Stormtroopers instead
My Rebel Alliance troopers (Leader, Specialist, and two blaster pistol-armed troops) set up in the ruins on the corner of the board. Our goal would be to have our Specialist with his blaster rifle provide covering fire while the two troopers dashed forward in stages towards the spaceship. The leader would cover them and be in the middle to rally any troopers who needed it. My fellow rebel, Mike W, was W-A-Y on the other edge of the board and would never make it to the spaceship. He did get in a firefight with some Stormtroopers, though, like a good rebel! The other Stormtrooper player, Mike S, was directly across the table from me, but we were using a likely too large table, so he struggled to get a shot off at my guys. Plus, Allen, the evil Mercenary Scum kept him VERY distracted.

    Meanwhile, Allen's Mercenaries were giving the other Stormtroopers more than they could handle
Speaking of which, Allen's brother Joel was immediately to my left. Joel had a force of three Gomorran grunts (remember those pigmen from the Star Wars universe?), an assassin droid, a walking trash can (the walking square box of a droid) that we finally decided had a blaster mounted to his trash can lid top, and a leader who had the Force. He was a very creepy alien looking dude who came from a planet plagued by extremely bad luck. Joel's rolls were AWFUL!

    The Gomorrans reach the spaceship and begin to investigate it with their thick, piggy fingers
Anyway, as I crept forward towards the spaceship, Joel sent his grunts (perfect name for pig-faced aliens) towards the ship, beating me there. Luckily, the assassin droid and the trash can focused on shooting Jenny's Stormtroopers instead of us. I admit that I started hostilities between Joel and I when my laser rifle-armed specialist took a potshot at a pig man. Joel's leader then used the Force to attack my specialist, who shrugged off his attack. On my next turn, he ran to the window, drew a bead on the alien-mercenary-scum-leader and blasted him, knocking him to the ground, wounded. 

    The Force was NOT with Joel's leader, as my specialist & his blaster rifle took him out of action
This started a one-sided fight between the two. Joel's leader popped back up, used the Force to push my guy out into the open (and away from the window, so he had no shot). Not content with keeping me at a distance, the creepy spindly alien leaped out of the window and engaged my specialist in melee. Joel's leader was a combat specialist (roll two dice, take the higher in melee), and my specialist was a long-range guy. Joel proceeded to roll a "1" and "2" for his combat rolls. My stalwart rebel trooper knocked him down and gave him a second wound for good measure. On my turn, he shouldered the blaster rifle and finished him off. In none of those rolls, did Joel ever roll above a "3," I believe!

Rebel trooper cleverly uses the final action to sprint to the ship and 1st move next turn to reach it

He got his revenge, though. As I was being clever, I used the last move of the turn to sprint one of my ordinary troopers across the wide open ground towards the spaceship. I used my first move on the following turn to dart him into the cover of the spaceship, right underneath the landing ramp. One of Joel's Gomorrans fiddled with some controls and released the ramp. Keith let him roll an attack with the surprise descent of the ramp and it wounded and knocked down my out-of-breath rebel trooper! As you can imagine, much hilarity erupted around the table at my expense!

    Allen's tiny alien laughs as the Gomorrans release the landing ramp on my out-of-breath trooper
Allen, who had been focusing on Mike S's Stormtroopers, decided to sneak up a diminutive alien up and try to kick my trooper while he was down. The Force was obviously with me that night (and not with those supposedly having Force powers!). My trooper defeated the tiny alien -- sorry, I forget which race he represented -- and leaped to his feet. On his turn, he snagged a communications jammer from the spacecraft and bolted away as fast as his rebel feet could carry him.

  Droid trooper uses the newly-discovered 'Ready' action to wait for someone to run into the open
Allen made up for this turn of bad luck by taking his frustrations out on a different Mike (Stelzer, playing the Stormtroopers). His Force-wielding leader dashed out into melee with a squad of Stormtroopers. Just like in the movies, he light-sabered hapless trooper after trooper, leaving a trail of crispy white plastic armor in his wake. Between the shooting kills Allen had inflicted earlier on Mike, and this melee mayhem, the squad of imperials was left with one figure. He promptly fled the scene, doubtless calling in backup!

    Allen's leader wades through Stormtroopers with his light saber like they were...well, Stormtroopers!
Seeing as how my rebels had taken out 3-4 enemy, including a leader, and had snagged some tech from the spaceship, we decided to leave the scene of our crimes against the Empire, as well. It had been a successful outing, with no losses. We rationalized the communications jammer was exactly what we had been looking for. How else would we ensure the Imperials we ambushed couldn't call for backup?

Cue the Star Wars music, and hopefully there will be a sequel soon...!

Wednesday, August 2, 2023

Painting Ancient Thracians Continues - On to the Javelinmen!

    My next batch of Thracians -- eight 28mm warriors with javelins from Crusader Miniatures
The painting of my next Saga army -- the Ancient Thracians, a Balkan people that raided the Greeks and others in the area -- started up again after Historicon. I am on to the last troop type -- the warriors armed with javelins. This will be the most numerous part of the army, as I plan on fielding three units of nine figures each (in my current warband configuration). This is the first batch of eight.

    A look at the freehand patterned cloaks and shield designs that force me to keep my batch size low!
Why am I not painting the javelin-armed contingent in three batches of nine? First, I think I may paint up some extra figures in case I want to change the configuration. The biggest reason, though, is that the Crusader Miniatures (which I purchased from Badger Games) infantry come in packs of eight. Plus, with the decorative cloak patterns, they are a LOT of work. I've found in my years of painting miniatures that if my batch size is too large, I lose motivation and stop painting. By keeping the batch size small, I see progress which inspires me to keep going.

    A look at the front and back of two of the figures in this batch of eight Thracian javelinmen
One reason I enjoy painting metal miniatures more than using plastic kits -- which seem to be more popular these days -- is the "Assembly" step goes very quickly. All I had to do for these is epoxy on their small crescent shaped shields and the javelin in their throwing hand. I know many (most?) gamers use superglue, but I stick with two-part, 5 minute epoxy. I find it holds best and I rarely have shields or weapons pop off during a game. Typically, I use poster tack to either hold the weapon or miniature in place while the epoxy dries. Sometimes, I will shave off some of the metal to give a flatter surface to join in the shield and forearm, for example.

    The detail work on the shields and cloaks is done with a mix of freehand brushwork & micron pens
I brush prime my miniatures white, and then do the flesh. I use a craft paint flesh and then do a Terra Cotta colored wash over the flesh to give it a more ruddy look. Next, I do the tunics. I chose mostly pale colors for this batch. Since the cloaks are not decorated other than a contrasting hemline color, I didn't want them to distract from the brighter, fancier cloaks. Ancient sources describe them as patterned in "geometric designs," and looking at examples that survive from Greek vases or frescoes on tombs, you have a lot of leeway in what to paint. I typically sketch out a design with notes designating colors on the cardboard base that I glue my figures to before priming and painting.

    I really like how these two cloaks came out, especially the blue one!
After the tunics and cloaks, I proceeded to the hooded headdress and the boots. All four clothing pieces receive a highlighting dry brush in a lighter color. Even the leather belts are done in two tones -- a lighter brown base and leather highlight. That's one of the main differences between painting 28mm and 15mm miniatures, I feel. Virtually every bit of detail on the figure gets a base coat and a highlight. It is still not done at that point, though! I go over all my figures with either a brown or black wash. Most figures get both -- the skin, white, yellow, and tan tones on the figure get a brown wash, while the darker colors like reds, greens, blues, and darker browns, get a black wash.

    One batch down, and 2-3 more to go on these javelinmen and my Thracian army will be complete!
Once the clothing is all done, I do the shields last. For any figure batches which I used a micron pen on, I tend to do a first clear coat BEFORE the wash. I've had the ink run because of my wash otherwise. With a spray of Testors Dullcoate, the ink seems to be pretty dry or sealed in so doesn't run. Last step is the flocking, and another Dullcoate or two, and these guys are ready to hurl their javelins at the enemy on the tabletop!

Monday, July 31, 2023

Prison Cell Block & Research Facility

    My Woodford - Prison Cell Block MDF building from Warcradle Studios that I constructed
A few years ago on a trip to St. Louis, I picked up an MDF building on a visit to a local gaming store. It was from Warcraddle Studios "Red Beam Designs" line, and titled Woodford - Prison Cell Block. It looked like the perfect thing for a Pulp or Modern game, kind of a combined research facility and row of prison cells, to my mind. What dastardly experiments were carried out there on the unfortunate detainees? Of course, I had to buy it and find out...ha, ha!

    Research facility section -- note the safety and research science posters I glued on the painted walls
Well, I finally got around to constructing it because I felt it would be the perfect building for the next chapter of my post-Apocalyptic campaign. Not to divulge too much, but such a combined research and detainment facility is the planned the centerpiece of that scenario. This was the first building I would be constructing from this company, so I was curious to see how it stacked up against Sarissa Precision (where most of my buildings are from) and TTCombat (which I had built one or two from).

Top view of the L-shaped building with the research facility on the left and prison cell blocks on right
It seemed to go together as easily as most of the Sarissa Precision buildings. I used tacky glue to affix the floors, walls, door frames, etc., together and they seemed to bond the MDF well. The thickness of the pieces seemed about the same, too. One interesting aspect was the building came in two parts, creating an "L-shape." The longer section of the "L" contains what I termed the research facility part. The shorter part contains three cells and a hallway outside of them. I was possible to glue the two halves together, but the length and width of the building would be huge! It simply would not fit in any of my 13" square carrying boxes. So, I decided to leave them as two separate pieces, and simply slide them up against each other on the tabletop.

28mm police officer patrols the corridor outside the 3 prison cells - what is inside, hidden by the walls??
That was when I discovered the most surprising thing about the Woodford - Prison Cell Block. There was no roof! The building came with no MDF piece for the roof, which is the first time that has ever happened to me. All of my Sarissa Precision buildings come with a roof, as did my TTCombat ones. Very strange! Upon looking at the image on front of the package, I admit that it shows the building roofless. I had assumed that was so you could see how it was divided into hallways and rooms, though. So, a warning out there to anyone seeking to buy a Warcraddle Studios building: Make sure you know if it is has a roof or not!

Patterned paper I cut into shape and glue into place as floors for my MDF buildings

I used my standard method for painting up and tricking out my MDF buildings. After constructing it, I spray painted it with Krylon Matte black, and followed that up with a 50/50 mix of acrylic black paint and water. I painted the interior walls of both building sections first. I then did a dry brush of a lighter color, followed by a black wash to dirty it up. Next, I cut out pieces of patterned paper for the floors. I purchase these at Hobby Lobby where there is a huge variety of textures, colors, and styles. I used a gray concrete looking sheet for the cell floors and two different patterns that looked like linoleum flooring for the hallways and research facility rooms. 

    Painting the windows is the most "fiddly" part of this building - here a guard hears a strange noise...
I also created images of steel doors in Photoshop and printed them out on my home printer. I used images I found with a Google search and then modified them a bit. Once all the doors, walls, windows, and floors were done, it was time to move on to the outside. I decided to go with a couple different texture looks for the exterior walls. There was a small lower row of rectangular stones that I painted gray and used as a stone base. Next, I did a tan-colored stone effect for the main surface of the walls. This facade has fallen away in some places, exposing a stucco like surface, which I painted in a different color.

    Sandbags atop the cork roof give the building a militarized and forbidding look
As if all that wasn't enough, I glued on a decorative wooden beam separating the top from the bottom sections on the exterior. I painted that green to match the two latticed windows. I used that same medium green for the trim around the doorways. Each of the doorway areas came with an upside down "U" frame which I think was a really nice touch in the design. Otherwise, doors in MDF buildings can look somewhat 2-dimensional. I know that on other buildings I have even added in a frame to give it a more 3-D look. 

    Exterior close up, with the tan stone, exposed stucco where the facade has fallen away, & green trim
Once the exterior was painted, I washed it more darkly with the same black wash. I then took an X-acto knife and scraped off a line of the paint to attach the green wood trim sections. I wanted to expose the raw wood so that the surface had something to adhere to on the model. I hoped this trim would make it "pop" a little, adding in another 3-D element. I was really happy with how the exterior looked. My dry brushing of the interior section of each incised square in a lighter, highlight color came out relatively well, I think. 

Since this building houses detainees, whether experimented upon or not, I figured the doors had to be fairly heavy duty. I painted the outside doors a base steel color and highlighted them with streaks of pewter color. I also did the handles and bottom of the window grills in pewter, as well. Above the individual prison cell doors I added in a sign, "Cell Block A," etc. Some of the interior doors I decided to use a printed doors, such as those for the prison cells below.

The doors, which are simply printed out on paper and glued over the outline incised on the MDF
That brings me to the posters. I like to create posters in Photoshop to decorate my MDF buildings. I think it gives them a nicer, more lived-in look -- without going through all the expense and work of painting up interior furniture for each of them. Maybe one day I will have the time to add desks, filing cabinets, etc., to this and my other MDF models. Until then, the posters will have to suffice. For these, I emphasized a lot of "Safety" posters, along with a good mix of Science-themed ones for a research facility section.  To add an ominous tone, I put in one urging visitors and workers to be prepared to "Run/Hide/Fight"! For these, I simply created the image in Photoshop and send it to my Word Processing program to arrange multiple images on so that with one page I can print multiple posters, doors, etc.

    Another look at the exterior and the scratch-build foam board covered with cork paper roof
At this stage, the building itself was done -- except for the roof. I went back and forth about what material to use for the roof. My first thought was black foamcore -- but I was worried that whatever surface I put on it would cause warping. I considered MDF and styrene plastic, too. I didn't have a large enough sheet at the time in my possession for either material. MDF and styrene would likely not warp, but would be much heavier than the foamcare (which I DID have in my possession). So, I made another trip to Hobby Lobby for inspiration. While looking at the different textures and patterns of their paper, I found one style they had that was actual thin cork with an adhesive backing. The cork surface's mottled brown look would match the exterior of the building, I thought. Plus -- attaching paper to the foam core would not cause warping. 

    This sprawling L-shaped building actually went together and painted up fairly easily
Was this the solution? The 12"x12" sheets were not large enough for the whole roof, though. I figured that if the seams looked bad, I could make a thin concrete "rib" out of bass wood and glue it atop the roof strategically to hide the seam. I also wanted to put in square strips of bass wood as lugs to hold the roof in place so it didn't slide around. That part was done easily enough and the roof fit snugly atop the MDF building. I cut the cork paper so that about a 1/4" would wrap underneath the roof, covering the "foamy" edge of the black foam core. Unfortunately, the adhesive backing wasn't strong enough to hold the paper to the foamcore for long. So, I ended up having to press them back into place and then paint with tacky glue where the cork and foam surface joined. This seemed to hold it much better.

Since it is a prison of sorts, my plan was to line the roof with sandbags. However, I didn't have enough pieces, so will be getting a friend to 3-D print me some. I will paint those up when I receive them and glue them atop the cork roof into place. So, technically, the building isn't truly complete. However, it is close enough to take pictures of and post on my blog!