 |
| A close-up of my scratch-built, Snake Rail Fencing used in one of my French & Indian War games |
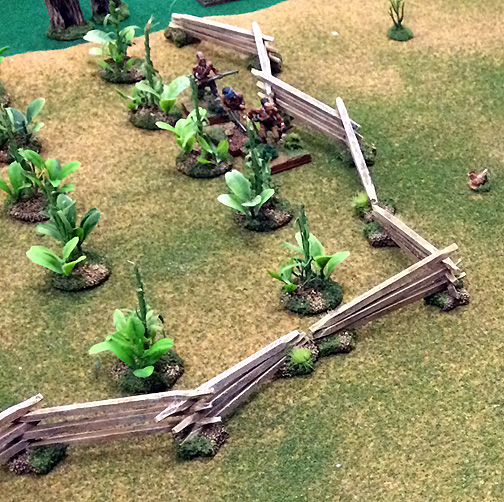
This year's slate of French & Indian War games I will be running using my Song of Drums and Tomahawks rules will feature native raids against European settlements. In the past, I've had a lot of big eye candy on the table -- Indian bark longhouses, stockade forts, cliff sections, and so on. I've kind of ignored the more common things to make settler farmsteads look good on the tabletop. One of those things I knew I needed was fences for fields of crops.
 |
| The "real deal" -- snake rail fencing in colonial America |
I'd seen some posts and discussion of "snake rail" (often called split rail) fences. The advantage of them is there is no need for posts. The alternating, zig-zagging posts stack on top of each other and provide a quick way for a frontiersman to fence his fields without time-consuming digging of post holes. I looked at pictures of a number of them online and discovered there was some variety in how they were constructed. So, I had some leeway in representing them on the tabletop.
My first question was fence sections vs. based and flocked fields surrounded by fences? Considering how my 28mm terrain boxes are bursting out of my closet already, I chose sections as they'll have a smaller storage footprint. The next main question was what to do about the ends of each section? I'd seen commercially produced ones that have the three rails "hanging in air" at the end and did not like how that looked. I thought about "X-shaped" support braces at each end, which I'd seen in pictures. I ended up deciding to go with simply having the three rails sloping down to where they lay atop each other on the ground. I'd also seen this in photos, and it seemed the easiest and least eye jarring way to go.
 |
| In the center of the photo, towards the bottom, you can see two "ends" of my snake rail fence sections |
The third question was how many zig-zags per section? I decided that I wanted each section to be a little less than a foot long (my terrain boxes are stackable, 13" square plastic containers). I cut up pieces of cardboard and played with what looked best. In the end, I simply went with an aesthetic choice. Since each end would feature the three rails simply laying atop each other -- and there would be (by definition) two ends to each section -- I went with four. That way, there would be three places in each section where the rails interlock and only two where they lay flat. It is easier to show with pictures than describe
(see above).
 |
| The bass wood rods that I purchased at the hobby store to create my snake rail sections |
I took a 28mm Conquest Indian figure to the local hobby store that has a good selection of bass and balsa wood. I stacked the various sizes up and compared them to the figure to decide which size to go with. I ended up choosing 3/16"x1/4" rectangular bass wood rods. They were each about two feet long, and I cut 8 of them into 3" sections. I did one prototype first, and then once I was happy with it, went back and assembly-lined the whole batch. That produces a LOT of little sticks.
However, the next step goes much faster than I would have thought. I took a sharp hobby knife and trimmed each end down to a blunt point. I considered trimming the entire length of each of the four edges, but decided not to do so. I know it would make them look more irregular, but the point of these is to give the effect of snake rail fencing -- not necessarily scale them down exactly.
 |
| You will need LOTS of these little 3-inch sections...12 per fence section, if you do it as I did! |
Once all the sections were cut, it was decision time, again. Do I base each section on a full length rectangular base, or put smaller bases under each intersection. I decided to go with the second choice because I felt it would look better. The fence would blend in to the tabletop better that way. Also, I wanted to avoid any situation where the base of the fence section differed drastically from the tabletop. I purchased a couple bags of 3/4" wooden star shapes from the hobby store to rest the fence rails upon and act as mini-bases.
 |
| Trimming down the ends to points was not as time-consuming as I thought it would be... |
I decided it would be easier to do at least some of the painting of the rails ahead of time. I took one of the pointed ends and punched holes in a scrap of insulation foam. This created a rack to hold the rails while they dried. I painted a base coat of dark brown, holding onto one end of each rail, then sticking that unpainted end into the foam rack. Once all of them were dry, I painted the other end, sticking the opposite -- now dry -- end into the hold to hold it.
 |
| The insulation foam rack I created to help me in my pre-painting of the fence sections |
I followed this up with a medium brown dry brush (I like to use Howard Hues Camo Brown). Once again, I held onto one end, then placed that dry end in the rack. Later, I reversed them and dry brushed the other end, as well. The rails were now ready for gluing!
 |
| The wooden stars I used as bases for the fence sections |
I set five of the wooden stars out onto a sheet of paper and placed sticks upon them, rearranging them until I was happy with the layout. I then traced around each star so I'd have a template for each section. I would use Aleene's Tacky Glue to glue the rails to the stars and the other rails. I started at one end, gluing the first rail to the first and second star base. The next rail sat on where the first one ended on the second star, and rested on the third star base. The third rail sat on the second one and fourth start, and so on. Once again, it is probably easier to show in pictures than describe in words. It is probably best to glue one layer of rails at a time and let them dry. Then, go the next four rails, and so on. If you try to do all at once, you end up with some shifting.
 |
| Base coat was a dark brown (I used a craft paint Dark Umber) |
Once they are all dried, I then do two separate dry brush colors. I go over them first with a khaki color (Howard Hues Colonial Khaki). I make sure to get the pointed ends really well with this color. And then, lightly, I finish it off with a gray dry brush (Howard Hues Rebel Gray). Most wood when set out for years turns gray. So, I would probably be more accurate simply skipping the browns altogether and going with gray. However, I like a little brown in my wood tones. So, I do a final gray dry brush to give it the effect of grayed wood.
 |
| Next comes the Camo Brown dry brush |
Finally, I flocked each of the stars, and the fence sections were done! I did not bother putting a wash on them because of all the nooks and crannies that would need to be filled up. I was very pleased with the fence sections, and plan to do more of them soon!
 |
| Fence sections glue together atop the wooden stars as bases |
 |
| And here is a section, dry brushed Khaki, Gray, and with the bases
flocked. Note how the rails simply lay atop each other, interlocking in
the middle spots. |


Great work Mike!
ReplyDeleteThis is an excellent tutorial post!
ReplyDeleteFritz
Good looking fences and a great tutorial.
ReplyDelete“Vineyard poles are highly durable; not susceptible to rot, termites, carpenter bees or other wood boring insects; never need painting; look good and function well for many, many years. Compare it to wood yourself. We think you will be pleasantly surprised,” states inventor and manufacturer, Patrick Kelley.
ReplyDeleteresidential fencing