Saturday, June 12, 2021

More Foot Warriors for my Carolingian Saga army

    My second batch of foot warriors from the 28mm Gripping Beast starter set - 5 Saga points done!
I took advantage of summer break to accelerate my painting a bit this last week. I finished off the second batch of my foot warriors for my Carolingian Saga army. These warriors of Charlemagne's Frankish empire are from the 28mm Gripping Beast starter box. I really like the poses and variety of this box. There were four different poses in this batch of seven, all of whom I gave spears.

    I continued my theme of faded colors for the tunics on these Frankish warriors
Besides cleaning excess flash (of which there was very little), my first step was to use my new pin vice to drill out their right fists for brass wire spears. The other warriors in this box came with various hand weapons that needed to be glued into their hands, so I gave them axes and swords. This should provide a nice, irregular look to the units of warriors on the tabletop with three different weapons. Much as I have always said I am super glue inept, I have taken to using Gorilla Glue superglue on attaching the spears. I slide the spear into the hold I drilled for it, dab a little behind the fist, then pull the spear forward through the fist to drag the glue into the cavity. I clean off any excess blobs of superglue on either side and it tends to hold very well. I have dropped them while painting and the spears don't budge.

    I really like the "Yew Green" on the middle figure, and have used it throughout this army
I kept with the faded colors look for this army, with pale blues, greens, yellows, and such. My rationale is that people of the Dark or Middle Ages rarely had the closet full of clothes like most of us do today. So, they would wear clothes over and over, again. Repeated washings and time outside in the sun would fade the colors. Each of figure's tunics also had a solid border on its hemline. Three of them had cloaks, so I splurged and gave them a dotted pattern like I have done with the mounted nobles for this army.

    Hand painted shields for this army...not the best of my attempts, but passable
The leather straps and gartering on their legs was the fiddliest part of the figure, of course. Some of them had solid calf-high boots, which meant I could get away with a solid leather color and dry brush over it. For this army, I am giving them a range of hair color with browns, mousy tan, and red brown. This batch appeared to have mustaches but no beards, for the most part. 

    My five points of Carolingians completed so far...two batches to go!
The shields are once again hand-painted. For some reason, I like the designs I did on the previous batch better than these. They're not bad, but not as colorful as the others, I feel. Still, these are not meant to be noble warriors, so a more boring shield design should be just fine!

Next up is my final batch of archers for this army. Who knows? If I really bare down, I may get them AND the warlord finished before our next Saga game day. My guess is that won't happen, but stay tuned to my blog and see. Thanks for reading!

Wednesday, June 9, 2021

First Game of Epic Saga!

    Normans, Vikings & Romans clash in our first-ever game of Epic Saga at our game days
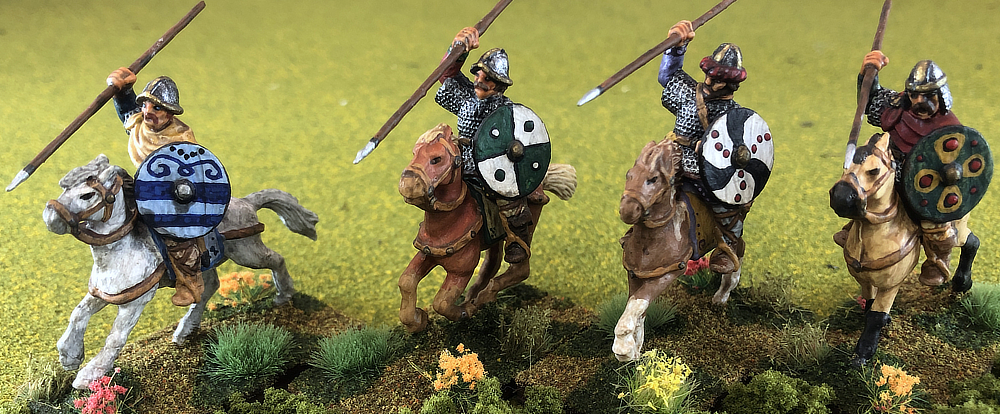
We had 13 Saga players invade the Guardtower East on the anniversary of D-Day in Columbus, Ohio. Six of those players were involved in a colossal clash in our first game of "Epic Saga" -- three armies per side. Andy S headed up a faction composed of two Norman warbands and one Roman, while Mike S took charge of a coalition of three Viking armies. Andy explained the way "big battle" Saga worked and then each side deployed, with Andy's Normans facing Joe M's Vikings, Dave E's Romans in the center holding off Daniel M's Norse, and Jason S's Normans taking on his Dad's Vikings.

    Dave (red) checks the range to Daniel's advancing Vikings, while Jason watches the slaughter begin
The Norman players decided to hang back and make the Vikings come across the field to them. What with their Volley ability allowing shooting out to two longs (24"), and the Roman's manuballista, they hoped to take out as many Vikings as possible before the two battlelines closed. The Vikings were more than willing and were soon streaming towards their foes all across the table. A spoiling charge on the Norman left by Jason's Normans shattered his father's Viking command, though. This demoralized the first Viking command. The Vikings struck back, though. Joe's newly-painted Vikings slammed into Andy's Normans and broke his command, too.

    Joe's newly-painted Vikings charge Andy's Normans and would eventually break his command
With each side wounded, the two traded blows for nearly four hours of game time. Both sides began to be whittled down. Victory or defeat would come down to which commander failed his roll first and became demoralized from the losses. Eventually, a counter-strike by Dave's Romans was enough to kill enough Vikings to break Daniel's command. It was a long, bloody slog that all six players said was tense and enjoyable. They had fun with the new rules and new abilities that Epic Saga gives players. 

    All six players said they really enjoyed Epic Saga - lots of new abilities to use and tactics to try
One feature that they all enjoyed was for allied commands to be able to leave dice on a shared battle board to boost the potency of an allied player. The Vikings could utilize this the easiest, of course, with all three commands sharing the same board. The Normans had one Roman ally command that hampered their ability to cooperate more fully, but that did not hold them back from victory in the end. The increased playing time for a game of Epic Saga will limit how often we can do it, of course. Essentially, while one player is taking his turn, the other five players are all watching. They can react with Activation/Reaction abilities and roll dice in combat, of course. However, the sequential nature of play means games will take significantly longer than standard 1-on-1 games. All enjoyed it, though. So, I am sure we will see more games of Epic Saga at future meetings!

    Tom send his Welsh cavalry on a flanking action in his first game of Saga against Jenny's Vikings
We also introduced a new player to Saga. Tom G was able to attend and borrowed my Welsh army. Jenny T patiently put him through the paces of playing a game of Saga against her Vikings. The two traded blows throughout the game in a close struggle of Clash of Warlords. Hesitant at first two use his troop's javelins ability, he caught on as the game went on and became an enthusiastic user of them as the game progressed. He learned to fear the "Odin" anti-shooting ability of the Vikings battle board, though. An unwise shooting activation left his warlord exhausted. Jenny made him pay and charged in and slew the warlord. Still, Tom kept fighting to a bitter draw, being ahead 15-13 in points at the close of the game. He said he really enjoyed the system, and would be back for more Saga action.

    Jim B (left) coaches Shane on his return to Saga in a matchup of against Vikings vs. Byzantines
Meanwhile, another new player was getting in a couple games. A former player of Saga Version 1, Shane was finally able to attend one of our game days. He brought his Byzantine army, and bolstered by some figures from my loaner armies, was able to field six points of troops. In his first game, he was arrayed against Adrian J's Pagan Rus in the "Desecration" scenario from Book of Battles. He quickly learned the frustration of facing the Pagan Rus abilities on their potent battle board.  Adrian narrowly edged out a victory against the equally deadly Byzantine battle board, 10-7.

    Shane's Byzantines close in on Adrian's elusive and frustrating Pagan Rus from the far cold north
In Shane's second match, he played Jim B's Vikings in Clash of Warlords. The two were trading blows back and forth until Jim decided to unleash the Ragnorak ability on his battle board. This ended up being a bad call, as the Byzantines could withstand the ensuing big losses in troops with their levy and warrior-heavy warband. Jim's army of mostly hearthguard could ill afford to suffer huge losses. He ended up losing his 8-man hearthguard strike force on that turn. His warlord bravely charged in and tried to remedy his mistake. He survived numerous shots and melees, but was unable to pull out victory. Shane won comfortably, 20-10.

    Jenny's Vikings slowly herd Adrian's Normans who (evaded away all game) to the table's far side
Meanwhile, Jenny and Adrian were each getting in a second round of games. They rolled up the various special rules for Battle of Heroes in their matchup of Normans vs. Vikings. However, their game in no way mirrored the slaughter going on in the Epic Saga game two tables away. Jenny cagily deployed the terrain to limit the maneuver room of the mostly-mounted Normans. She advanced steadily across the table, hoping to force them into battle. However, Adrian's Normans danced away in response to every Viking advance. He refused to commit his forces to battle. In the end, only four Norman levy and two Viking hearthguard died. However, due to the victory conditions this gave Adrian a 3-2 victory in likely our lowest scoring game of Saga ever!

    Jenny's berserkers hurl taunts and epithets at the "cowardly" Normans as they refuse to engage
In the other matchup of the day, Tyler P and I were finally getting a chance to play each other. We had been wanting to square off since before Covid shut things down, but never could make it happen. I am often the odd man out our Columbus game days, and Tyler has not been able to make any of the Dayton meetings, yet. In another first, it would be my first time ever playing against the Irish battle board. I had never faced them with any of my other armies I've played -- Welsh, Anglo-Danes, Norse-Irish, Scots, Carolingians, nor my Moors, of course. From my interview with Tyler in episode 5 of the Saga Ohio podcast, I knew to expect lots of javelin volleys from him. I had looked at the board the night before and thought I had seen some vulnerabilities in the Irish.

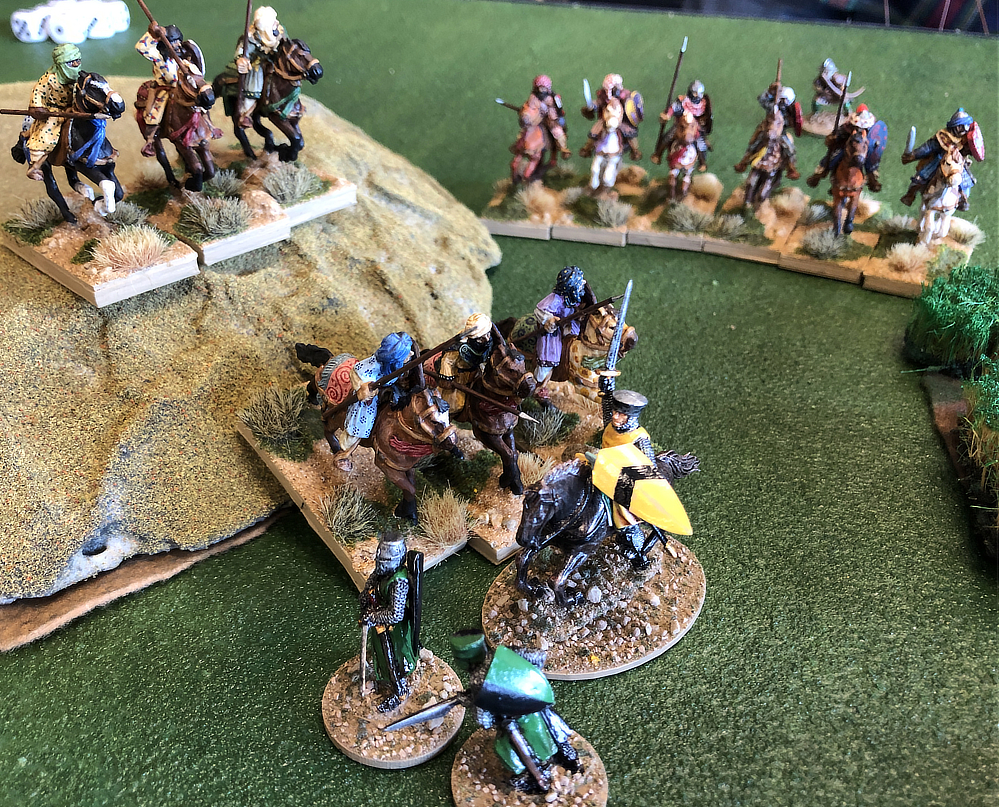
    My Moors deploy to face a strange new opponent - Tyler's Irish - in our first matchup ever
We were playing Clash of Warlords because this was Tyler's first game back since the Covid layoff. He wanted to minimize the re-learning curve in case he was rusty on rules. I was First player and placed a large, gentle hill in the center. He countered with a woods. I placed a rocky area on my right towards my baseline. Tyler followed with another woods in an attempt to clutter up the battlefield for my cavalry. I moved one of his woods towards his baseline, and he responded with the final piece of terrain -- another woods towards the center (where I had just moved the other piece away from!). I rolled for deployment and had a choice between the standard method or the diagonal one. I noticed that if I chose the diagonal, it would place most of the terrain on my side of the battlefield. I chose that to give him less cover from my shooting.

    Tyler's Irish advance, confident of their ability to outshoot the Moors and repel this Muslim invasion
Tyler's forces consist of three units of 8 javelin-armed warriors, one levy sling, one "warrior dog" unit, and the two Curaidh champions. As I scanned his ranks, it seemed to me that nearly his entire army was vulnerable to shooting. My plan was to concentrate my shots on his champions and take them out first. Although they have "Resilience 1" -- meaning they can trade casualties for fatigue markers until Exhausted -- my Moors have Wholehearted, which gives extra attack dice for enemy fatigues in shooting or melee. As it would turn out, the damp Irish weather must have fouled the bowstrings of my levy and warped the shafts of my cavalry's javelins. I had my worst shooting dice of any of my games, which wasn't helped in that Tyler's saving rolls were phenomenal!

    So eager to get to grips are the Irish, they inflict fatigue on themselves to close within range
Our opening shots were against his war dogs, whose armor is 3. I miscalculated the distance and wasn't able to unleash my full 18+ dice against him on turn one. Still, we killed three of the Irish wolfhounds -- enough to make him withdraw them on his turn. Tyler began to shift his battleline away from my levy archers, though, moving to my left while he advanced. On turn 2, we targeted one of his champions with my two mounted units. As he took fatigue from the first unit firing, I used Wholehearted on the second shot. In the first of Tyler's great saving rolls, he saved the exhausted champion from death by one roll!

    The frustrated Moors pull back their cavalry units, unable to inflict significant casualties on the Irish
Tyler got a bit of revenge when I pulled back my cavalry units. One unit got within a Short of the rocky area in our rear and he used "Sons of Dana," killing one of my noblemen. I quickly learned to stop my fall backs short of his targeting range with that ability! Tyler then showed me the power of the Irish shooting on his next turn. He brought a champion forward to throw javelins at my Warrior spear unit on the left. He then played "Sidhe," which allows him to discard all of his attack dice (only two) in return for a +1 for all subsequent units shooting at that same unit. That is an amazing ability for an Uncommon dice, and he exploited with with three units throwing javelins, bolstered with bonus attack dice by "Firbolg." I always joke that it is not a good thing to be hired on as a foot warrior in my Moorish army. They are the wall that I use to hold off the enemy, and often suffer major losses. However, Tyler's shooting attacks definitely seemed more potent, at this point, than the Moors'.

    The Irish, though, were having no trouble whittling down the Moorish ranks with their javelins

I decided to concentrate all of my shooting the next turn on one of his javelin units. The levy archers fired twice (12 dice), and each mounted unit once (11 dice). So, 23 attack dice against an armor class 4 unit should cause 11-12 hits, likely causing 5-6 kills with a saving roll of 4+. What did we get? One. One lone Irish warrior died in this massive outpouring of shooting, due to my poor rolling and his exceptional saves! On his turn, Tyler repeated his nasty combination of shooting abilities. My saves were decidedly lackluster and I was suffering way more casualties than him in this skirmishing.

    Frustrated, the Moors charge the Irish, killing all but one warrior in a unit
On the next turn, I made my first major mistake. I decided to take advantage of the Irish warrior's armor of 3 in melee and switched gears. I queued up a "Torrent of Iron" charge. I had rolled only one Uncommon, though, and forgot to put it on Perseverance. That meant after my charge, my mounted hearthguard would be left exposed. We crashed in and killed seven of the eight warriors in the unit. Finally! Some real casualties!! Tyler patiently lined up his shots as a counterattack and even took fatigue for extra shooting activations to completely eliminate my six mounted hearthguard.

    Huge mistake - I did not have an activation to pull the troopers back, who are eliminated by missiles
In Las Vegas, gamblers are cautioned not to throw "good money after bad." In other words, don't keep raising the stakes when you're losing in attempt to win it all back on one roll. So, what did I do? Doubled down! I saw a way that I could potentially destroy two units, creating two "fatigue bombs" in the middle of his forces (units within Short distance of an eliminated unit take a fatigue). My warlord charged into the single, lone warrior. This would be followed up by my remaining mounted cavalry unit charging his (by this time hopefully Exhausted) levy slingers. Remember what I said about dice rolling? Not only did my warlord somehow manage NOT to kill a lone warrior, the hearthguard equally failed to wipe out the 12 levy.

    Moorish warlord & hearthguard risk all on dual charges to break the Irish's fighting ability
This left my warlord and his remaining hearthguard sitting atop a hill amidst a sea of Irish. Tyler knew he was ahead on points, and would likely stay that way as he shot down more of my cavalry. So, he resisted the temptation to charge in with either his warlord or champions. Instead, it was all hands on deck chucking every rock, javelin, stick, or clod of earth they could find. One by one, the fatigue piled up until the warlord was Exhausted. Then, one by one, the hearthguard died to protect the warlord. It was masterfully handled by Tyler as he used every unit activation he could to pile on the shooting attacks. 

    Irish hearts were unbroken, and the Moorish warlord & cavalry about to be encircled & shot down
In the end, the warlord remained standing, but all of his horsemen lay dead around him. At this point, I pulled him back to my far right. My levy fired shots at the war dogs who were prowling forward, and the foot warriors moved in to protect the levy from charges. Tyler was merciless, though, and until the final action of the final turn, piled on every shot he could. My saves were as abysmal as his were fantastic. In the end, the Moors slunk from the field, routed 27-11.

    Another look at the opening stages of the first Epic Saga game, Vikings vs. Normans/Romans
I had known a day of reckoning had to be coming in Saga, and as it turned out on this day of numerous firsts, it was today! My Moors lost their first battle. I admitted that I had a LOT of good fortune in my winning streak, so certainly don't begrudge Tyler his "luck of the Irish" with the dice. It was bound to happen sooner or later! 

    Closeup of Adrian's surprisingly un-aggressive Norman cavalry in their matchup against the Vikings
I had studied his battle board, but I think I underestimated the sheer volume of fire his warband could put out. I was looking for weaknesses, rather than his strengths. Counting it up, his fresh army with only a single activation, can put out 26 shooting attack dice per turn. If he ditches two of those dice with Sidhe, those can potentially all be at +1 against the target. And that is before you add in Firbolg's bonus 3 attack dice (which also make 6's rolled additional hits) and second shooting activations. I had thought MY army had a lot of firepower, but I can see I did not have a plan to deal with his. No one in my army has an armor against shooting of greater than 4, so I can see that as vulnerable as I thought he was, my forces were much more vulnerable.

    Jim's warlord (with two, very cool new fatigue markers) charges Shane's Byzantine levy
 I could easily dismiss all of this and chalk this up to his great saves and my lousy shooting. However, that would be unwise and ignore the lessons that the day taught me. So, a tip of the tam o shanter to Tyler -- congratulations on stopping the Moors victory streak. Now, you can lay claim to History as Charles "The Shillelagh" O'Martell for saving Europe from the Moorish invasion!!

    Jenny's Vikings and Adrian's Normans play a chess game of a matchup in Battle of Heroes
       

Results from today's 1-on-1 games of Saga:

  • Tom G's Welsh tied Jenny's Vikings, 15-13, in Clash of Warlords
  • Adrian J's Pagan Rus defeated Shane's Byzantines, 10-7, in Desecration
  • Tyler P's Irish defeated Mike D's Moors, 27-11, in Clash of Warlords
  • Shane's Byzantines defeated Jim B's Vikings, 20-10, in Clash of Warlords
  • Adrian J's Normans defeated Jenny T's Vikings, 3-2, in Battle of Heroes

Saturday, May 29, 2021

Second Batch of Mounted Carolingian Nobles

    My latest batch of 28mm Gripping Beast Carolingian mounted nobles
I'm onto the second half of painting my Carolingian army. Not counting the warlord, I plan on fielding two units each of mounted hearthguard, foot warriors, and foot bowmen. With this batch of mounted nobles completed, I over the hump, so to speak, and hopefully cruising downhill on finishing this army. The plan is to start playing it at our monthly Saga game days in preparation for this fall's Saga tournament at Cincycon 2021, Oct. 23. 

    Two of the riders had cloaks and two of them were just in chainmail, tunic, and pants
These four mounted spearmen were all armored in chainmail, while the first batch had scale armor. Two of the riders wore cloaks and the other two were more simple. All four looked like they would paint up quickly, having a minimum of equipment festooned on them. As usual, though, I started with the horses. I pulled out my horse painting chart and picked four of the colors and patterns. I was really happy with how they turned out, my favorite being the red dun horse. The gray turned out particularly nice, too. The black wash I put over him at the end really gave it a depth of tones from gray to white. 

    A good look at the four horse patterns/colors that I did with this second batch of mounted nobles
Since these were nobles, I added splashes of detail here and there, including borders and patterns on the saddle cloths. I go back and forth, though, on whether I like 28mm horses with eyes painted or not. These I painted black with a couple dots of brown. I'm not necessarily sure I like these any better than the eye sockets just given depth with the wash. Horses have different looking eyes than people, and though I have seen miniature painters paint them like human eyes, I always find that startling looking. Almost cartoonish, so I am still experimenting.

    The clothing of the nobles is painted in richer colors -- blues, reds, and greens
When it came to the riders, I used brighter and richer colors than I tend to do on the rank and file in the army. As I've mentioned in previous posts, I'm trying to go with a theme color combo of red and green with this army. So, most figures have some green or some red on either their tunic, sleeves, or somewhere in their equipment. I added in borders and designs on the rider's clothes, too. I was really happy with how the borders on their cloaks came out. 

    Once again, I hand-painted the shield patterns. I think they came out good - not stunning, but okay
As also mentioned in earlier blog entries about my Carolingians, I had made the commitment to hand-painting the shield patterns for this army, too. I keep threatening to try out shield decals, but it won't be on this army. I've swtiched over the years from obtaining source materials -- Osprey books and the like -- to simply making Google searches. It is really surprising how often commercially available shield decals show up in my searches. So, I use them as inspiration as well as other "hits" that appear. I usually simplify the shield pattern for more complicated ones, or jazz up ones I feel are too simply for nobles. Nothing too incredibly fancy on this batch, but I think they came out solidly, and give the proper effect of Carolingians Franks.

    I was happy with the cloak borders and the how the patterns of tiny dots came out
One thing I have started doing with my last handful of batches of miniatures is doing a final, brush-on matte finish. Even my favorite Testors Dullcoate seems to have a satiny sheen, nowadays. So, I have begun painting on Vallejo clear matte after the final spray coat. This gives a truly matte finish that Testors used to give. As I was painting that last step on the miniature, the next batch -- Carolingian foot spearmen -- had just received their base flesh tone. They'll be my next batch, and give me five of my six Saga army points for this army. After that, its eight more archer, and then the warlord's command stand. So, the army of Count Drogo gets closer and closer to the tabletop!

    A good closeup of the "Red Dun" horse colors - definitely one of my favorites from this batch

    I like my brown or black wash at the end gives the horse colors a more mottled look

    Count Drogo's Carolingian forces is now up to 4 points of Saga troops - 3 more batches to go!

Tuesday, May 18, 2021

Moors Repel Reconquista at Dragons Guildhall

    Moors and Crusaders clash in another battle of the long, bloody Reconquista of Spain
Majik Ibn Battuta al-Waqaa stroked his beard as he looked to where the scout was pointing. Far away in the dusty distance, he could see the column of Crusaders as it entered the Emirate of Cordoba's lands. By the Prophet's Beard! These Franks were relentless in their desire to seize the lands that Allah had granted them at the point of the spear, hundreds of years ago! Just last month, he had repelled a similar invasion by the Christ-worshippers. Majik nodded his head as he considered the land the lay between the invaders and his own border force, a short ride away. Most of these Franks were on foot, so he knew where he would meet them in suitable open fields that favored his mounted troopers' style of warfare.

  Moors deployment and the Ted's Crusaders after their first turn of movement in Clash of Warlords
It was the third Sunday of the month, which meant more than a dozen Saga enthusiasts were gathering at the Dragon's Guildhall for the second of our two monthly game day. Once again, Crusaders were in abundance, along with Vikings, Romans, Last Romans, Byzantines, Milites Christi, Moors, Saracens, Jomsvikings, Pagan Rus, Normans, and even Skraelings! I was paired up with Ted H, one of the newer players from Cincinnati, to help him hone his Saga warlord skills and have fun. Ted was playing the Levantine Crusaders. Of course, in the mind of my warlord, these were more Spanish crusaders bent on pushing their merciless Reconquista and trying to retake Spain. 

    Ted's mounted knights aggressively advanced towards the center of the battlefield on turn 1
Ted chose "ordinary" pilgrims as his one Levy unit - not the fanatical pilgrims they can take. He also picked two units of 8 warriors with no special equipment, and one unit of warriors with bow. For hearthguard (or knights in the Crusader list), he chose one unit of four on foot and one mounted. To his credit, Ted was choosing units that matched the figures he had available, so this might not have been his most combat effective or deadly list he could have taken. Still, the Crusader board can be nasty against opponents, so I was curious to see how Ted would use its multiple weapons.

    The knights attract the Moors notice and go down under a hailstorm of arrows and javelins
Majik fielded his normal warband -- I haven't changed my list since the first game. I really like its ability to counter multiple threats and play a skirmish style game or use in-your-face, charging tactics. My two units of 6 hearthguard armed with javelins are my primary weapons. Safeguarding them and optimizing my dice to benefit their attacks is my main focus when placing Saga dice on my battle board. I also use two units of 8 foot warriors (spearmen) and one of 12 Levy bow. The foot are my defensive wall that the cavalry shelters behind on the opponent's turn and that stands in the way of enemy advances. The bowmen seize whatever cover is available on the battlefield and try to be able to shoot at the same target that the cavalry is targeting with their javelins.

    As is our preferred way of fighting, the cavalry was pulled back behind our lines after their attack
Ted opened up terrain placement with a medium-sized woods on his center right. I placed a large, gentle hill in the center of the battlefield. Next, he placed an area of scrub along the middle of the board edge on his left. I chose not to place any other terrain and nudged the woods a Medium towards the board edge, leaving the center more open. Ted decided that battlefield looked good enough for my Crusaders. Since most of his troops were on foot, I think he was more worried about terrain slowing down his advance than about providing cover from my shooting. 

    The knights' deaths inspired these guys - warrior spear - who would be Ted's heroes this battle
I opened up deployment with my levy on my far right as close to the scrub as they could get, while the two spear units stretched from their flank towards the center. The spear were not as far forward as I could deploy them, but far enough off my board edge that the cavalry had room to shelter behind them. Ted deployed his entire army with the pilgrims poised to enter the scrubland, followed up by a unit of warriors to their rear. The archers guarded their right, whose own right was guarded by the foot knights. The mounted knights, the other unit of warrior spear, and the mounted warlord all were pushed forward on his right to advance up the center hill.

  Forgot to take photos - so here you see the end of the Warrior Bow, who the Moors attacked on Turn 2
I placed my two cavalry units on either side and behind my left hand spear unit. Examining the Crusader's roster, I had planned to target either his mounted knights (armor 4) or his foot bow (armor 3), if given a chance. Ted would oblige with an aggressive advance up the hill by his mounted knights, urged on and supported by their warlord. "Deus Volt!" they shouted, and the foot warriors took up the cry and hurried along behind them. We were playing Clash of Warlords, so Ted had only three Saga dice on the first turn. That wasn't really enough to launch a spoiling attack, so he contented himself with a move towards the center of the table. 

    Ted's second wave, pilgrim levy spearheads and advance including foot knights and warriors
Those who have read reports of my Moors' battles can probably predict what happened next. I moved the archers to within range of the Crusader mounted knights and loosed a volley. Next, both units of Moorish cavalry darted out and threw javelins at the small unit of knights. The knight's dreams of glory died under a hail of arrows and javelins -- 18 dice worth in Saga terms. I then used Perseverance to pull back both units behind my spearmen to await his next move.

    Through the first 3 turns, the battle seemed to be going in the Moors favor...
Ted wanted revenge for the death of his nobles, so brought his warrior bow forward and loosed two volleys at my Levy, killing several. On his right, the warrior spearmen also shouted for revenge and crossed over the summit and began descending towards my Moorish spearmen. On his left, the pilgrims sang praises to the knights, doubtless entering Heaven at that moment, and rushed into the scrubland. Ted regularly queued up The Peasant's Crusade all game to give all his warriors and levy a free activation -- one of the many great abilities on his board. He also used Happy are the Humble to make his pilgrims fight as armed warriors rather than Unarmed Levy. I noticed how both those abilities need pilgrims to be useful, so planned to do something about his single unit of pilgrims if given a chance!

    Ted's heroes charge my foot spear and hurl them back, opening the Crusader counterattack
By moving into the gap between the scrub and the hill, the warrior bow had raised their hands and volunteered to be the next target of my missile fire. My remaining archers fired, along with both units of Moorish cavalry cantering forward and flinging javelins. One lone archer remained after our shooting, who quickly took to his heels on Ted's next turn. I could see the dilemma of facing the Moors with a slow moving army was hitting home to Ted. He was also now out of shooting units, so would need to charge me in melee to attempt to rebalance the score.

    Ted's pilgrims charge, then charge my Moorish archers a second time, reducing them to 1 figure
Ted had no problem doing that, though. The Peasant's Crusade allowed him to hurl his warrior spearmen into one of my units of Moorish spear and his pilgrims into my Levy. In fact, the levy were even able to charge home a second time. My poor archers were no match for their enemy's fired up 12 attack dice and only a single archer remained at the start of my turn. That was certainly tit-for-tat, and I saluted Ted's aggression and clever use of his board. Much to my surprise, his warriors spearmen also savaged my Moors. I had closed ranks and played Forest of Spears -- which usually means I take one or even no casualties. Instead, we withdrew, reduced almost to half. It was dawning on me that Ted was not going to sit back and let me pick my battles, and would go down swinging (if he went down at all)!

    Of course, the Moorish cavalry exact revenge on the pilgrims, riddling them with javelins
The pilgrims' follow charge meant that they had extended themselves towards my battleline. They were the obvious target for next turn. Luckily, I also rolled a rare dice, so queued up Torrent of Iron. It takes a lot to kill 12 figures in Saga. That is one of the advantages of Levy in these rules is they can weather a lot of casualties and still be a presence on the battlefield. In this case, my cavalry was going in alone -- no prepping the target with levy bowfire. Each unit threw their javelins once, then for Torrent of Iron, I took the extra shot. When my mounted hearthguards charged home, inflicting another fatigue, seven of the 12 lay on the ground transfixed by javelins. The remaining five were killed to a man in melee. My Moorish cavalry were proving quite the deadly one-two punch, again! Three turns, essentially three eliminated units.

    After both units soften the target up, one charges in with Torrent of Iron, wiping them out
On turn four, I think Ted realized he was running out of troops. The warrior spear on the right continued to be the heroes of the battle. They shouted praises to God and charged home against their previous opponent. Once again, my infantrymen closed ranks, and this time managed to take only one casualty. We had yet to cause a single hit against his hero spearmen, though! Ted brought up his warlord, protected in front by his foot knights - closing in on my other spearmen unit. Despite my playing Forest of Spears to bump their defensive dice, the poor bloody infantry were definitely having a rough day of it (and would continue to do so). However, I felt good that I had basically weathered his turn 4 with no major losses, and that his second warrior spear unit was mired in the scrubland and would likely play little role in the rest of the battle.

At this stage of the battle, Majik paused and surveyed both his and the enemy battle lines. The Crusaders had suffered ruinous losses, but were still moving forward energetically on the attack. How to dishearten them? He looked down to his side where his pet cheetah, Scirocco, watched the mayhem with a typical big cat's disdain. Nothing would deter the speedy hunter -- short of something happening to Majik. That was it, by the Prophet! The enemy leader was the key. Nothing would bring despair into their hearts more than seeing their Crusader Lord fall. He called to a pair of messengers, relayed his commands, and watched them speed off to his cavalry units...

    The battlefield after the Moorish cavalry's first "drive by shooting" of the enemy warlord

As Majik had determined, my next target would be the enemy warlord. I rarely do "Assassin's strikes" on enemy warlords. However, all four foot knights were within Short (Bodyguards) range of their leader. Still, I rationalized, what better way to target foot hearthguard (armor 5) than by shooting at their mounted warlord (armor 4)? It was time for what Ted jokingly called a "Drive By Shooting." Both cavalry units galloped towards the warlord, pausing to throw their javelins, then continued a Long move away. Ted was faced with a dilemma. Should he take the fatigue, making his warlord vulnerable to a charge, or cancel the hits by removing his foot knights. Ted wisely chose neither and both, and split the casualties among fatigue and the bodyguards.

    Ted's heroes -- still full strength -- continue to attack my Moorish spearman units
Next, Ted launched his foot knights and heroic spear unit into the fray against my full strength spearman unit. We closed ranks -- just surviving was the key thing -- and actually repelled the heroic warrior spear for the first time this game. We even killed four of them! The enthusiasm of the Crusaders MUST be on the wane, I hoped. When the foot knights charged in, we did no casualties, but ended up repelling them because we closed ranks and outnumbered them. That was Ted's gambit for Turn 5, which left me open to retry my drive by shooting on my half of the turn.

    After another turn of throwing javelins at the Crusader warlord, the Moorish cavalry charges in
Majik's bannerman waved the great banner of Cordoba and the Moorish horsemen shouted and waved their javelins in acknowledgement. Once again, a dozen horsemen thundered in and hurled their deadly shafts. Once again, Ted was given the choice between taking bodyguard casualties or warlords fatigue. He took some of each. That was enough for me to play Torrent of Iron again. The uphill unit charged down upon the warlord, who was now Exhausted from fatigue. Since hearthguard casualties are one-for-one victory points in Clash of Warlords, we violated the maxim and removed all of the warlord's fatigue. Two were used to raise our armor to 6 (making us invulnterable to an Exhausted unit), and the other to lower his armor. With our javelin +1, we'd be hitting on 3+. I rolled eight hits on 18 dice (I had played Wholehearted to get 6 bonus attack dice for his 3 fatigue) -- definitely under average. However, Ted chose to kill his warlord rather than eliminate the hearthguard unit AND have his warlord be still Exhausted.

    Ted's heroic spear unit meets an end worthy of song, ridden down by the Moorish cavalry
At this point, the game was pretty much over, we both acknowledged. I finished out the next turn with a couple charges, mopping up the heroic spearmen with another Torrent of Iron and that lone archer from turn 2 who was trying to hide behind the bushes. It had been a fun game. Ted never gave up, and charged and charged till he had little left to melee with. I was surprised he never played Find Chinks in Their Armor for its bonus 4 or 6 attack dice. I don't think a turn goes by that Thomas M doesn't play that battle board ability! Still, in his remarkably few games of Saga, Ted proved he is picking the game up very quickly. After my three quick kills on turns 1-3, Ted pretty much won rounds 4 & his half of 5 on casualties, I felt. Still, the Moors continued their winning streak, and the reputation of Majik grows ever higher in the courts of the Emir of Cordoba!  

Here are the results from the games we played at Dragons Guildhall:

  • Jenny T's Vikings defeated Daniel M's Vikings 24-15 in Battle of Heroes (Tactical Version)
  • Jason S's Byzantines defeated Thomas M's Levantine Crusaders, 34-12
  • Bob B's Last Romans defeated Aaron J's Normans, 30-24
  • Adrian J's Saracens defeated Tom's Crusaders, 11-4
  • Mike D's Moors defeated Ted H's Crusaders 26-11 in Clash of Warlords
  • Dave E's Romans defeated Michael C's Milites Christi, 22-12
  • (2nd Round) Jim B's Skraelings defeated Jason S's Pagan Rus (no score)