|
Bad Goblin Games' 'Fortified Trailer #2' - 3-D printed building with lots of character & details
|
I picked up two more 3-D printed trailers from
Bad Goblin Games at
Siege of Augusta awhile back. One is their
Fortified Trailer #2 and the other is
Ruined Trailer #2. The really cool thing was that Brian and Liz Peak will both be attending
Cincycon this weekend. They wanted to run a game of their
Trailer Park Warlords of the Apocalypse. I offered to bring down a game mat and terrain for them, if they wanted to do it. They agreed, so if you go to
Cincycon, you'll have a chance of playing a game with these newly-finished trailers!
 |
Heavily damaged front of 'Ruined Trailer #2' with some of my post-apocalyptic survivors
|
I decided to do both of them simultaneously, because I had slight deadline pressure. Plus, having already finished two of them that I bought at
Historicon 2024, I knew how quickly they painted up. There is no construction to do on these -- just prime and paint. That is, unless you count epoxying the upper half of the trailer to the lower base...! First, though, I based both on MDF. For the ruined trailer, I glued the roof on, too, because it is 2/3's destroyed/missing. The roof wouldn't get in the way of moving figures around inside of it. For the fortified one, I kept the roof removable -- it has nice tabs that keep it in place during games.
 |
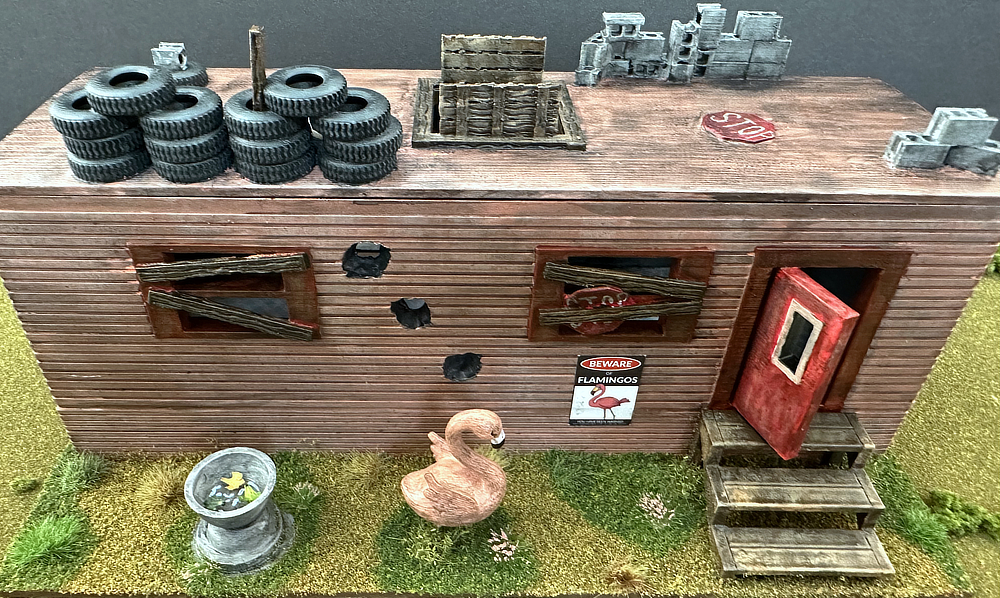
Other side of the fortified trailer with my add-ons (yard flamingo & bird bath) and some 28mm figs
|
I did my usual Krylon Fusion Acrylic Black Matte spray coat first, followed by brush-on mix of 50/50 water and acrylic black paint. The black base does mean you have to do two coats of lighter shades (like I was going to do), but it is no real problem. I chose a pale gray-green for the ruined trailer and a salmon pink for the fortified one. Each got a base coat then a dry brush of a lighter shade (very light gray for the green, pink for the salmon). The bottom half of the ruined trailer I did in a medium gray, figuring a two-tone look might be nice.
 |
Detachable roof on the fortified trailer -- the tires, cinder blocks & everything come already affixed
|
Next, I painted the various fortifications and damage on both trailers. The tires, wooden door, stop signs -- all of it -- is straight out-of-the-package. The only modifications I did to either was to the interiors with posters and flooring. I did the windows and doors in a contrasting trim color, dry-brushed in a lighter shade. For the damaged sections, I painted them dark gray with a medium gray dry brush. The tires were also done in charcoal gray, with medium gray drybrush. I had to pull out one of my finer tip brushes for my attempts at lettering the "STOP" on the hexagonal signs. Bad Goblin trailers typically come with two stairs leading up to the doors. One is made of cinder blocks and the other is wooden stairs. If you are using the wooden ones, I suggest gluing them to the base AFTER the outside of the trailer is done. That way, you don't have to poke your brush through the slats to paint the trailer's surface.
 |
A look at some of the 'trailer park kitsch' posters I printed out and glued to the walls
|
For the doors, I decided to leave them open on two trailers. They are modeled to be able to swing open and close, but I find that once you've painted both the doors and the frame, the layers build up kind of freezing them in place. If you want yours to open and close, I suggest you shave off some material from the door or frame before priming. For the interiors, I chose pale colorw for the walls (yellow for the ruined one and sky blue for the fortified trailer). This time, I used a wide, flat brush rather than my usual rounded brush. It worked a lot better, and there was fewer splash over spots on the window or door frames. Two coats was enough to cover over the black primer, even with the lighter colors I used.
 |
Other wall's posters -- Jenny suggested the "Velvet Elvis" poster, and a look at the smoke damage
|
Next, I did a black vehicle wash over the exterior and then interior. I stupidly went back to my rounded brush for the interior of the ruined trailer and it came out very streaky. For the sky blue interior, I used the wide, flat brush and I was much happier with the look. The flooring is scrap booking paper sold at the local craft store trimmed and glued into place. I also dry brushed smoke stains around the damaged sections on both the interior and exterior. I was very happy with how this turned out, adding a touch of realism, I feel.
 |
A little bit of whimsy with the flamingo and a scratch made water fountain with water & leaves in it
|
The next step was to glue my trademark posters on the inside walls (and a few choice places on the exterior). I found images I thought were appropriate with Google searches. I tried to go with what might be a stereotypical decoration in a low-income or working class trailer park. Jenny suggested the Velvet Elvis painting, and the NASCAR poster (sorry, Jason -- don't tell Lily!). I thought the Springsteen "Born in the U.S.A." and the Lynard Skynard...wait, "Skyyyyynard!" were nice touches. Hopefully, no one is offended by my playful lampooning of trailer park chic! I resized the images and printed them off at the local office supply store on their color laser printer. After cutting them out, I paint the back with white glue and stick them to the walls. They are easy to do and work perfect!
 |
The mostly blow away back of Ruined Trailer #2 - I'm happy with how the smoke damage came out
|
The final step was to decorate (or trash up?) the yards a bit. For the pink one, I built a bird bath with round miniature bases and a tiny plastic bowl. I cut a circle of blister pack plastic for the water surface and glued a couple leaves to it. I added in tiny sky blue ripples of a reflected sky and then finished it off with a clear gloss. I then did the Homer Simpson, "D'oh!", because I would need to carefully cover it up with masking tape when I clear coated the model to prevent it from "frosting." Other things I added to the yards for atmosphere were a toilet, kitchen sink, and curved pipes. For the pink one, I really, really wanted to put flamingos in the yard. I couldn't find any tiny plastic ones at the local train store or craft stores. So, I resorted to buying a pack off Amazon. To save our brick and mortar stores, I try to buy as little as possible off Amazon. The flamingos are probably too big, but I used them anyway. I drilled out the underneath and added wire legs with a paper clip. I also drilled holes for the legs in the MDF for stability. If you think they look too goofy, let me know. I can always remove the flamingo later if I decide the out-of-scale size bothers me too much!
 |
Close up of the posters in the ruined trailer -- a rocker & NASCAR fan lived here (or still does?)
|
The last step was flocking, clear coating, and then the two trailers were done! They went quickly (soooo much faster than building and modifying an MDF one). If you're interested in creating a 28mm trailer park or adding one to your skirmish games, I highly recommend
Bad Goblin Games and their selection. Thankfully, Liz and Brian are NOT bringing their store with them to
Cincycon (they're in town for work), so I am saved at least till
Historicon 2025 from the temptation of buying more trailers!
 |
Side of trailer with my scratch made debris and plumbing pipe from Miniature Building Authority
|
What else am I working on? I have a batch of eight Dark Age mounted troops begun on my painting desk right now. The plan for the next terrain that I will paint is to convert my two Reaper shipping containers into buildings, much like the
Miniature Building Authority one I painted recently. And of course, I'm headed to
Cincycon this weekend. Hope to see you there!
 |
Close look at the included cinder block stairs & more debris flocking I made & an MBA kitchen sink
|
MINIATURES Acquired vs. Painted Tally for 2025- Miniatures acquired in 2025: 95
- Miniatures painted in 2025: 15
TERRAIN Acquired vs. Painted Tally for 2025
- Terrain acquired in 2025: 5
- Terrain painted in 2025: 9
SCATTER Acquired vs. Painted Tally for 2025
- Scatter acquired in 2025: 9
- Scatter painted in 2025: 5
 |
Another look at the front of the ruined trailer with some of my survivors scoping out the territory
|
 |
Side view of the fortified trailer, plus a discarded toilet sitting in the yard to 'trash it up'
|