Showing posts with label American War of Independence. Show all posts

Monday, September 21, 2026

A Visit and Revolutionary War Battle with the Hubbard Ohio Gamers Guild (H.O.G.G.)


    British troops advance through the crop fields to attack the American rebels at Harlem Heights, 1776
One of the things that I really wanted to start doing once I retired was visit the various clubs in our region and get in a game with them. Helping with my mom and her decline in health kept me from doing that for the last two years, though. Her recent passing, and a trip through northeast Ohio to upstate New York, gave me a chance to stop in and visit Rich Brown in his small city outside Youngstown. Although we weren't arriving on their scheduled night, Rich set up a Revolutionary War battle for us and hosted Jenny and I for the evening.

    Rich & Gwen (right) hosted Jenny & I on an off-night for their group, providing pizza & game!
The Hubbard Ohio Gamers Guild (H.O.G.G.) meet in the basement of his wife Gwen's yarn shop, which is also the physical location for RRB Minis & More. While gaming, you are surrounded by much of his stock displayed as if you were in a brick and mortar game store, which you pretty much are! Rich carries many of my rules sets and shows up at most of the regional game shows. He was using Flash in the Pan rules by David Bezio for the game, a very simple and easy-to-learn game. Rich had set up the Battle of Harlem Heights, 1776, which is the sixth in a series of games re-fighting the American Revolution on its anniversary.

    British command after its first turn of advance (another unit would march on to cover the right later)
Jenny and Gwen played the Rebels, while Rich and I took command of the British. Our job was to dislodge the stubborn Americans and chase them off the table. Our opponents simply needed to prevent that from happening. Rich explained to us that he isn't particular about his re-fights simulating the historical outcomes tactically, but did want the deployment to present the same challenge to the tabletop commanders. He must have been doing a good job, so far, as he mentioned that they were 5-for-5 on having the historical winner triumph in their games. What that meant for our game was that troops arrived on the tabletop somewhat piecemeal, as they did 250 years ago.

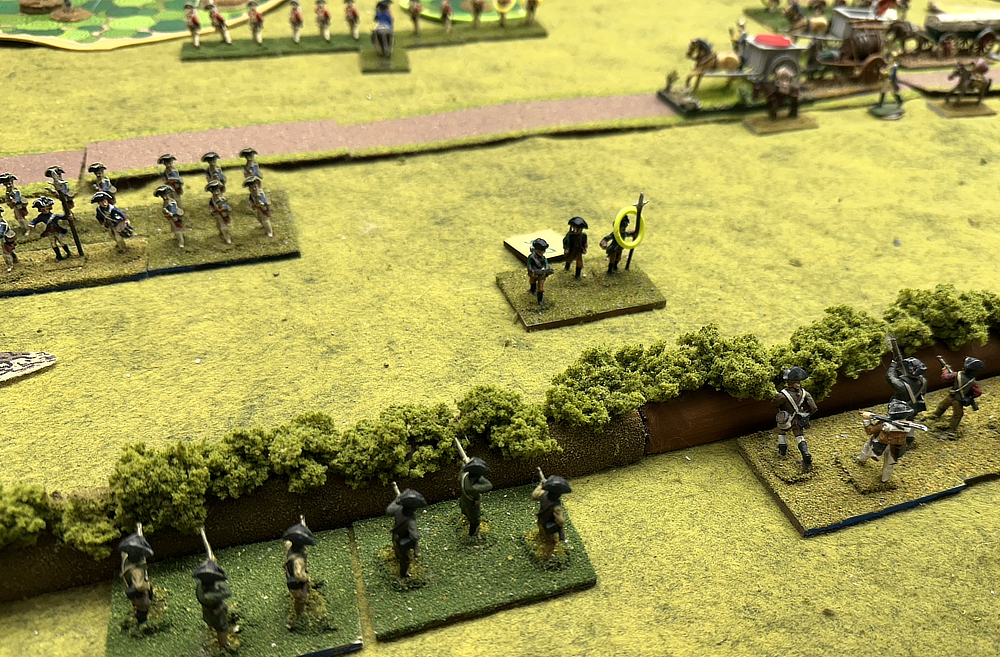
    American riflemen line the barricades in the gully, ready to take a toll on advancing troops
Each of us controlled two units. Mine were a battalion of Highlanders and a small battery of artillery. I shifted my highlanders from the center to my side of the table (the British left), while Rich sent his light infantry in open order up the center. His regulars would come in later on the right. The artillery hung back to see where the American flanking force would come in. Sure enough, Jenny's small unit of riflemen appeared on my left flank and rear. My artillery began firing at them as quickly as we could unlimber, and started to inflict hits upon them. Meanwhile, they blazed away instead at the rear of my column of highlanders, who they had obviously showed up to harass. Gwen's riflemen in the gully between the two heights used the barricades and cover to begin sniping at the advancing British light infantry.

    First British wave of highlanders on the left and light infantry in open order in the center
In the game, the regulars on both sides started the game with four stands of troops, the light infantry had three, and the American riflemen only two. Artillery counts as one stand. Each stand moves and fires individually, but they test morale as a unit. When shooting, players roll for each stand individually. A stand of skirmishers inflicts one hit, regulars two hits, and artillery three. Units in Flash in the Pan that take hits must check morale, of course. The more hits a unit takes, the worse chance of passing the check. If it suffered enough hits, the unit may not even be able to roll high enough on 1d6 to pass the test. For example, when my highlanders and Jenny's Continentals fired on each other, we each inflicted a total of 8 hits on the ther. We couldn't roll high enough on a 6-sided die to pass. So, what do you do? You can "voluntarily" remove a stand to give yourself a +3 on the roll. Why would you do that? Well, otherwise, you will flee backwards once, then test again. If you fail the second time, you flee again. So, the only way to rally your unit may be to suffer the loss of a stand (or even two). It is a very clever mechanic.

    More American riflemen appear on the British rear and left & engage the artillery in a duel
However, morale is not all an inexorable decline. At the end of each turn, you can test morale to rally off any hits, removing one on a 4 on 1d6, two on a 5, and three on a 6. Typically, as the range shrinks, the number of hits you take mounts, though. You find yourself unable to rally them off quick enough. The effect of these mechanics is that you will see units fleeing away from the enemy on the tabletop, then rallying and reforming. They will then march forward into battle again, as accounts of countless Revolutionary War battles describe. This happened in our game as both my and Rich's British marched up, fell back, and then marched back up again. Gwen was rolling well, and she kept driving off Rich's light infantry. Gamely, they rallied and returned to try again. Meanwhile, my artillery firing on the the flanking riflemen were eventually able to drive them off the field. Flash in the Pan is not a game of sudden routs and collapse of commands. You wear down your enemy and get them to the point where they simply can't inflict enough in response and are eventually forced to call of your attack.

    At top, the lights have been driven off by the fire of the riflemen in the gully (for the 1st time)
My highlanders were much superior to Jenny's Continentals, but she rolled well enough when we got within range that both of us were battered and driven back. She was forced to eventually remove two stands to be able to roll high enough to rally them. Unfortunately, my rolls were poor enough that I ended up having to do the same. We did get lucky and wounded General Washington, who was inspiring Jenny's troops to roll above their pay grade. I guess old Georgie didn't find the whistle of the bullets as "charming" this time as he did earlier in his career...! Ha, ha!

    Highlanders also suffering hits, this time from the American riflemen to their rear
Gwen's Harlem Militia were able to get to the gully and take cover before Rich's advancing regular infantry could double-team the riflemen alongside the Lights. The militia's volleys gave the regulars a pasting, and they were driven off. Meanwhile, Rich's lights had been shredded down to an ineffective force. Rich and I counted up our force and had only 8 stands between our four units. We agreed that the Americans had given us enough of a bloody nose that there was no way we could force them back uphill. Like gentlemen, we took our lumps and pronounced Jenny and Gwen the victors. 

    British artillery whittled the riflemen down & finally were able to drive them off
A key mechanic in the game is what's called the "Battleworth" roll. It is a number of d6's that a unit rolls when testing to move, shoot, or rally. Green troops or Militia have 1d6, Regulars 2d6, and Elites 3d6. Units may also have +1d6 for an inspiring leader (like the Continentals did with our first president). A player rolls the Battleworth number of six-sided dice, using the highest result on a single die. So, Militia may out-roll Elites on a turn, but over the course of the game, the Elites rolling their greater number of dice will likely out-roll and out-perform their lesser capable opponents.

    Highlanders and American continentals close in on each other, ready to deliver a volley
It was a fun, quick game. Now that I have a game of it under my belt, it would be easier to make tactical decisions and use the rules to maneuver to gain a tactical advantage. The rules are free to download, so they're worth taking a look at. Though on the face of it they appear very simplistic, their subtleties become apparent when playing. Rich will likely have printed copies of the rules available for sale, too, this Oct. 9-10 at Advance the Colors (if you're coming -- and you should be!). 

    After suffering from their fire many times, the Brit light infantry charges the riflemen in the gulley
Thanks, Rich, for adding a bonus night to the H.O.G.G. schedule to accommodate Jenny and I! And for the pizza and beer, of course! 

    Both sides are battered after hammering away at each other with musketry all game
MINIATURES Acquired vs. Painted Tally for 2026

  • Miniatures acquired in 2026: 217
  • Miniatures painted in 2026: 198

TERRAIN Acquired vs. Painted Tally for 2026

  • Terrain acquired in 2026: 14
  • Terrain painted in 2026: 36

SCATTER Acquired vs. Painted Tally for 2026

  • Scatter acquired in 2026: 34
  • Scatter painted in 2026: 75

Wednesday, August 19, 2026

To the Toy Box! Time for Another Blissfield Trip


    The rebels are on the attack in an American Revolution game at Jim's 'Toy Box' in Blissfield, MI
Typically, August is a slow month for me for conventions. However, there's one event that month becoming a tradition among my friends. HMGS Great Lakes newsletter editor Jim W hosts a handful of us every summer at his gaming clubhouse, aka the Toy Box. We meet for dinner on Friday evening, retire to the clubhouse for an evening game, and then follow that up the next morning with another game. Jim usually runs one game and his buddy Ted runs the other. This year, they would be showcasing the American Revolution on Friday and 30 Years War on Saturday. 

    Jim, left & Ted prove to the players at the Toy Box that they know how to count during the game
Friday's game featured a Rebel assault on a stone walled village by a command of Continentals on the left, French regulars in the center, and American Militia on the right. Both wings of the British army were aggressive and marched out to meet the rebels with drums beating and flags flying. I was commanding the French, and my opponent in the middle of the board, Mike S, cannily stayed behind the walls for the most part, and let us march upon him. On my left, GM Jim W advanced steadily, swatting aside all of Dave E's attacks and clearly inflicting more casualties. Things were a bit more even on my right, as Jenny advanced initially, but then stood to receive Ted's oncoming British. 

    Jim's command of Continentals advance on the left in our game using Saratoga Soldiers rules
I was a bit more methodical in my push up through the village and woods towards the our objective village. Jim and Ted had warned me that the rules we were using, Saratoga Soldiers (the AWI variant of the more well-known Gettysburg Soldiers) were bloody. Interestingly, for all the years that Larry Reber has been running his Gettysburg Soldiers rules, I had yet to play in them or Saratoga Soldiers. Part of that is because I've never been a big American Civil War buff. Another likely reason is that at conventions we both attend, I'm also running a game! The rules are very straight forward and easy to learn. Combat, whether shooting or melee, resolves extremely quickly.

    Jenny's Militia advanced towards the fence where they will halt to take on Ted's advancing redcoats
My French command was doing their best to utilize the woods and village we advanced through to cut down on the casualties from fire we received on the way in. Still, about the time my force was only a couple moves away from the enemy blazing away at us from the stone wall or in the open to the right, our numbers had dwindled a bit. I muttered to Jim that I would likely not have the strength to drive the British out of the village. He told me not to worry, that he'd be there soon to help. His command was wading through poor Dave's British. Pretty soon, Dave had only a few stands left. On my right, Jenny and Ted were killing swaths of each other's troops. Like me, Ted has a reputation for poor die rolling. Tonight that wasn't happening, and he and Jenny were mowing each other down with wild abandon.

    Jim's Continentals close with Dave's British commander on that flank & inflict a 'royal' drubbing
When Jim's help did arrive, I decided to follow his example and charge the enemy at the wall. It would be suicide, I thought, to simply exchange volleys with me in the open and the British in hard cover. To my great surprise, both Jim and I were successful, and we recoiled the redcoats away and seized their position. Before Mike S could mount a counter-attack, we hammered his troops with a couple more volleys, and he conceded that we had won the position. We looked around, and saw almost nothing left on the right. The Militia had fought the British to a standstill, and most of the troops on both sides were gone. Each army had only their commander and one stand of troops left. Dave's command was completely gone, so it was obvious that the Americans (and French) held the field. 

    By game's end both the Militia & Ted's Brits had disappeared as the two inflicted great slaughter
As Jim and Ted had warned, the rules were extremely bloody. The only morale in the game is when the attacker rolls a result on the combat chart that dictates the enemy to retire a move. Otherwise, battalions can grind each other down to nothing with shooting, neither side giving ground. I'm assuming that the losses are reflecting not just men actually killed by volleys of fire, but also those who have had enough and are taking to their heels to fight another day. So, battalions in this game wither away bit by bit, rather than suffering a catastrophic morale failure and running away as a unit. The rules reminded me a bit of the Colby Rules, named after a Toledo gaming group, the Colby Street Irregulars. Their games are similarly bloody, though feature a card-driven activation sequence rather than one side going and then the other. 

    My white-coated French are almost to the walls & are cheered to see Jim's troops arrive on our left
Still, one advantage of simple bloody rules is that games are easy to learn and they go very quickly. We were done before it got too late, and sat around and chatted for another hour or more while Jim picked up the troops and cleared the table. It's nice to shoot the breeze with fellow history buffs and gamers, and talk about various projects we're working on or rules sets we've played. At Jim's Toy Box, it is also fun to wander from room to room and examine his buildings and terrain for various periods displayed on the shelves. Most of the miniatures are in a giant wooden filing cabinet which the lawyer's who'd owned the building before him used to store deeds, blueprints, etc. Now, they make excellent drawers for Jim to organize his troops by scale and period.

    Continentals & French regulars have seized the walled village and won victory in Friday game
The next morning, Gene joined us from Jim's group, and Mike's son Jason drove up for the day's festivities. Mike and his son are both interested in the 30 Years War, which is the period Ted's game was set in. I had never really had much interest in this historical era, but am always willing to play a game and try it out! Ted and Jim had added another extra table to the gaming room and we had a full 12' of table length, I believe. By the time we arrived, Ted had the table set up with terrain and crammed with troops facing each other. With 8 players this morning, we had four players per side. Once we figured out who would be Catholic and who controlled the Protestants, we sat down and Ted explained the rules.

    The panorama that greeted us Saturday morning when we arrived at the Toy Box -- a Ted game!!
We would be using another set that I had never played before called On Bloody Ground. Ted handed out troop rosters and quick reference sheets, and then explained how to play. Jim interjected occasionally to clarify or specify important points. While I was looking at the reference sheet, I noticed a tagline saying it was for games with "individually mounted 28mm figures." I looked at the troops, who were a mix of 10mm - 15mm figures, based in units -- some very big. The pikes, for example, had four ranks of 10 figures in their stand. I pointed to the line about "individually based 28mm figures" to Dave, and he smiled and shrugged. Some gamers like pushing the envelope and making things bigger, with a more massive spectacle on the tabletop. Ted is definitely one of those!

    From left at top, Gene, Ted & Jason survey the battlefield as Jenny & Jim discuss tactics
Each of the four commanders on a side were given their own individual special victory condition where their command could earn more victory points. Mine was probably the easiest of them all, I felt. My commander was disdainful of the C-in-C's decision to engage the enemy here, and considered it a minor insignificant skirmish. We didn't want to waste troops in this unimportant battle. So, I had to preserve my two most expensive units -- my armored pike blocks -- and have them been still on the table (and undamaged? I don't remember) at the end of the game. Thus, I decided to advance only enough to get into range of the Gene's troops, opposite mine. Then I would let our cheaper shot units blaze away at the enemy while I preserved my four more expensive units of pike with attached shot in a second line. 

    Part of the Catholic center and right wing - not the pike blocks flanked by groups of shot
The game commenced and players were soon rolling lots and lots of dice. I mean LOTS of dice...ha, ha! Remember that individually based tagline? Yes, you rolled one dice to shoot (or melee) for each figure. So, a 20-man unit of shot rolled twenty dice. A 40-man block of pikes rolled forty dice! And it wasn't just hit or miss. First, you rolled to hit. Then the opponent rolled for armor saves, if he was wearing any. Then, you counted the number of hits that got through and rolled to Wound. Yes, this seems a lot like the standard Warhammer roll it hit, roll to wound, roll to save -- just in a slightly less convenient order. I remember when one of Ted's pike blocks was fighting one of Jenny's in what seemed like a never-ending struggle, I looked over at Dave, again. He smiled and shrugged again. 

    My troops at the bottom, reluctant to die on this day and more than willing to skirmish ineffectually!
Since most shot units didn't have armor, when Gene and I were rolling away at each other, it was just a two step process. We'd roll to hit and then roll to wound. The game in our center portion of the battlefield proceeded fairly quickly. My command and Gene's kept our distance from each other and simply blasted away. Ted had developed a system with 10-sided dice of various colors to keep track of your casualties. With all figures multi-based, there wasn't going to be any figure removal. I am thinking that players using On Bloody Ground with 28mm troops would probably have smaller units, too. So, I'm sure things flow much quicker with these rules in that case.  
    Dave's Catholic command on the left & his vaunted (over-rated in this game!) Polish winger hussars
As it was, things bogged down when we got to hand to hand. The other three sectors did get involved in melee, mainly because they had the mounted troops. Time and again, Jim would finish his brawls with Jason's command opposite him and say, "Okay, you guys can do your firing." Gene and I would smile and say we were already done! Jim struggled to repeat his success of the previous evening. Jason's troops kept his command on its back foot, and Jim was losing men rapidly. On my left, unfortunately (this time, since he was on my side) Dave was having a repeat performance. His Polish winged hussars -- he had requested to play that command -- were over-matched by Mike S's armored cavalry. The Poles big advantage, being able to charge two commands at one target, was too difficult to pull off with the command rules. One unit against one, the armored cavalry had 50% more men, hit better, and had heavier armor. Dave was slowly but steadily losing on our left flank.

    After several turns of gunpowder firing, the field became obscured - giving shooting a minus to hit
Remember how I said Ted was know for his bad dice rolls? Yet didn't manifest that in the AWI battle? Well, his curse came home to roost this morning! His dice were simply awful. He would roll 40 attack dice for his pike block and end up with only a couple hits. Jenny began to mow down his troops. Soon, Ted was removing entire blocks of troops. On Bloody Ground has a peculiar melee mechanic. After one round of fighting, the loser withdraws and tests morale. If he fails, the winner slams back into him and they immediately fight another round. This continues until one side either passes his morale or loses a third consecutive round (when they are removed). So, yes, it means one side can win two rounds, then the other side wins two rounds, then the first winner wins again. On and on. One memorable struggle between Ted and Jenny went on for at least six or more rounds of combat in one turn. And yes, that meant everyone else just sat back, ate popcorn, and watched the fight!

    Closeup of the Polish winged hussars as they engage one of the Protestant armored horse units
In the end, Ted lost so many Protestant troops from his command, the Catholics actually narrowly won the battle. This was despite Jason defeating Jim's command handily on our right and Mike S driving Dave back on the left. Jenny won so big, in essence, it made up for two defeats! Not surprisingly, Gene and I skirmished to essentially a draw in the center -- exactly as my commander had hoped. Even though the mechanics seemed a bit cumbersome and could definitely use some streamlining of the dice rolling, we all had fun. Jason is a big fan of the period and said he would probably pick up the rules. I didn't try to talk him out of it as he actually uses 28mm figures, and waaaay fewer of them than the masses Ted had on the table that afternoon! It will definitely play a bit more quickly with smaller forces. So after four hours of gunpowder smoke and cavalry charges, Ted counted up the points and read out the verdict that God was narrowly on the Catholic's side, today.

    Jenny's unit of 'Trotters' catches Ted's pike block in the flank and begins driving them back
It is always a fun weekend at the Toy Box. I almost always get to play something new and different from what we do on my Sunday Night gaming group. Thanks Jim and Ted for hosting the games, and the Columbus crew looks forward to next year's Toy Box weekend!

    Final sweeping look at the battlefield, with my command in the center - happy to keep our distance!
MINIATURES Acquired vs. Painted Tally for 2026

  • Miniatures acquired in 2026: 210
  • Miniatures painted in 2026: 166

TERRAIN Acquired vs. Painted Tally for 2026

  • Terrain acquired in 2026: 14
  • Terrain painted in 2026: 36

SCATTER Acquired vs. Painted Tally for 2026

  • Scatter acquired in 2026: 34
  • Scatter painted in 2026: 71

Monday, February 9, 2026

Patriots Drive British from Redoubts in Revolutionary War Battle

    Patriot center crosse the causeway and whittles down the British forces defending the center redoubt
We have been playing Rebels and Patriots from Daniel Mersey's "Rampant" series of games off and on for a year or so, now. It is fast-moving and the mechanics are easy to pick up. Like all games in the series, though, there are tweaks for each rules set. That's actually the hardest part to remember when switching from Dragon Rampant to Rebels and Patriots to Xenos Rampant, for example.  
    Left side of the battlefield, with Mike S's French force pushing aggressively towards Joel's troops

A good example of the minor differences would be testing morale after being shot at. In Rebels and Patriots, if your unit removes any figures due to shooting or melee, you test morale. You modify your 2d6 roll by -1 per casualty received on that particular shot. In Dragon Rampant (and Lion Rampant), you do the same, but modify it by -1 per casualty received throughout the entire game. They're cumulative -- not just from that shot. And in Xenos Rampant, any hits on a unit -- even if they're not enough to overcome the armor level (three hits are needed to cause a casualty against an Armor 3 unit, for example) -- cause a morale test. It is a more modern concept of reacting to being under fire even if you don't take any significant casualties. 

    Allen on left keeps an eye on the Patriots in the center, while Jason watches Tom's encircling move
So, this time I created a document for us that organized the main differences between Rebels and Patriots and Dragon Rampant (the other Mersey set we had played most recently). It was a two-sided sheet of paper and I think it did a nice job of making the game go easier. So, on to the game! Keith had set up a scenario which was inspired by the Patriot siege and assault on Savannah, Georgia. He had set up three redoubts on hills, manned by British or Loyalist troops. Our job, as the Patriots, was to push them out of the fortifications and have a clear path to the enemy board edge.  We had significantly more troops, but not to the 2-to-1 level recommended by the scenario that inspired him.

    Tom's Georgia militia begin their looping way through the swamp, hoping to strike the redoubt's rear
I commanded the Patriot center with decent quality Continental troops, with Mike S as the French on my left and Tom as the Georgia militia on my right.  Keith had given Allen, my opponent in the center, two units of mortars on his baseline. They could fire over his own lines out to 36". However, he also gave them a minimum range, which I believe was 18", coinciding with a raised causeway running from one side edge to the other across the center of the table. So, there would be a beaten zone my center would have to advance through. I hesitated whether to put my line infantry in Close Order, which improves their activation chances and also morale tests, but would allow Allen to hit my guys with his artillery on a 4-6 on each d6 rolled instead of 5-6. I hedged my bets, and kept the unit directly in front of the mortars in normal formation while the two line units to its left formed Close Order.

    Jason's redoubt on the left - bristling with artillery and two units of Loyalist infantry
In the Rampant games, the player rolls to activate each unit. If it fails, it does nothing. Unlike the other games in the series, one failure does not end your turn in Rebels and Patriots. My activation dice were abysmal. All units require a 6+ on 2d6 to activate. They gain +1 if in Close Order and another +1 if their commander is within 12". So, assuming I kept my commander nearby, I would activate on a 4+ with my line infantry in Close Order, and 5+ with the unit marching towards the guns. The number of failures I rolled for those units was mind boggling. I enjoy the rules, but my least favorite part of this set is its "blunder table." If you roll a "double one" or "double six" on your activation roll, you have to roll on the table. Most of the results are random, fluke happenings, such as a unit rolling double 6's charging towards the enemy a full move. That happened twice in the center -- to units of artillery! Are the gunners actually going to leave their guns and go storming across the table attempting to close with the enemy? Really?? The other problem I have with it is probability. If the game were simply a two players, each with a single 24-point Company, perhaps the double 1's and double 6's wouldn't happen as much. However, I had six units. Rolling a double one or double six on 2d6 is a 1 in 18 chance. That meant every three turns, statistically, these should happen. Now multiply that by three players per side. In our game, just between my right wing commander Tom and I, we rolled them five times over the course of the game. WAY too often, I feel! 

    Allen's two units of British infantry in the redoubt, one in the gap with cavalry, & mortars in the rear
I am trying to convince Keith and the other players to leave out this rule in future games, but so far have been unsuccessful. Otherwise, it provides a fast-paced and fun game. My command's halting advance across the center seemed logical, with them being under constant bombardment. The artillery fire caused a slow attrition, usually just one figure per shot. Keith had given me very large units in anticipation of the casualties from bombardment. The defending British had much smaller units -- all only six figures strong. So, as my medium and light battery began to pick off the enemy, his two British units manning the redoubt were slowly withering away. I also like the shooting system in Rebels and Patriots. You typically roll 12 dice, needing a certain score (often 5-6) to hit on each 1d6. The number of casualties that are removed per hit scored depends on cover or distance. On one one glorious roll, I hit nine times. However, my target were more than 12" away (which increases casualties from one per two hits rolled to 1:3), and they were in hard cover, which increased that from 1:3 to 1:5. So, even though I had a bizarre roll, I stilled did only one casualty as excess are removed. I like that! It keeps a system with lot of dice rolling from being overly affected by outlier die rolls.

British redoubt on our left -- more lightly defended because Joel lacked the troops Allen had
In the center and our left, the greater Patriot numbers (and clever tactics, of course) began to tell. Mike S quickly routed Joel from his redoubt and drove his command from the field. Unfortunately for Joel, he had the smallest command of the three British ones and Mike had our best-rated troops. It took a lot of hammering away at Allen's troops to make headway. However, late in the game, we had whittled their numbers down to below half strength, where it appeared they would be unable to hold back our advance anymore. The struggle on our right seemed much more evenly matched, though. I didn't watch it closely, but heard something about Tom's troops getting lost in the swamps. I did see they ended up executing an encircling movement all the way behind Jason's redoubt, firing on their rear. Still, it was looking like a close-run struggle.

    Patriot center is approaching the causeway with their light artillery opening fire on the redoubt
I thought the Rebels and Patriots system did a nice job of replicating the grinding assault on a redoubt. In my attempts to whittle down Allen's troops behind his fortifications, I needed a good roll on 12d6 to inflict a casualty. A completely average roll missed that by one hit. I also liked how Keith's rule for indirect mortar bombardment gave us another defensive modifier. It meant Allen similarly needed a good roll to cause casualties against my advancing troops. My poor activation dice rolling (and below average morale checks) meant things swung in his balance for a bit. If I had normal 12-figure sized units, the British could likely have driven us off. It was a good game, all around!

    The join between the South Carolina rifles on the left followed by my third large unit of Continentals
As we were discussing the game afterward, we all agreed that units survive casualties better than expected. Not so fast, though! We actually forgot a very important rule. When a unit falls to half strength, it is supposed to immediately receive what is called a permanent disorder marker. If that is in addition to testing for the hits it just received, then potentially that could make a big difference. I'll have to ask on the Facebook group for the rules to see what the timing of that disorder marker should be. All in all, Rebels and Patriots continues to provide for fun and fast games that feel like the period. 

    Vive le France! The French infantry have swept the British from the redoubt on the left & occupy it

    Tom's Georgia militia firing on the rear and sides of Jason's redoubt -- the encirclement worked!

MINIATURES Acquired vs. Painted Tally for 2026

  • Miniatures acquired in 2026: 95
  • Miniatures painted in 2026: 29

TERRAIN Acquired vs. Painted Tally for 2026

  • Terrain acquired in 2026: 0
  • Terrain painted in 2026: 17

SCATTER Acquired vs. Painted Tally for 2026

  • Scatter acquired in 2026: 2
  • Scatter painted in 2026: 24 

    Dam appears broken and French & Patriot troops flood their way through the depleted British lines


Sunday, February 23, 2025

Rebels & Patriots: Cutting Off Philadelphia

    Mike and Jason Stelzer, left, face off against Allen and Jenny in a game of Rebels & Patriots
We played our fourth game of Rebels and Patriots this past Sunday evening with seven players. Jenny, Allen, and Joel took on the role of British commanders trying to usher a supply column towards the garrison in Philadelphia. Mike and Jason Stelzer, Tom, and myself were rebel commanders intent on preventing the wagon train from making it across the table. Keith had designed the scenario and provided the figures and terrain. 

    Early stages of the battle with the American forces advancing towards the roadway against the Brits
The road ran down the length of the table, about 2/3's of the way across from the American starting positions. Mike S commanded the left, Jason the center, and Tom the right wing of the Americans. I took control of the a (point-wise) weak force of militia in the woods lining the far side of the board. I had five units, but all worth only one point according to the game's point system. Just one unit in some of the forces was equal to my entire force, but I had the advantage of position, which I intended to use aggressively. My first moves were to advance my entire force to within shooting range of the column and its support troops. After that, I would simply hunker down and fire and hope not to be driven off by counter-fire.

    Later in the game, my militia units at the edge of the woods pour fire into the British flank guards
The British had the disadvantage of having to march along the road in addition to firing back at my sniping. My compatriots on the opposite long table edge would have to advance to get within range to add their weight of fire to my shooting for us to be successful. Keith's rules were that the wagon train would move 4" each turn automatically, unless it was fired upon. In that case, it would have to dice to advance. Jenny's rolls for the wagon train were below average at first, and then finally caught wind. Would it be too little too late, though? How much damage could the Americans do to the convoy escorts?

    Tom's Continentals and state line troops advance on our right flank to cut off the British convoy
For 1-point units, I felt my militia were not that bad, actually. Keith gave them the ability to choose the "Fire" action, rolling all 12 dice, if they were stationary. I'm not sure if American militia are supposed to be able to do that or must always take the "Skirmish" action, rolling only six dice for firing. Keith said he'd checked and that we should be able to use the Fire action. In that case, I think my troops were a bit overpowered at 1 point. Four of the British units turned to face my skirmish line in the woods. However, I was able to inflict as much damage on them with my five inferior units as they did upon me. I did have two militia units flee off-table due to casualties from British musketry. However, I destroyed or drove off three of the enemy units. At the end of the game, I was hovering around 50% losses, figure-wise, but were still in the fight!

    Early game, Brits try to (1) Keep moving (2) Deal with my sniping (3) Face the American main force
Keith actually took command of the small garrison of two artillery and one dragoon regiment at the table edge the British were marching towards. If anyone's dice were terrible that evening, it was Keith (the GM's). He lost two of his three units and inflicted essentially no damage on Tom's advancing forces. The African-American Rhode Island light infantry shrugged off every one of the artillery shots he was able to get off. Of course, I was rooting for my compatriots to get in the battle quicker and to hammer the enemy harder. They did well, though. We ended up calling the game after only 2+ plus hours as it was obvious the supply train was not going to get off-table.

    British wagon train struggles to move forward as we pour fire into the lead wagons, slowing them
Both Jason and I made it a point to shoot the wagon train whenever we could, forcing them to dice to be able to move. As mentioned early, Jenny's activation rolls were below average, meaning they moved forward infrequently. Both Jason and I cleverly focused our shooting on the lead wagons, so that when they didn't move, they stalled the entire column. Keith did let them move off-road since it was winter and the ground would be frozen. However, that just meant we focused our fire on the new "lead" wagons. 

    I felt good that four higher point value British units were turned to face my sniping the entire battle
We did struggle a bit with the morale and rally rules this game. It had been since September that we had played them. In between, we played both Lion Rampant and Xenos Rampant from the same stable of games. Unfortunately, each rules set does thing subtly different. All three due morale checks (or "Courage checks") differently. We did things wrong in the early part of the game and it wasn't until three quarters of the way through that we finally got the rules all down pat. On one hand, it is nice to use a similar game system so that was are familiar with the basics. However, the subtle differences in each set make it a challenge to get your head wrapped around each one's way of doing things. I think that I honestly need to sit down and create a cheat sheet going over the differences between the three sets. Heaven forbid we start playing another game from the "Rampant" stable (as Keith is talking about doing)! I enjoy the games, but it is challenging keeping them straight in our heads!

    Mid-stages of the battle, as the British convoy guards are getting worn down by American musketry
I guess that's kind of a blessing, because it means we get to play a variety of games, right? I asked the group after the game if they're enjoying the Rampant system and they seemed amenable to continuing to keep playing them. They work, provide a game which makes sense for the most part, and they do play VERY fast. Once again, we were done in less than three hours for a six player game. Granted, we often don't play till the bitter end, and "call it" when it is obvious one side has won. However, we tend to do that in most games (except board games, perhaps?), so that doesn't take away from their fast-play aspect.

    Firing takes place along the length of the battle line, with Americans slowing gaining the upper hand
It was a good time, my troops "punched well above their weight class," and we laughed and enjoyed ourselves. What more can you ask for in an evening of gaming, right? Our normal host, Mike W, returns this week from snowbirding in Portugal. So, we will likely be gaming back at his abode next week (or soon). In the meantime, look for another update from me in a day or so detailing my two newest, 3-D printed trailers that I painted up from Bad Goblin Games.

    We decided the convoy did NOT get through, starving the Philadelphia garrison of supplies...

MINIATURES Acquired vs. Painted Tally for 2025

  • Miniatures acquired in 2025: 95
  • Miniatures painted in 2025: 15 

TERRAIN Acquired vs. Painted Tally for 2025

  • Terrain acquired in 2025: 5
  • Terrain painted in 2025: 7

SCATTER Acquired vs. Painted Tally for 2025

  • Scatter acquired in 2025: 9
  • Scatter painted in 2025: 5

    Everyone had fun, & finishing a game with seven (really 8) players in just over two hours is a bonus!