Tuesday, August 5, 2025

3-D Printed Canyon Rocks & Stacks from Diabolical Terrain

    Battle droids prowl the canyon lands of Tatooine among 3-D printed pieces from Diabolical Terrain
A big part of my advance purchase that I picked up at Historicon from Diabolical Terrain were these desert terrain pieces from his Canyon Rocks & Stacks range. I wanted them to supplement the Desert Rock Formations that I had painted up awhile back. I now have 17 of these printed in 32mm scale, so should be set for any of my Star Wars skirmishes that I set out in the outback of Tatooine! 

    These canyon rocks and stacks certainly evoke desert terrain out west, such as Arches National Park
They are incredibly easy to get ready for the tabletop, too. I began -- as I did with the first batch -- with sand-colored Camouflage spray prime from Menards. I must not have sprayed it on as thick as I did with the first batch, because I did have to go back and do a base coat on top of the priming in a craft paint khaki color. Or maybe there are more grooves and crevices in this batch than the first. Who knows?

    I love how the erosion lines paint up quickly with a simple base coat, dry brush, and wash
Either way, I let them dry overnight after that. Next, I did a white dry brush highlight with a wide, stiff-bristled brush. If this is sounding familiar, it is exactly the same recipe as for my Tatooine buildings! Some of these are fairly big pieces, so I had to be careful to not smudge the areas I'd already dry brushed as I went all the way around each piece. Once again, I let them dry overnight before the next step.

    The contrast between the two styles of pieces -- stacked rocked look and eroded look
The final step besides a clear coat spray was to go over them completely with my Vallejo brown vehicle wash. I was worried that the massive surface area of the eight pieces would deplete my bottle completely and force me to mix up a new batch with the restock I picked up at Historicon. However, it did not -- there is still some left in the pre-mixed (watered down) bottle I made last summer. Now, the problem is that I don't actually remember what my ratio or formula was for Vehicle Wash to Water. Maybe I'll go back and read some of my blog posts to see if I mention it? I looked on the bottle cap (where I usually write these things down in Sharpie), but there's nothing there. 

    Few things are more Star Wars iconic than creatures riding huge beasties -- so this fig was a natural
Anyway, I really like the effect this dark brown wash gives on these pieces. It gives  the surface a nice kind of glow that you sometimes see in photographs of the desert southwest. Speaking of which, some of these are dead ringers for the terrain you see in Arches National Park. I'm sure that is intentional, so these pieces would also look great in a Western game set in the appropriate desert lands. The pieces actually break down into two types of surfaces. One is very craggy and like piled rocks (stacks?). The other is smooth and eroded with parallel lines carved into them by wind or water. Geologically, I'm not sure which it is -- I just know I've seen some amazing photos of these types of rocks out West!

    These battle droids are on the hunt for the Empire's enemies, tirelessly trekking the sandy planet
I really like how these turned out, and now I'm wishing my next Star Wars scenario was set in Tusken Raider land or something. Instead, it is a city scenario using the additional "Tatooie" (as the website calls them) buildings I bought from Diabolical at Historicon. Oh well...next game! Still, if you are currently doing Star Wars skirmishes with your group, you can definitely use some of theses for your games! They are reasonably priced and you can scale up or down what size you want them printed in (with the price going up or down, too, of course!).

    No sign of the Rebels here! Terrain pieces like these are where 3-D printing excels, I feel...
So, what's next on my paint desk? Well, speaking of Star Wars, I'm working on a batch of six civilians that I pieced together from the various Stargrave plastic sets I've purchased. They're about half done and will be needed for the upcoming game near the end of the month for our next game of Space Weirdos. The resin bunkers and sniper positions from Miniature Building Authority are still primed and awaiting their first coat. After that, I would like to polish off those five additional fishmen I primed up awhile back. Otherwise, if I jump from here into painting my Dragon Rampant fantasy troops, they'll be giving me the stink eye the whole time: "Hey, Bub! What about us? Youse said we's was next...!"
    A final look at the atmospheric 8 Canyon Rocks and Stacks that I just painted up

MINIATURES Acquired vs. Painted Tally for 2025

  • Miniatures acquired in 2025: 288
  • Miniatures painted in 2025: 161

TERRAIN Acquired vs. Painted Tally for 2025

  • Terrain acquired in 2025: 36
  • Terrain painted in 2025: 57

SCATTER Acquired vs. Painted Tally for 2025

  • Scatter acquired in 2025: 115
  • Scatter painted in 2025: 150

Monday, August 4, 2025

Ninjas Escape With the Treasure in 28mm 'Test of Honor' Samurai Game

    Tom's mounted noble charges into the village center in his game-long attempt to save his bride

  We gave Test of Honor Samurai rules a try out yesterday evening at our regular Sunday evening gaming get-together. It was a kind of free-for-all scenario with eight players. It is a tribute to the rules that the game actually flowed well and there wasn't a lot of waiting around for your turn. My friend Mike S was running it, and was using some modifications that he'd seen at a sprawling game at Historicon. He had to adapt on the fly when players on the same side of the table decided to attack each other. It worked out, though.  
    One of the clans gets ready to cross the stream to join the fray in the village center
I was playing the Ninja force, which doesn't begin the game deployed ontable. My mission was to hijack a payment going from one clan to another. We didn't know which clans were involved in the transaction, nor the form of the payment it would be. Everyone else had similarly vague missions, which he intended to make each player not trust the other, including their neighbor. It worked like a charm for Mike W, who promptly attacked Keith's force in the early stages of the game. To be specific, he sent two of his samurai over to kill the draft ox pulling the cart containing Keith's two female samurai. The ox proved to be made of sterner stuff than expected, resisting two swings of the sword by two separate warriors. 

    Hilarity ensues as 8 factions tussle near the village in the center of the board
Tom also charged into the fray early, when he saw someone upend a palanquin containing his noble's bride. The fact that the bride jumped out, armed with a sword, didn't deter him from shouting to any and all in the area "hands off" his bride. He was the only mounted figure in the game, and he was still swinging his sword and upholding his bride's honor (or avenging her after she was slain) at the end of the game. I seized upon this confusion in the village center to have my ninjas bolt from inside one of the houses and search the inside of the palanquin. Mike confirmed it contained the treasure I was looking for, announcing it to the table at large. This meant that slowly many other players shifted from their local feud to attack my black-robed thieves trying to abscond with the treasure.
    'Ha, haaa!!' My Ninjas reveal themselves and then discover the treasure in the overturned palanquin
The ninjas darted back into the house from which they'd came, and my other ninjas emerged to fight off the attacks of the other players. As the ninjas, I could remove any civilian figure and replace it with my own undeployed troops, representing us uncloaking our disguise. I was rolling fairly well and was able to fight off Mike S's mercenaries who, unbeknownst to me, were also hiding in the very same house on the second floor. I sent the trio of archers holding the treasure out the back door, hoping to bolt for the board edge. Joel's clan raced to cut off my retreat, but I was able to beat back his attacks, for the most part. Opposite Joel, Keith and Mike W's clans ceased their battle, perking their heads up, "Treasure...?" They also moved forward, trying to close the jaws I was attempting to escape from. 
    Escaping our the back door with the treasure, we are immediately beset by Mike S & Joel's forces
There was lots of laughter around the table as we mocked each other's vague missions. We began pulling up Google Translate and typing in our taunts to each other, to read aloud in Japanese by the female voice on the app.  Just when it looked like the last of my archers carrying the treasure was going to go down, the games was called on account of time. The 4th quarter reprieve by the clock meant we had possession of our objective at game's end. Of course, I declared my victory to the jeers of the other players.
    My ninjas cut down one of Keith's samurai who attempt to waylay us and steal our seized treasure
I'm sure there were numerous things we did wrong in our first Test of Honor game. Still, the game flowed well and eventually the various factions came to blows. I would probably tweak the scenario to give incentive to factions on the opposite sides of the table to attack each other. Maybe victory points for killing members of rival clans (who are the ones opposite you)? There can also be secondary objectives for each player, like Tom's protecting/rescuing his bride, my hunt for treasure, etc..
    'The Affair of the Ox Cart' sparks a clash between Mike W and Keith's clans
I'm sure we'll play more Test of Honor soon since most seemed to have a good time in the game. My friend Abel D runs the game regularly at HMGS Great Lakes and regional conventions. I'd never got a chance to play in one, but everyone seemed to be having a good time at his table. Now I can see why, and look forward to the next time Mike breaks out his samurais, ronin, ashigaru, and ninjas!
    The palanquin moments before it is overturned and the donnybrook in the village begins...
MINIATURES Acquired vs. Painted Tally for 2025

  • Miniatures acquired in 2025: 288
  • Miniatures painted in 2025: 161

TERRAIN Acquired vs. Painted Tally for 2025

  • Terrain acquired in 2025: 36
  • Terrain painted in 2025: 50

SCATTER Acquired vs. Painted Tally for 2025

  • Scatter acquired in 2025: 115
  • Scatter painted in 2025: 150

Saturday, August 2, 2025

I'm Liking My 28mm Empress Vietnamese Civilians

    A dozen 28mm Empress Miniatures civilians I picked up from Age of Glory at Historicon 2025
I know in my last post, I pronounced myself not so enamored of the 28mm Empress Miniatures LMG-armed miniatures I bought at Historicon. I feel the exact opposite about these three packs of Vietnamese civilians I bought at the same time. First of all, the size difference for a Vietnamese civilian vs. a U.S. soldier should be pretty marked. Every memoir I've read by veterans talks about how both Americans and Vietnamese noticed how much bigger we were than the locals. The other reason is I think they did a wonderful job sculpting personality and better faces onto these figures. The features seem much sharper detailed. The variety of interesting poses makes these an easy buy for someone doing 28mm Vietnam. 

    Youth at left & his older sister in the 'Ao Dai' dress are examples of very simple but effective poses
Many of these are very simple figures and poses, I admit. For example, the walking Vietnamese youth has no equipment to note and is just simply sauntering along. Same with the one that could be his older sister -- the Vietnamese lady in the flowing "ao dai" dress, as they're called. And perhaps their grandmother, the old mamasan squatting in the dirt? Somehow, these simple poses look natural for a villager. Since about half of the figures were relatively equipment-free (we're talking hoes, baskets, and bundles here), I decided to paint all 12 at once. Normally, I would split these into two groups of six. However, I had a feeling they would paint up very quickly, and they did.

    Rural Vietnamese villagers in their traditional black costume with 'Non La' palm & bamboo hat
I reverted back to my normal method of painting for these civilians. I primed them with Liquitex white Gesso, then did their skin first, followed by clothes and equipment (if any). Since most of my Vietnam games will take place in the countryside, not in Saigon or another bigger city, I wanted a more rural look. So, after painting their flesh, I got out my black paint the next day and added black to most of the figures, reflecting traditional dress in the countryside of Vietnam. About a quarter were done in all black. The rest might receive a black shirt, but then a different color of trousers, or vice versa. Some got no black at all, such as the one that appeared to be an ethnic Hmong, with her much more elaborate traditional costume. 

    The middle pose resembled Hmong tribal costume so I painted the woman up like that - a bit fancier!
Since these are 28mm figs, though, most would receive a dry brush highlight on their clothing and whatever they were holding or carrying. This meant painting the base color one morning during my usual AM paint session, and then letting it dry overnight. The next morning, I would dry brush a highlight color, and then do the base color for either another article of clothing or their basket or whatever. This meant it took about 4-5 days to get all 12 completely done. 

    A few stoic looking 'mamasans' hardened by an agricultural life in Vietnam's climate & conditions
I am very happy with how these country folk turned out. The poses are very natural and believable, and they look like they belong out in the "boonies," as U.S. troops would call it. Many wear the traditional Non La conical hat made of palm leaves and bamboo. It is the iconic look for Vietnam, and rather than do them in a variety of colors, I made them look relatively identical. I'm sure newer ones would be brighter and older ones a little darker, but I honestly didn't bother with that. I painted them a base coat of Iron Wind Metals "Dun Yellow," and dry brushed them a very light tan craft paint called "Wild Rice." Finally, i did a dark brown wash over them with my Vallejo vehicle wash.

    Another look at the group of villagers from above, alongside two of my scratch-built jungle huts
I went for a simpler flocking system for these, too -- at least compared to the troops. I am assuming that these civilians will be hanging around villages, not out in the jungle.  As with the Empress LMG-armed figures, I based them on the raised plastic bases that came which my Crucible Crush Black Sun American and VC troops. Since I substituted the soldiers onto flat bases, I hoped this little bit of extra height would make them look more natural next to the U.S. or Vietnamese troops on the tabletop. I flocked the lip of the base, too, so that it wasn't obvious they were on a different shaped base. Hopefully, they'll look great next to my Crucible Crush figures on the tabletop.

    Tight shot showing the range of poses in just three of a dozen packs Empress Miniatures makes
What else is on my painting desk, at the moment? Well, since the weather in Congo-lumbus, OH, finally broke and it is much cooler and less humid, I was finally able to spray paint yesterday! So, I have the Miniature Building Authority bunkers and sniper positions black primed. One step ahead are the Canyon Rocks and Stacks I bought from Diabolical Terrain -- they have their tan base coat on, and await only a dry brush and brown wash. For miniatures, I have a group of six Sci-Fi civilians that I assembled from my various Stargrave boxes. I need them for my next Star Wars scenario using Space Weirdos rules. Oh, and I did finish off another batch of those movement markers that I featured in the last post. I didn't bother photographing them since they are identical to the first ones. So, stay tuned for more soon...! 

MINIATURES Acquired vs. Painted Tally for 2025

  • Miniatures acquired in 2025: 288
  • Miniatures painted in 2025: 161

TERRAIN Acquired vs. Painted Tally for 2025

  • Terrain acquired in 2025: 36
  • Terrain painted in 2025: 50

SCATTER Acquired vs. Painted Tally for 2025

  • Scatter acquired in 2025: 115
  • Scatter painted in 2025: 150

Tuesday, July 29, 2025

Adding 28mm Empress Machine Gunners to My V.C.

    Four 28mm light machine gun Vietnamese from Empress Miniatures to augment by Vietnam project
I have loved the Crucible Crush miniatures from their Black Sun Vietnam range, but one drawback was the lack of Vietnamese machine gunners. There were enough U.S. M60 gunners, I felt. However, there was only one VC with an LMG in the range, forcing me to look elsewhere to supplement my opposition force. I knew that Age of Glory would be at Historicon the previous weekend, so reached out to Steve to ensure he was bringing his 28mm Empress Vietnam figures. He said he was, so I looked through the website and made a list of what I wanted to buy.

    I liked how the pack came with four completely different poses (wearing different uniforms, too)
Top of the list was this pack of four LMG-armed NVA. I'd brought along one of my painted Black Sun guys bundled up in a tissue and small ziploc bag. I pulled him out and yes, as my friend Jim W had told me, the Empress figs were significantly smaller. However, I bought the pack anyway and it was the first thing I prepped and got ready to paint upon returning home from the convention. I liked how there were four completely different poses and had noticeable differences in their uniforms. This would make it easier to use them as either VC, since my force so far is all VC.

    This marching pose looked the most 'VC' of the pack, so I painted him in black pajamas
Looking back at the Age of Glory website picture in my last post, I just now noticed the figures in my pack did not come with the bipod sculpted on. That's odd, unless there was a pack with and without and I bought the latter? I didn't notice that, though. Hmmm. The bipod would have been a good way for the figure to say, "Hey, this is an LMG!" As it is, I will be using these figures in solo play tests initially. They will come on board as an LMG, so it should be fairly obvious what it is once on the tabletop. Still, I decided I needed a better indicator of the fact they are LMGs. So, I cut up pieces of brass wire and glued them on top of the flocking. I did this with my 20mm Modern Africa figures, and it made them easier to identify on the tabletop. The question is -- should I go back and do that with my Black Sun figures, too? Hmm, not sure on that one!

    This pose has the gunner firing from the hip - similar to some Black Sun poses for the Americans
Of course, as if the size difference between the Empress and Crucible Crush figures wasn't marked enough, three of the four figures are either crouching, kneeling, or prone. That would make them appear even shorter! To help make up for the sized differences a little, I used the raised black plastic bases with a wide lip that came in each pack of Black Sun figures. This would boost the Empress figs' height a bit, since I did NOT use those bases for Americans or VC. To affix a 1" adhesive magnetic bottom to the hollow base, I flipped it upside down first. I gooped in (technical term!) two-part epoxy in the center and along the rim. I placed the magnetic circle on top and then flipped it back, right-side up. Luckily, the magnetic circle has a slightly wider circumference. So, the magnet should stay in place. I hope! Either way, the "high heels" I am giving the Empress figs will make their height closer to the Crucible Crush ones, which were based on flat bases I used instead. 

    Normally I am not a fan of prone poses, but I guess it makes sense with a LMG
After painting up these figures, I do have to say that I like the Crucible Crush ones better. I feel the detail is more crisp in the Black Sun range and the poses are more dynamic. If my solo play tests go well, I will eventually look at adding regular NVA forces to my collection of opposition for the Big Red One in Vietnam. If I do, my plan is to use Gringo 40s for those, as their size (according to my friend Jim W) are much more in alignment with the Crucible Crush. Plus, I really like their poses, too, and the breadth of the range. Honestly, the biggest reason I went with Black Sun over Gringo was I did not want to order from the UK in this era of tariffs and wildly fluctuating rules on international trade. You-know-who has not been kind to our hobby!

    Final look at the Empress LMG figures as they take cover in a ruined temple complex
I'm fairly happy with how these LMG-armed figures came out. Not as happy as with Black Sun, but these will suffice for my play test games. Speaking of which -- I know I keep saying this -- I am very close to doing my first solo play test. The rules are pretty much written. I have only one or two small things I need to do, such as rules for throwing grenades. Otherwise, I have all the command and control, movement, combat, and cards written. I expect I will go to Office Max this week to print up my own version of the Event Cards I've created for this game. I even put artwork that I found on Google Image searches on each card. Of course, if the rules are eventually published by Ganesha Games, I will need to source artwork that is royalty free (or get Andrea to draw it -- he's a great artist, himself!).

So, what else is on my painting desk right now? I'm actually making very good progress on the on the 28mm Empress Miniatures Vietnamese civilians that I bought along with these machine gunners. I would say they are close to halfway done. And weirdly, I am painting all 12 of them as one batch -- something I normally don't do. Of course, with much less (or no) equipment, there isn't as much to paint on them! Terrain-wise, I am stalled. I really want to start the MBA bunkers and sniper positions that I bought, but it has been simply too hot and humid to trust spray priming them. It is finally supposed to cool off this weekend, though. Maybe I'll finally get a chance to spray something then! In the meantime, I'll probably do up another batch of the movement markers I showed you in the last post

MINIATURES Acquired vs. Painted Tally for 2025

  • Miniatures acquired in 2025: 288
  • Miniatures painted in 2025: 149

TERRAIN Acquired vs. Painted Tally for 2025

  • Terrain acquired in 2025: 36
  • Terrain painted in 2025: 50

SCATTER Acquired vs. Painted Tally for 2025

  • Scatter acquired in 2025: 115
  • Scatter painted in 2025: 138

Monday, July 28, 2025

Urban Development in Tatooine (& moved markers)

    My newest Sci-Fi buildings for Tatooine are 3-D printed in 32mm scale from Diabolical Terrain

It was a race to see which of the things I purchased at Historicon last weekend that I would finish first. At first, I thought it would be the four Vietnamese light machine gunners (next post). However, my multi-step flocking method slowed progress down on them enough so that the Tatooine buildings and some movement markers for our Star Wars skirmishes beat them to the finish line. The buildings were ones I bought from Diabolical Terrain. With these finished, I now own one each of the six different styles in their "Tatooie" line of 3-D printed buildings. Hopefully, I'm set for now with buildings for my Star Wars skirmishes! That's the thing about 28mm terrain -- it takes up a lot of room and is not cheap!

    Two views of the larger domed building -- these paint up so quickly and I think look great!
I really do like these buildings, though. They look perfect for a Star Wars setting. Plus, they are so easy to prep for the tabletop. I guess I shouldn't have been surprised that I finished them first. First, I spray painted them with a Khaki "camouflage" color I bought at Menards. Unfortunately, it didn't cover as well as it did on my first batch of these buildings, so I had to go over with a brush-on craft paint to give it a thorough base coat. After it had dried overnight, I dry brushed the buildings white. Waiting another evening, I applied Vallejo brown vehicle wash over it. I really like how the wash softens and blends the brush strokes of the highlighting. Prior to washing the buildings, I was kind of disappointed in myself, feeling I had botched the dry brushing stage. The harshest strokes disappear, though, once the wash is applied. Magic for the fumble fingered...ha, ha!

    The 'Double Humped' building being inspected by Stormtroopers on the lookout for 'rebel scum'
All that was left after that was to pick out the details. Most were done with Iron Wind Metals "Steel" paint. Progressively, I added a craft Gunmetal Gray, then Pewter to give depth to the metallic sections. The doors were painted first in Steel, then I added Metallic Brown in the recessed panels. Pewter was added as a highlight to the steel sections. Once again, these lines between the different colors disappeared when I did the Vallejo black vehicle wash over it. I really like what this wash does to metallic colors. It gives great shadows and depth, yet lets the highlighted areas still have more shine.

    Street level view of the three buildings together -- soon to be used in our next Star Wars scenario!
I'm glad I finished these, as I will need to use them in a few weeks for Mission 3 of our Star Wars skirmishes. This will take place in the city, again. The extra buildings will prove useful in creating the backstreets where most of the battle will take place. If anyone is interested in picking up a set of these from Diabolical Terrain, mine are printed in 32mm scale. There is a drop down menu on each building's page which allows you to select which scale you want them printed. Or -- better yet -- pick them up at the HMGS Great Lakes flagship convention, Advance the Colors, Oct. 10-11 in Springfield, OH. Ron Weaver will be attending as a dealer and has lots of great stuff!

    This pack in Menards caught my eye -- I had been looking for something to use for move markers
The next items I finished up involved a bit of serendipity. I was in Menards, picking up a replacement can of that Khaki spray paint, when I cut through one of the hardware aisles. I happened to pick the aisle that had the little stick-on sliders you put on the bottom of furniture. Lo and behold, I saw 1/2" diameter round adhesive cork pieces on the wall rack. Scratch builders know that cork is a great material. It can be painted or dry brushed to look like just about anything -- a rocky outcrop, asphalt, you name it! I have been trying to figure out what to use as markers for some of my games to denote which figures have acted already for that turn. In particular, I need them for Space Weirdos rules. You are supposed to show how many movement actions a figure has taken on its turn because it can affect shooting at (and by) them. Since you can move up to three times in a turn, I wanted smaller markers. These will be perfect, I think.

    Luckily, I already had a box of 1/2 washers that fit on the underside of the cork pieces perfectly
Even better, I discovered that I already had a box of 1/2" metal washers when I got home. Cork is a great looking material, but it can be fragile. I simply peeled off the paper back of the pieces and stuck the metal magnet to the underside of each cork piece. No problems with fragility now! Next, I flipped them over, and put a blob of white glue in the center of each washer -- just to make sure that the two stay properly adhered to each other.

    First batch of 24 move markers - I really like how they look with the cork surface, rocks & tufts/flock
I guess I shouldn't have been surprised how quick these were made ready for the tabletop...wait! Didn't I just say that about something else? I pulled out all of my khaki-ish paints, opened them up, and set their lids next to the mat I most often use for Space Weirdos games. I picked out the one that matched best -- it was a craft paint called...wait for it..."Khaki!" I painted the side edges of the cork/washer first in that color. Next, I wet brushed the cork top in that color, as well. I figured they'd need more than that, and after looking at them, I decided I was right. I added groups of 2-3 small tan ballast stones to the top by applying a bit of white glue and then placing each stone with a brush whose tip was dipped in the glue.

    How the markers will be used -- to indicate which figs have acted & how many moves they made
A few hours later, I went downstairs and took a look a them. I felt the movement markers needed a bit more. I added brown vehicle wash to the base and the rocks. They definitely looked better, as the wash settled into the grooves of the cork and gave irregular darker patches. But...guess what? I felt they could use just a bit more...ha, ha! I added tufts or clump foliage to each one with a dab of white glue. Now, they were perfect! Or at least would be, once I got a chance to spray coat them with matte.

    A rebel drone keeps an aerial view on a squad of Stormtroopers as they search Mos Eisley
I will be headed back to Menards soon for another box of 24 of these cork pieces. Or two boxes? Remember -- cork looks great! It can be used to replicate so many surfaces! Anyway, I was happy with how they came out. The question will be whether I will make similar ones for other terrain surfaces. So, what else is on my painting desk? Quite a bit, actually. The only miniatures currently underway (other than the machine gunners who are just waiting on a matte spray coat) are the dozen 28mm Empress Vietnamese civilians I also bought at Historicon. They are about 1/3 of the way done. Terrain-wise, I have the nine 3-D printed canyon rocks and stacks that I bought at Historicon base coated. The MBA sniper positions and bunkers will hopefully get a black primer today. So, stay tuned! More of my purchases from Historicon are on the way!

MINIATURES Acquired vs. Painted Tally for 2025

  • Miniatures acquired in 2025: 288
  • Miniatures painted in 2025: 145

TERRAIN Acquired vs. Painted Tally for 2025

  • Terrain acquired in 2025: 36
  • Terrain painted in 2025: 50

SCATTER Acquired vs. Painted Tally for 2025

  • Scatter acquired in 2025: 115
  • Scatter painted in 2025: 138

Tuesday, July 22, 2025

Historicon 2025 Purchases

Well, I didn't make it. Oh, I arrived at Historicon 2025 with no problem. I am referring to my goal of having my flea market sales cover my new purchases. My sales in the Friday flea market were more lackluster than I was hoping for. About half of the items I brought came home with me, unfortunately. I did make around $200, but some of my big ticket items, such as the MDF ruins from Four Ground and Father and Son Gaming, were not purchased by anyone. My advance purchases with Miniature Building Authority, Diabolical Terrain, and Michigan Toy Soldier & Figure Company set the bar too steep, though. Oh well...they did put a dent in my expenses, though. So, I guess I should be happy! 

    Resin bunkers and sniper positions that I picked up from Miniature Building Authority at Historicon

First, I stopped at the dealers where I had made arrangements ahead of time (or purchases on their website) to pick up at the convention. For Miniature Building Authority, this included more resin terrain for my 28mm Vietnam project. I picked up two Sniper Positions from their Pacific and Vietnam line. I also picked up one of the Coconut Log Bunkers. The final piece was the NVA Jungle Bunker. All four of these are items he has picked up from Acheson Creations and is selling in his catalog. That makes me very happy that at least some of the Acheson stuff I love so well will continue to be available to gamers. Kirk charged me $85, which was a nice (and very appreciated) discount. I do my best to promote his great products, showcasing them here on my blog when I get them painted up and ready for the tabletop. Thanks, Kirk! It was good to see and talk to you at Historicon. I look forward to seeing you at Advance the Colors, Oct. 10-11, in Springfield, OH!

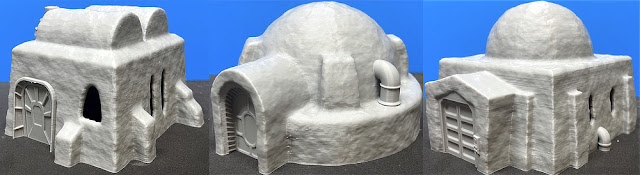
    The remaining three buildings from Diabolical's "Tatooie" line of 3-D printed Sci-Fi buildings
Next up, was a stop with Ron Weaver from Diabolical Terrain. I think my largest advance purchase was through him, and he had my items all boxed up and ready to go. As I put the box under my arm, Ron asked, "What? You're not going to check them?" I told him no, I trusted him. He also realizes that I showcase his items on my blog regularly, too. Money-wise, my order was about the same size as at MBA, but included quite a few more items -- mostly for my Star Wars skirmish games. First up, I purchased the remaining three of the six "Tatooie" Desert Buildings. I had purchased the first three of these from him at Advance the Colors last year. They were so easy to paint up and I liked them so much that I wanted to get the remaining three models from that line. Also for these games, I picked up all nine pieces from the Canyon Rocks and Stacks line of 3-D printed terrain. I had picked up the Desert Rock Formations also at ATC, and I liked them so much that I wanted to complete my collection for Star Wars games out in the wilds of Tatooine. His 3-D printed products are always high quality, so I like to buy things from his booth every time I see Ron at a convention. 

    I liked the Desert Rocks I picked up last year so much, I bought the 'Canyon Rocks & Stacks'
My last advance purchase was with Michigan Toy Soldier & Figure Company. As it turns out, their website does not immediately deduct purchases from their inventory. So, my order of half a dozen items was missing three which were out of stock. They were very accommodating, though, and offered to do store credit for the missing items at the convention or ship them when they came in. I perused the booth, but decided to simply wait for them to come in stock. I did pick up the three things they had on hand, though. Two were figure packs from Crucible Crush. One was the Fearsome Flying Head from Native American mythology, while the other was a pack of 28mm English Puritans. The final item was the brown vehicle wash from Vallejo that I use for my miniatures -- especially on skin and colors in the white to tan range. I can almost hear the head or beard scratching from readers through my computer. Puritans? Native American mythological monsters?? Wait. All will be revealed shortly! Well, looking at the picture below, I think I kind of gave it away...ha, ha!

    The Fearsome Floating Head from Native American mythology & some English Puritans
I did not do an advance purchase for my next things I picked up, but it was actually my first stop in the vendor hall. I had contacted Steve from Age of Glory about their Empress 28mm Vietnam line to ensure they were bringing it to the show. He said he would be, and confirmed he had the items I wanted in stock. So, right after lunch on Thursday, I zipped inside the dealer hall and made a beeline for his booth. I had brought along one of my painted 28mm Viet Cong from the Black Sun line to compare sizes. It was as my friend Jim W had cautioned, though. The Empress line is MUCH smaller than the Black Sun figs. So, I cut back on what I was going to buy, and simply picked up the pack of four light machine gunners I needed from their NVA line. I am not planning on mixing the LMGs in with groups of small arms in the rules I am writing, so the size shouldn't be a problem. I also picked up three packs of civilians from their Viet Cong (Armed Civilians) line. I figured that the civilians could be shorter as they are significantly less well fed than the soldiers. I had read in one of the books that the villagers often marveled at how big the Kit Carson Scouts serving with the U.S. were, which they attributed to eating so much American food. I picked up civilian packs DS4, DS5, and DS6. The civilian poses are very nice and have a lot of character, as you can see from the pictures I've added to this post.

    The four packs of Empress 28mm Vietnam that I picked up -- LMGs and a dozen civilians
I drove to the Historicon contemplating more purchases than above. One in particular I really hadn't make up my mind on. I was thinking about starting a new period (gasp!) for next year. I had been reading battle reports on blogs or watching them on YouTube channels for 28mm Horror. I already owned Silver Bayonet, so that was one set of rules I was thinking of using for it. Recently, I downloaded from Wargame Vault the Devilry Afoot rules. Silver Bayonet is set during the Napoleonic Wars while Devilry Afoot is set during the 1600s or 1700s. If I pulled the trigger, I would base them in frontier America during the one of the series of wars fought in the New World. I already have a very large collection of 28mm native Americans and frontiersmen, as well as British and French. I have even purchased a number of Native American mythological creatures as I was contemplating doing a supplement for Song of Drums and Tomahawks were the boundary between our world and the spirit world was broken. However, my friend Mike Stelzer declared he was also considering doing that, so I backed off and let him run with it! Still, I had most of the figures I would need except for specialist characters and some more traditional monsters.

    Pictures from the Badger Games site of the packs that I bought at Historicon for 28mm Horror
I had taken hours going through the website of both Badger Games and Brigade Games. I jotted down (actually typed into my phone) likely packs of character or monster figures. Badger carries the Bad Squiddo Games which has an amazing array of characters from many periods, including the one I would be setting my games in. However, the prices tend to be on the higher end. Brigade Games carries the Silver Bayonet and Dracula's America lines, which tend to be more reasonable. Actually, Badger carries those lines, too, but confirmed by email they wouldn't be bringing them because other folks carry those lines at the show. I slowly went through the figure packs at both vendor booths, and finally decided I would pull the trigger on this new period. I told myself I wouldn't try to get it going until 2026, as I wanted to focus my Sunday Night Gaming efforts on the Star Wars skirmishes. However, I would use this opportunity to pick up the necessary miniatures. After all, I am only down on the Acquired vs Painted for Miniatures 237 to 144. That's less than 100...ha, ha!

    Some of the Silvery Bayonet & Dracula's America figures that I bought for my 2026 Horror project
It might have been helpful to have chosen which rules set I was going to use before buying, but honestly, I wanted to try them out myself first. So, I picked out the characters using types that both games had in common. The monsters are very similar, though I would introduce more mythological creatures from Native American stories than a standard campaign in either game might. Between the three lines (Bad Squiddo, Silvery Bayonet, and Dracula's America), there were often the same monster. For example, each of the three produces a "Wendigo" figure from Algonquian folklore. Sometimes I went by the figure I liked best. Other times, I went with the most reasonably priced -- for example, the werewolves from Dracula's America were the cheapest and looked great. For witches, I couldn't resist the Bad Squiddo figures. Yes, the "Angry Witches" pack looks a little whimsical and Wizard of Oz-ish, but I can mix up the colors a bit and don't have to paint them with green skin. It will be hard to resist cackling, "I'll get you my pretties...!" in the first game, though...ha, ha! 

    Some of the 17th-18th century personality figures I picked up from Brigade Games
I was still missing some key character types, so hit up Brigade Games, again. Both games can have lords, churchmen, and scholars as part of the player monster hunters. So, I went through Lon's collection and then asked his advice when I still couldn't find some things. In particular, I was having trouble with scholars or scientists until he pointed out a pack from the Napoleonic range. They're meant to represent the group of academics that Napoleon took along with him to Egypt. At the edge of my period, but nothing wrong with the odd top hat or two...! 

    Freebie pack of Charlton Heston from Planet of the Apes, a chimp astronaut, & other figure
Other than the odd bottle of paint, that was the extent of my purchases at Historicon. I've been keeping a running tab on my calculator, but it likely doesn't reflect any discounts vendors may have given. I was attempting to pay as much as possible with cash instead of credit card. Still, as mentioned, I fell short of having my flea market sales pay for the things I bought in the dealer room. I'm a little bummed about that, but I realize that I wasn't selling painted miniatures this time, for the most part. Those are what I've earned the most from at previous flea markets. Terrain and odds and ends can add up only so much. I'll have to remember that, and maybe next time begin to dig into my unpainted (and unplanned to paint anytime soon) pile of minis more rather than preparing terrain to sell.  Still, it was a fun time. Although I feel like I kept my purchases under control, my phone's calculator is telling me otherwise! I've adjusted the numbers below of Acquired vs. Painted, so you can see my task ahead to stay in the green!

MINIATURES Acquired vs. Painted Tally for 2025

  • Miniatures acquired in 2025: 288
  • Miniatures painted in 2025: 145

TERRAIN Acquired vs. Painted Tally for 2025

  • Terrain acquired in 2025: 36
  • Terrain painted in 2025: 47

SCATTER Acquired vs. Painted Tally for 2025

  • Scatter acquired in 2025: 115
  • Scatter painted in 2025: 114