Sunday, January 1, 2017

28mm Tables & Rifle Cases


28mm Resin table I picked up awhile back from a vendor I can't remember...!


I had some odds and ends in resin that I'd picked up at various conventions that I felt needed to be painted up. The first of these was a set of three 28mm tables. I honestly don't know who I purchased them from. Doubtless, it was at a convention when I was browsing a vendor's resin terrain. I always like to support the dealers as much as possible, so I must have picked these up intending to paint them one day. Well, Christmas break from school afforded me that day -- or several days, as it turned out.


The plain table with nothing molded on top of it -- MUCH simpler to paint up!


I followed my usual method for resin terrain -- beginning by spray painting the tables black, following that up with a 50/50 mix of black acrylic paint and water. I wet brushed them Howard Hues Camo Brown, following that up with a dry brush of Colonial Khaki. I then went back and painted all of the items on the tables black, again, to provide a sharp relief from the table surface.


I really like how this one turned out, with my scribblings actually looking the part of writing on the scroll and book


The most time-consuming part of getting these ready for the table -- no pun intended -- was painting the various items on each. One portrays a meal with silverware, plates, various dishes, food items, and so on. The other portrays a scribe, doctor, or perhaps even a wizard's desk. These were fun to paint up, though I had to guess a couple times what each little resin lump on the table portrayed! In the end, I decided to base the tables up to help with wear and tear, using a small piece of styrene which I flocked with Woodland Scenics Earth Turf.


Gun crates posed with some of my 28mm Pulp figures (U.S. sailors)


The last two items were crates with firearms. I have also forgotten which vendor these came from, as well. I'm sure I was thinking they'd make good objective tokens for Pulp Alley, or even just warehouse or camp clutter for other games. They were also a snap to paint up. I based them all a couple of the last of my magnetic bases I used for DBA Ancients. I've been using the Renaissance Ink bases I had collected in my DBA years for various terrain or scenic items. The supply of them has dwindled till they are almost all gone, now.
Next up, some more terrain for my Modern Africa games!
Next up, I will be painting some plastic Quonset huts that I purchased at Advance the Colors 2015 -- yep, not last year's, but the previous one. They'll make good terrain for my modern Africa games. So, look for that update relatively soon.

Saturday, December 24, 2016

Destroyed Concrete Wall sections


25mm Acheson Creations Concrete Wall sections with my 20mm Modern Africa figures


At Advance the Colors 2016 this Fall, I was sorting through Bryan Borgman's bins of Acheson Creations products. I was looking for some more terrain I could use for my 20mm Modern Africa games. One of the things I really like about this scale is you can often find 25mm and 15mm accessories or even buildings that work for it. I saw these Concrete Wall sections and began to wonder if they'd work. I decided they'd make a perfect ruined factory building, or destroyed warehouse complex.


The Concrete Wall sections come in a variety of angles, corners, and straight sections


They make a number of different pieces -- some straight wall sections, some corners  -- including those with either the left or right adjoining wall destroyed. I loaded up my bin with eight of the pieces of different sorts. Acheson terrain is always very affordable, with these pieces running only $2 each. They could be rearranged in a variety of positions to create the effect I want for the scenario.


The posters were simply downloaded images from Google searches and resized in Photoshop


I did my usual Acheson method of painting them -- starting with running them through the dishwasher to get rid of the mold release agent. Then I spray painted them with acrylic black, following that up with a 50/50 mix of black acrylic paint and water. Once dry, it was a simple two stage process to get the color I liked. I began with a thick wet brush of a darker gray. I followed that up with a drybrush of Howard Hues Rebel Gray. While drybrushing, I discovered a very nice lined effect that was modeled onto their surface which made it look even more like concrete that I'd anticipated. Normally, I do a black wash at this stage. However, I liked the color exactly as they were and was afraid the wash would darken it too much.


I really like the subtle "grain" that Acheson Creations molded onto the surface to look like concrete


I flocked them by painting the ground a reddish earth, and then with white glue and dipping them into Woodland Scenics Earth Turf. Next, I painted blotches of the dry turf with white glue and sprinkled on Woodland Scenics blended grass. Finally, I added dark green or light green pieces of clump foliage. Once dry, I dullcoated them with Testors spray.


These pieces can be rearranged to produce a variety of options for scenarios


At this point, I decided that perhaps they looked TOO plain. The thought struck me that some wall posters or graffiti would really spice them up. Previously, I'd done Google Image searches on African Independence propaganda posters and saved a bunch. I opened these up in Photoshop and resized them to an inch tall. I printed them out at the local office supply store in color on white cardstock. Trimming each, I painted the backs with Tacky Glue to apply them to the walls. After they were dry, I had to go back and paint the white edges of the paper with black paint to make them appear to blend into the walls. The graffiti was easy, too, simply painting various slogans on in black paint directly onto the wall surface.


The graffiti was simply painted on with a thin black brush -- any irregularities can be blamed on the spray painting vandal!


I was very happy with how the wall sections came out. I *may* have gone overboard on the posters, but it certainly looks better than a blank concrete wall. They will add to the atmosphere of my African games.

Sunday, December 11, 2016

"Bloody April" WW I Mini-Campaign using Wings of Glory


Keith's 1/144 scale WW I airplanes using the Wings of Glory rules


Every once in awhile, my friend Keith gets the urge to fly a plane. Or at least, using Wings of Glory (formerly Wings of War) 1/144 scale World War I airplanes on the miniature tabletop. Rather than just doing the odd scenario, he wanted to try a mini-campaign around the Bloody April phase of the air war in WW I. He would record losses and victory points for aerial kills (I imagine -- he never really explained that part of it to us!).


The Germans -- Steve and Joel -- plot their fiendish maneuvers to shoot down our bombing mission


So, Allen, Mike S, and myself took on the role of an allied flight trying to bomb a bridge and one other target. Allen had a fighter and bomber, Mike S had two fights and a bomber, and I had two Sopwith Pup fighters as cover. Our opponents, Joel, Steve, and Keith, had 5 German fighters which we were told were superior to our planes. I began on the left side of our formation and raced out and flew an arc towards their center, hoping to disrupt their formation and draw attention away from the bombers. I was happy with how I lined up my shots with both of my planes getting in shots at Steve's two fighters.


Colorful Allied and German planes bank and turn to get a shot at the enemy


Once we'd flown by them, my two planes split up, one peeling off to face off against Keith's fighter coming in from our left (and soon to be rear), while the other turned to follow Steve's fighters, which we'd damaged. I was completely unsuccessful in drawing them away from the bombers, though. We soon had a massive, swirling melee with planes from all six players involved. True to form, one of my undamaged fighters drew the dreaded "explosion" damage card and I was down one plane. Luckily, Joel had similar bad luck on the other side.


Allied planes line up to concentrate on one of Steve's fighters


In the end, we lost four planes (both of our bombers and two fighters), while they lost three. Allen did successfully bomb the target, damaging it. Considering their fighters took more and dished out more damage than ours, I considered that a draw. Not sure how Keith will score it, but he recorded all the statistics for the next time. It was fun to get out the Wings of Glory game again. It is a fast-moving, easy game to pick up. The card deck simulates the flying well, and having to choose three maneuvers ahead of time makes up have to do some planning and guesswork. I look forward to our next game, and hopefully avoiding the explosion card!
A good look at the swirling central melee a turn before my plane drew the unlucky explosion card

Chieftain's Hut for African Kraal

Acheson Creations Zulu hut as a chieftain's hut for my 20 mm Modern Africa games
I saw this terrain piece at Advance the Colors and decided to pick it up. It is a similar style to the resin African huts I have been buying at Michaels craft store here for such a bargain. It is much larger, of course. So, I envision it being the village chief's hut. It is made by my favorite, Acheson Creations, who list it in their Colonials section as Zulu Hut style 2. Up till recently, I was collecting modern looking buildings for my African Wars. However, reading about the bush wars again this year made me realize that much of the fighting took place in the countryside. There were still kraals that did not look much different than in the Zulu era. So, this was perfect, I felt.
Some of my 20mm Liberation Miniatures Africans posed next to the hut
It was easy to paint up, and I used my standard technique I use on my Acheson terrain. I ran it through the dishwasher to get rid of the mold release agent. Then I spray painted it black, following that up with a 50/50 mix of water and black acrylic paint. I wet brushed it Howard Hues Camo Brown, leaving black in the gaps and crevices. I dry brushed it Iron Wind Metals "Dun" yellow, and finally gave a light gray highlight. 

Tuesday, December 6, 2016

Painting Some Terrain - Market Stalls & Acheson Log Cabins

Repainted Miniature Building Authority market stalls in 28mm
It was time to paint up some buildings and such that I have had laying around. First on the list were some prepainted market stalls from Miniature Building Authority. Wait a minute, you say, I thought you said they were prepainted? Well, they were -- and that was part of the reason I picked them up way back in the Spring at Cincycon 2016. MBA makes such gorgeous buildings, but unfortunately they are usually out of my price range. The market stalls were much more affordable, so I bought I blister pack of three. I always like to support the vendors at our regional conventions. I tend to pick up odds and ends when they show up at Cincycon. In the past, I've bought their "Jersey Barriers" -- triangular concrete barricades we see on roadways for my Modern 20mm gaming, resin Buddhas for 28mm Pulp, and even some 25mm office furniture that, ahem, still sits unpainted in my boxes!
Close up of the vegetables stall

 So, back to the prepainted thing! Once I unpacked them, I was less than impressed with the paint job. Think cheap Chinese prepainted and that was the caliber. There was no wash or dry brushing -- just solid colors sloppily blocked in. The more I looked at them, the more I felt I would need to repaint them. This explains why they sat for half a year before I finally got around to painting them!


Just what I want -- meat that has been sitting out for hours exposed to the flies...mmmm!


I painted everything in black acrylic as a base coat -- right over the colors that were already on there. The detail and grooves on them were deep enough that I didn't feel it would obscure much. Once it was dried, I began work on the canvas roofs of the stalls. I chose three different whitish colors -- a light gray, tan, and dun yellow -- and wet brushed it on thickly. I left black where there were creases and folds in the canvas. I progressively dry brushed two lighter shades over each. Next, I went to work on the wood. With four 3D wood posts, a shelf, and upper and lower framework, there was a lot of wood to paint on each. I applied Howard Hues Camo Brown over the wood in a heavy drybrush. I followed this up with Colonial Khaki in my usual method for painting wood.
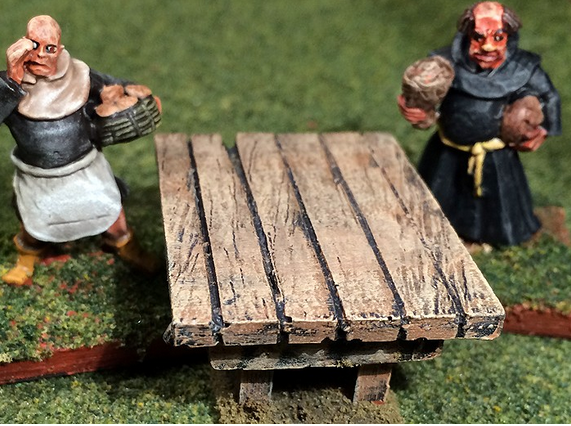
"Get your fresh bread here! Just baked -- right out of the oven!" Old Glory 28mm Baker
The toughest and most "fiddly" part was painting the products that are cast onto the shelf. One appears to be various meats, another vegetables or fruits, and the third is breads. It was time consuming, especially so when you consider these were prepainted...ha, ha! It was such a pain in the butt doing all of the sides of the wood and all of the products on the stalls that I think I will scratch build them in the future. Still, they turned out very nice, I think. The models themselves are very well done, and I recommend them highly. However, I would caution gamers to inspect them and determine how picky they are about what appears on their tabletop. If they consider themselves picky at all, expect to be repainting these.


Two Acheson Creations log cabins with some of my 28mm Colonial French marines


Next up were three Acheson Creations log cabins that I had purchased from Bryan Borgman at Advance the Colors 2016. I wanted to have them painted up and ready for our next convention scenario we will be running in 2017 for Song of Drums and Tomahawks. I have stated on here often enough how big of a fan I am of their polyurethane "resin" terrain. It is incredibly affordable, a breeze to paint up, and looks great on the tabletop. They are my favorite maker of buildings and terrain, and look better and cost less than most equivalent laser-cut wood buildings, in my opinion.


You can see the black foamcore board slots I add to the roofs of my Acheson buildings to keep them in place


One thing I do to all of my Acheson buildings that have roofs, now, is to epoxy in some black foamboard as slots to keep them in place and from sliding off. Early on, I used rare earth magnets, but the thickness of the metal and magnet leaves a gap between the building and the roof that I don't like. This more primitive approach works like a charm. I simply cut out a piece of cardboard in the shape I need, then lay it down on the foamboard and cut it out with a hobby knife.


Acheson Creation's polyurethane "resin" buildings paint up wonderfully and are a solid, 3D presence on a table


Otherwise, previous readers here know well my approach to painting up these log cabins. First, it goes in the dishwasher to remove the mold release from the surfaces. I then use an acrylic black spray paint as a base coat, and follow this up when dry with a brush-on, 50/50 water & black acrylic paint. I wetbrush Howard Hues Camo Brown, followed by dry brushing Colonial Khaki, and finish it out with a Rebel Gray light dry brush on the roof or most sun exposed portions of the wood.

And just like that, my Colonial era village grows larger and larger!


Monday, December 5, 2016

Swatters: UN Marine Force Guns Down Bugs in 2nd Try of Rules

Joel and Allen in the center were the Alien Bugs for the evening,  and faced the same frustration that last Bug Commanders did
Keith wanted to give the Ganesha Games "Swatters" rules another try, so cooked up a scenario with the UN Marines on the attack in an African desert. Under Keith's storyline, the alien bugs have invaded the Earth for unknown reasons, and are actively seeking out and establishing a present in the desert regions of our planet. Since the U.S. and Soviets are engaged in their 1950s-era Cold Wars posturing, the UN has taken the lead in aggressively confronting and turning back the alien incursion.
My force had one tank, 3 squads of UN Marines, and one elite squad -- all accompanied by one support personnell armed with a rocket launcher
My fellow commander, Mike W, took my cue and began a tentative advance. The last thing we wanted was a squad that advanced too far and become strung out. A small town hid the Bug advance from us, as we cautiously jockey our units for the best firing positions. We avoided getting too close to the center, where the Bugs would be able to "spawn" from any rocky outcropping. As soon as the Bugs came within range, we began firing.
Beyond the town, the Bug force advanced in earnest. They had learned from the last battle, and carefully hugged terrain to limit the effect of our gunfire.
One different thing, force composition wise, we were trying for the Bugs was more screening troops. Both Allen and Joel's contingents had units of Swarms or Worker Drones. The goal was for them to put them out front and soak up the the human fire rather than their more expensive troops. As it was, neither Bug Commander truly adopted this tactic. Instead, both did a good job of hugging terrain to decrease our firepower.


View from the Marine side as the Bugs come within sight and we begin to blaze away at them.


The rules employ a mechanic called a "Dice Pool," which the UN side used to supplement their fire regularly. In fact, we would see our dice pool dwindle to single digits by the game's end. I was forced to be a bit more conservative this game and sometimes fired without any bonus dice provided by the pool. The Bugs tried a new tactic with their dice pool. They also used them to supplement their die rolling rather than use it all for spawning new units. In fact, it wasn't until I had destroyed most of Allen's units on the table that they chose to attempt to spawn.

Three new units of Bug Swarms are spawned by the Bug side to replace Allen's losses.

Keith had unbalanced the forces using the rules' point system to favor the Bugs. Nevertheless, the UN continued to gun down the approaching alien units. They actually scored fewer successes than last time. Allen had a Bomb Bug which acted like a massive mortar, firing the length of the table over the heads of his troops. However, he mis-deployed it, and it was unable to spot enemy of our troops for a number of turns. When it did hit, it would typically take out one or two figures in our 5-man squads.

A Stomper Bug spawned, Allen's new force is ready and begins to scuttle towards my marine infantry and tank.
There was a moment when it looked like the Bugs might crash into our forces and create some mayhem. They had closed to within movement range and a number of very effective melee units were poised for the attack. I "crapped out" on my first activation roll, which meant no firing from me this turn. However, the Aliens responded in kind, with Joel crapping out as well, and Allen having a less than effective turn, as well.


Allen's King Bug lumbers into one of my marine squads who cause one hit upon it and escape unscathed.


Still, the Bugs moved into contact with my side of the battlefield. However, by this time, they had totally depleted their own dice pool. I was able to bump up my rolls (which allow you to roll more than one attack or defense dice and choose the best number), while Allen could do nothing except roll a single die and hope for the best. A number of times, in key situations, he rolled a "1" or "2" on a six-sided die, causing his troops to be repulsed or his attack to be less effective.


King Bug down! The last final attack of the Bugs came up short against my mostly undamaged troops


As it was, the result was the same as the first playtest: Human victory! Although they still had troops left on the table, it was apparent that they would be unable to break through our cordon of fire. Once again, the UN had done a good job of gunning down the advancing Bugs and preventing them from getting into effective melee contact. Keith vowed to keep tweaking the points to see if he can obtain a more balanced matchup. Joel pointed out that "crap outs" -- activation failures -- are more deadly against a side that relies on closing to melee than one that shoots. I feel the dice pool mechanic heavily weights the game in the Humans' favor. I think if we were not able to routinely use two dice every time we fire to ensure a higher number rolled then maybe we would not gun them down as effectively.

Either way, Swatters provides a fun game (at least for me, having played the winning UN side both times...ha, ha!) and we'll continue to play around with it to come up with a more balanced matchup.

Sunday, November 20, 2016

Inglorious action for British in Sails of Glory

 
My sloop leads the British line into action -- or would have, if my co-commanders had their way (I was much to clever and deferred that role to the larger frigates!)


We had a guest GM for this evening's gaming, Ferkin, who wanted to introduce us to Sails of Glory. This is age of sail version of the popular Wings of War card game, with plastic ships and large wooden ship templates, but much of the basic mechanics being very similar. It was a small ship battle for 7 players. The French had 3 frigates, while our British side had two frigates and two sloops. I trust that Ferkin balanced the engagement, but I know my sloop was vastly inferior in its ability to take damage compared to the larger frigates. For example, it took only 1 hit counter to eliminate one of my ship's hull/gunnery boxes, yet the Frenchie that I was tangling with took 4 hits per box.


Age of Sail action on a Sunday evening using Sails of Glory


No surprise that Allen and I, controlling the sloops, hung on the edges of the battle plinking away at the enemy. Well, I hung on the edge and Allen -- after taking a couple splintering attacks from French frigates -- just hung out on the edges and did little else. The result was the French did a good job of ganging up on the two British frigates, particularly the one belonging to Mike S. He stayed in the center and mixed it up with Steve and Keith's ships, while our other British frigate, captained by Joel, helped me against Mike W's Frenchie frigate.


My British sloop gets a bow rake ("What? Rakes are an advanced rule...?") on Mike W's French frigate


In the end, we lost both our frigates, but both sloops would have gotten away. We did force Mike W's frigate to strike its colors due to crew loss. However, there would be no way for us to take its ship as a prize, as we had to flee the scene to save our smaller ships.


The brave British frigates try to pierce the French line, while my sloop at bottom turns away to stay on the edges of the fray and avoid slugging it out with the larger enemy


We played just the basic game, and it was a good time. Ferkin says he'll add in some of the advanced rules next time. It was a nice change of pace, and the "Wings of War" systems translates well to age of sail combat, I felt.

Ferkin (in purple cap) shows us how it's done in Sails of Glory


Another view of the brave, but ill-fated attack by the two British frigates on the French line

Sunday, November 13, 2016

Swatters -- Bugs Attack the Earth in 1950s!


Keith checks the rules for the new Ganesha Games set "Swatters" -- a Starship Troopers vs. Bugs style game


We tried out a new Ganesha Game called "Swatters" -- meant for Starship Troopers vs. Arachnid Aliens. Keith had an interesting twist on it, placing it in the 1950s with a Bug invasion of the Earth (explaining all those flying saucers and the Roswell incident). He used his ample supply of plastic insect figures along with 15mm WW II miniatures for the humans, tossed them on flocked CD movement trays, and boom! A new chapter of our history (well, alternative chapter...) was gamed out on the tabletop.


My UN Marine force of 4 squads supported by heavy weapons


Since it was our first time playing the game, we did a few things wrong (of course). It happens with every rules set that you miss subtle rules. And of course, we had no real idea what the proper force matchup should be. As it was, the game was heavily weighted in favor of the humans -- despite the equal points. In my opinion, a successful bug assault on heavily armed humans requires more experience than our first-time players could pull off.


Allen's armored force of two tanks and power-armored infantry (experimental 1950s version, of course!)


We had 3 human forces -- my UN Marine force of good quality infantry, each squad supported by a heavy weapon such as a grenade launcher, rocket launcher, etc. The armored force, which consisted of two tanks and a power-armored squad. Finally, there was the militia force, controlled by Joel, which was the only force which sustained any significant losses. Allen controlled the armor and I controlled the UN Marines. We both whacked the bugs handily -- me shooting them down at range and Allen repelling all of their desperate assaults on his tanks. As it turns out, that was one of the things we did wrong. Tanks should NOT cause melee damage against a bug assault.


The bug force arrayed against me -- warriors, giant bugs, and flyer bugs


Nevertheless, we liked certain things about the rules and will doubtless play them again. For a more detailed look at the scenario, read Keith's report on his blog: Swatters Game Report - Orcafinn's Basement


The bug forces advance!


For me, I'll just let the pictures tell the story!

My Marine force begins to gun them down at long range


The armored force boldly advances, while my troops move up to support
The Warrior bugs swarm a tank!
Only to be blasted away by the resolute UN armored force

The battle between bugs and humans rages across the board


The bug commanders, Mike S, Tom, and Steve seek a way to break the stout human defenses

They gang up on the Militia force on the left and score their only successes of the battle
Will that lead to success against the human center and right? The bugs throw everything at the tanks, but fail

The UN infantry holds steady and continues to gun down the bugs, until their force gives up, and scuttles back to its holes

But Keith says they'll be back again, and with the what we learned in this playtest, perhaps the next bug assault will prove more menacing and deadly...