Sunday, March 1, 2020

Facing Down the Scourge of God in Saga

Bob Bogg's Last Romans (painted in the month since we last met!) fight a civil war against Jim R's Byzantines
A new challenge awaited Nechtan Mac Fergus and his victorious Pictish host this month in Saga. Always dangerous Saga player Jeff Fletcher brought his Attila the Hun army from the Aetius & Arthur supplement. Though tempted to opt out and say "No" to the legendary leader and his two mercenary units, I figured it would be good experience to play against them. Plus, Jeff was maxed out on his horse archer figures and needed the two foot units of warrior foederati to be able to field the army at all. Not owning that supplement (because it is due to be re-released in updated format soon), I was a little hazy on what all their special abilities would be.
Close up of Dave E's Romans marshaled for battle in the second round
Even without their abilities, facing a horse archer army in Saga would be a new challenge. I am feeling more and more confident with my Picts (Scots board from Age of Vikings), so felt we should be able to meet this new, mysterious foe and give a good account of ourselves. In preparation for next month's Saga tournament at DayCon 2020, we were playing one of two scenarios from Book of Battles that Steve and Jason will be using when they run the tournament. By the way, if you are a Saga player (or want to try it out) and can make it to Dayton, Ohio, for this tournament, please come attend! We have slots for 16 players (and loaner armies, too).
The solid Byzantine battleline of Jim R's army, which has been very successful in recent months
The "Change of Plans" scenario has players score an array of victory points throughout the game. On turn 3, they record "Massacre Points" (enemy slain), turn 5 "Survival Points" (your remaining troops), and end of game "Conquest Points" (advancing across the centerline of the board). Jeff had to place the first terrain piece, which meant he was facing more terrain than he probably wanted as a horse archer army. I placed a couple woods, one on either flank, as opposed to Jeff's gentle hill and swamp.
Nechtan edges his Picts forward, making sure each unit's flanks are supported against encircling horse archers
One of his battle board abilities is placing fatigue on enemy who they can encircle between two units, so I would deploy my army in a compact, self-supporting block which took advantage of our woods we'd placed. On the right flank woods not far from my baseline, I placed my Levy archers. Opposite the woods on the left flank, I placed one of my units of warrior long spearmen. Stretching between the two terrain pieces were my other two warrior units, backed up in a second line by my small mounted hearthguard unit and my warlord.
After receiving a bloody nose from the Picts "Reach" ability, the Huns stay far away on the battlefield's edges
On the first turn, Jeff as Attila unleashed his horse archers upon my battleline. Their composite bows allow them to fire for free, but not in consecutive actions. So, they could fire/move/fire, for example. His horse archers were in small, 6-man warrior units. With an armor class of 3, I knew they'd be fragile if I could hit (or shoot) at them. Jeff's plan was to move them up with Saga command dice, have them shoot, and then pull back with his "Endless Horde" ability - which allows all of his units to move. His bowfire caused a few casualties, but Jeff's mistake was to not stay out of the "Reach" range of my troops -- which allows my longspearmen to make a shooting attack at a unit within Medium range. His pullback moves were too short, and I advanced, allowing all three of my warrior units to inflict hits upon his horse archer -- knocking one unit down to a single figure and the other to 4 figures.
The Pictish mounted hearthguards redeploy from the left to right to mount an opportunity charge
Attila seemed unrattled by this setback, though. He sent his horse archers forward again, shooting, then pulling back again with Endless Horde. This time, my save rolls were good, and the Picts jeered all along the battleline as the Hun horse archers pulled back yet again. The Scourge of God did not make the same mistake again, and pulled back a long way from Nechtan's troops. In fact, they were so far away, I wasn't sure what to do. Still, the battleline edge forward, staying supported and presenting no isolated units for the Huns to decimate. My Pictish horse also rode across the board to be poised to strike on the right flank.
Attila's German foederati advance headlong and prepare to charge into my levy bow
As uncertain as Nechtan was how to proceed, other than advancing steadily, Attila seemed more baffled. Jeff kept his units far away from mine, along the edge of his baseline and the side edges. My goal was to get close enough to charge one of his two German foot foederati units (legendary units Attila is permitted to take). Their movement was a Medium, like my Pictish spearmen, and I figured I could eventually corner them. After a couple turns, Attila seemed to be willing to take the chance of his high-powered unit against my larger spear units, backed up by a full Scots battleboard of Saga abilities.  One of the two units of foederati charged headlong, making three moves, and crashed into my Levy archers.
Dave's Roman warriors prepare for battle
Although they savaged my archers, taking them below half strength, this brought them within several of my units.  Nechtan marshaled his troops around Attila's German warriors, preparing to use a unit of long spearmen to eradicate them. However, Jeff cannily used the one fatigue on my Pictish warrior unit to make our charge fall short. There was nothing he could do, though, about the Pictish horse crashing into one of his horse archer units, killing four of their six. Surprisingly, the remnants stayed in place. This time, I used Reach, to soften them up some, with the warlord and long spearman. Next, the Pictish horse charged the last of the horse archers, slaughtering them. The Pictish long spear followed, and the foederati died to a man.
A new army for our Saga Game Days - Mike S's Skraelings!
At this point, Attila was willing to call it a day. However, since we had only one more turn, I felt we should finish the game out, so we could see how the dynamics of the Massacre/Survival/Conquest points worked out. I honestly think Jeff was a bit flustered, and wasn't sure how to proceed when his composite bow tactic he'd planned for didn't work out. Talking afterwards, we think he may have fully taken advantage of the number of times he could shoot. That may have enabled his horse archery to wear away at my troops. However, I was quick to use his fatigues that he accumulated for moving a second time in a turn to make him hit me only on 5's, instead of 4's. That also minimized his shooting. In the end, Nechtan's Picts emerged victorious, 27-14.
Round 2 action, from left Dave, Steve, Jenny, Jim R, Mike S, Bob
We had 12 players this time around, only two of which played magic (Andy's Undead vs. Joe's Arachnean Jungle army). Jeff and my game moved too slowly for us to get in a second game, but three others did. The Next Generation (Jason, Daniel, Thomas) had to leave after one game, too. Most of us played one of the proposed scenarios we will use in the upcoming DayCon tournament (Steve and Jason decided on "Feasting & Pillaging" and "Clash of Warlords" as the other two games). I also think a number of players have settled in on which armies they will use in the tournament. We saw a lot more players using the same warbands, again.
Jim's Byzantines provide a solid front to their enemies
It seems Vikings remain popular, but by far the most popular are the various iterations of Roman/Byzantine (three players). I intend to use my Picts/Scots. We saw a brand new army this time, as Mike Stelzer  pulled out a bunch of his bow-armed and melee weapon French & Indian War native Americans and fielded them as Skraelings.
Jenny's Viking archers prepare to shoot out from a grove of trees
Here are the results of this month's Saga Game Day at the Guardtower East:

Round 1
  • Mike D's Picts (Scots) defeated Jeff Fletcher's Attila the Hun, 27-14 in Change of Plans.
  • Mike S's Skraelings defeated Thomas' Crusaders 25-11 in Change of Plans.
  • Steve's Jomsvikings defeated Jason's Last Romans, 44-24 in Change of Plans.
  • Jenny's Vikings defeated Daniel's Norse-Gaels, 25-6 in Feasting & Pillaging.
  • Bob's Last Romans defeated Jim R's Byzantines, 41-30 in Feasting & Pillaging.
  • Andy's Undead defeated Joe's Arachnean Jungle (no score recorded), in Age of Magic.
Another view of the Roman civil war, courtesy of Jenny who fought beside Jim and Bob
Round 2
  • Jenny's Vikings defeated Mike S's Skraelings, 29-21 in Clash of Warlords.
  • Dave E's Romans defeated Steve's Jomsvikings, 15-13 in Clash of Warlords.
  • Jim R's Byzantines defeated Bob's Last Romans, 21-16, in Clash of Warlords.
The Skraeling list uses Totems - here is one on Mike S's Skraeling levy unit'

Steve's Viking warrior and hearthguard units take shelter in the woods
Our lone Age of Magic game with Joe's Arachnaean Jungle warband against Andy's Undead


Monday, February 24, 2020

Mean Streets Mission Testing

Sons of Thor in a photo NOT from the game - actually one Jenny staged for the rulebook when it is published
Lately, we have had the good fortune of having 7-8 players showing up for Sunday night gaming. I decided to take advantage of the numbers and try out an idea that I have for running my gang warfare game, Mean Streets, at conventions. Rather than have one board for six players, I thought about splitting the board into two roughly 3'x3' sections, divided by a bridge over a river, freeway, or something similar. I put out the call and lo and behold had 8 players -- not counting me!
We filled up an 8'x4' table with a giant playtest of my "Mean Streets" gang warfare rules on Sunday night
It took me all day Sunday to set up the scenario, assigning gangs and their respective missions to each of the boards. Each gang would have one Primary Mission and two Secondary Missions to amass victory points. I set up the missions so that the gangs end up bumping into each other to guarantee some fighting. Although I learned long ago that gamers have minds of their own and will do everything possible to ignore the way you're herding them. That proved to be the case on one of the two boards, but certainly not on the other, which was a dustup from start to finish.
The Bexley Blockwatch on patrol - one member taking the opportunity to "tag" a vehicle in the parking lot
With eight players gathered around the table, and getting questions from the players, I didn't get much chance to take pictures. I did get a chance to playtest out some of the newer missions that I'd written. Only one of them will require some tweaking, I think. The others worked out fairly good, although more than one player had his mission abruptly eclipsed when their members were jumped by another gang. In particular, the Grandview Gurkhas (Brian) had the mission to "Show the Colors." This meant sauntering down the main street slowly looking for a fight and showing off their "badassness," as Brian put it. However, they were cornered by the Hilltop Highlanders (Mike W) and engaged in a brutal knockdown, drag-them-out fight that lasted the whole game.
The Hilltop Highlanders emerge from an alley onto the main street - players place their dice indicating actions they rolled next to the figure
This actually meant that the Highlanders, who were supposed to protect Wallace's Brewpub, ended up being too busy fighting to prevent either the Berwick Wangs (Bruce) or the Sons of Thor (Joel) from fulfilling their secondary mission of "Beer Run!" In fact, the Wangs had the mission of essentially getting off the board on the opposite corner from where they entered in, "We Gotta Get Outta Here!" Meanwhile, they were supposed to tag everything in sight with their gang logo and look to leave a few bruises on rival gangs. Bruce ignored the last part of the mission, and his gang members never threw a punch (though they probably ran out of spray paint with as much tagging as they did!). The Sons of Thor were the mystery to me, as they were essentially supposed to roam the table looking for a fight -- they would receive double points for knocking out rival gang members. Joel loves to be contrary (like many a gamer!) and threw all of one punch all night long!

The Linden Daos cruise through the street market, looking for a fight
On the other half of the table, Mike S and his "O-Ren-Ishi School for Girls" jumped Tom's Eastmoor Kings from behind, knocking out their leader in a savage flurry of blades and blows. Tom's boys bolted for the other side of the board and were able to put some distance between themselves and the vicious Japanese schoolgirls! Keith's Linden Daos renewed their bad blood with Allen's Bexley Blockwatch, ignoring their primary mission to knock out all but the Blockwatch's Leader over the course of the game. Keith's leader broke new records for the number of wound markers on him, racking up nine or so, at one point. He was eventually knocked out when the Kings decided to wade into the fray, as well.

Another staged photo Jenny took for the rulebook: The Linden Daos - martial artists that pack a heavy punch!
All in all, it was a good playtest of my newest missions I'd written for the rules. It also allowed me to hone the point costs of various skills that gang members can purchase. I went with smaller forces, too, to test what is a minimum point size for a gang. The rules played fast, as I hoped, with the one game being over within 2 hours, the other following within another half hour. I am thinking that my two games at Cincycon will be the final walk-through of the rules, and that I will begin laying them out for publishing after that weekend.  Stay tuned for more gang warfare on Columbus "Mean Streets!"

Wednesday, February 19, 2020

Sidewalks for my 28mm Cityscape

The Shell station and a factory atop their newly-created concrete sidewalk slabs - I was very happy with the look!
I've been really busy the last couple weeks creating sidewalks for my 28mm urban terrain. Although I like the look of the black wool felt I am using as asphalt for the streets, I was unhappy with how the equivalent gray felt looked as sidewalks. It was too flat and two-dimensional looking. I went through a few ideas in my head before I settled on creating them out of MDF board flocked with gray ballast.
Another view of my sidewalks using Fine Blended Gray Ballast from Woodland Scenics
I had a lot of assistance from Jenny on this project. Not only did she cut my MDF board with her power tools, she also helped me put felt on the bottom of all my buildings and the sidewalk pieces. I figured this might be needed to keep the buildings from sliding on the flocked surface. The basic idea was to cut a piece of MDF for each building I've made. The dimensions would be 3" larger in both directions than the building itself, giving about 1.5" of sidewalk all the way around.
The Eastmoor Kings gather on the concrete sidewalk corner and in the black wool felt streets
I would then flock the MDF piece with Woodland Scenics Fine Blended Gray Ballast. Sidewalk concrete can be anything from gray to tan, I've found. I liked the look of the blended gray, and I especially liked how it gave it a much more three dimensional look. I began by painting white glue onto the edges of a piece, then pressing it into a 13" square, plastic container filled with the ballast. I found doing the edges first prevented a ridge from forming up on the edges. I then painted white glue on to the top surface of the MDF board. Once covered, I shook the ballast onto the piece, being sure to thoroughly cover its surface.
Their foes, the Hilltop Highlanders, gather on the sidewalk in front of the Shell station
After about a half hour, I tilted the board over the plastic container and dumped off the excess ballast. I then set it out on a flat surface to dry completely. Once dry, I sprayed it with Krylon Matte Clear to seal it in. After that, I gave it about an hour to dry, then I elevated it off of the flat surface. I squirted on a 50/50 mixture of white glue and water. Using a wide brush, I spread it out so it covered the entire surface, including the edges. I made every effort not to over-soak the MDF board, knowing that warping was bound to occur.
After the 50/50 mixture caused some warping, this arrangement would flatten the concrete slab back down nicely
After about an hour, I took it off the elevated surface and laid it out flat on a surface, letting it dry for about four hours. Warping had occurred (as I expected). However, I took four large craft paint bottles and placed them in the center of the board, setting a heavy weight atop them. This forced the center of the board back down. I usually let this sit overnight. When I woke up in the morning, the concrete slab was flat. I sprayed it with Matte Krylon again, and then finally glued gray felt to the bottom surface of the slab so that it could stack on top of others without acting as sandpaper and rubbing it too much.

Only once did I set the plastic bottles atop the flocked MDF board too soon, leaving an impression. I fixed this by simply reflocking those impressions lightly. It covered up the round, flattened dents well. I'm really happy with how these concrete slabs worked out, and will be making more of these as I create more buildings.

Monday, February 17, 2020

Day Trip to Dayton & the Dragons Guildhall for Saga

Pictish mounted hearthguard sit in reserve, ready for their moment to charge forward and seal victory for their lord
Two of our regular attendees to our Saga Game Days have been trying to get a once-a-month meeting started up in Dayton, too. Adrian and have set their monthly game day on the third Sunday of the month at a store in Beavercreek called the Dragons Guildhall. Since our "next generation" -- my friend Mike's son Jason and his cousins Daniel and Thomas -- actually live in Dayton, it sounds like this group should grow rapidly, too. Upon hearing Mike was going to go to Dayton this Sunday, as well, we decided to make the hour and a half drive over.
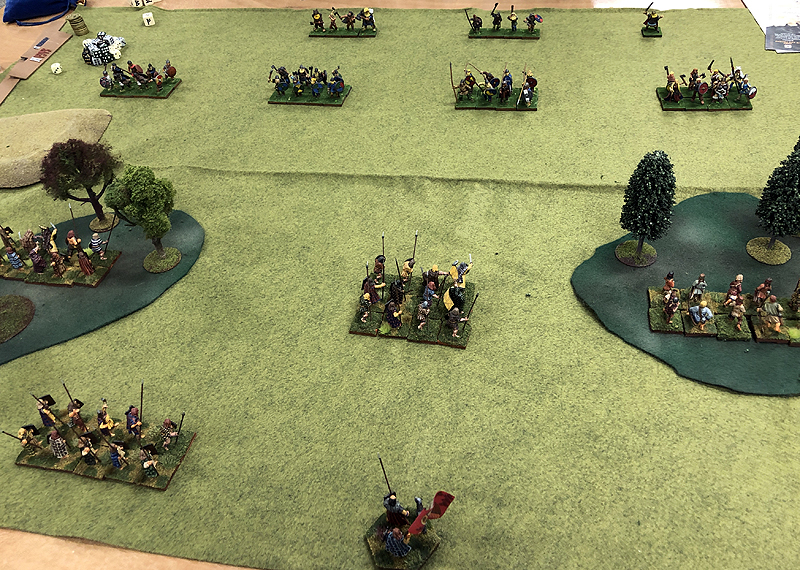
The Picts, at bottom, deployed levy archers in the right-hand woods, with warrior spear in the center and left. Across from them, the Jomsvikings deploy with warriors in the front line and hearthguard and warlord in the rear
There were two new players who showed up, Keith and Sally, and were interested in trying out the game. Adrian and Jim took them under their wing and ran a Viking vs. Viking game for them, coaching them through the rules. That left the other six of us to pair off and get in a game, as well. Since I hadn't played Mike in forever, we decided to match up in a Clash of the Warlords game. I had brought my Picts (Scots in the Age of Vikings battle board), and Mike was playing Jomsviking. Daniel wanted a rematch with his Norse Gaels against Jason's Last Romans, which left Thomas and Jenny to do another game of Crusaders vs. Jomsvikings, respectively.
On the left, two Pictish spear blocks confidently await the advance of the Jomsviking warriors
I set up a woods on either flank, while Mike place a hill off to the left side of the table. We rolled up deployment method "B", which means none of our units can be within a Medium distance of another friendly unit when set up. I placed my Levy bow in the right hand woods, flanked by my largest unit of long spearmen warriors. Behind them, was Nechtan Mac Fergus, my warlord. In response, Mike deployed his entire army. His four units of warriors were spaced across the front of this battlelines, while the two hearthguard and warlord were behind in reserve. I deployed one of my other warrior long spearmen units in the left flank woods, another one in center reserve on the baseline, and on the far left reserve, my small unit of four mounted hearthguard.
Jomsvikings prepare to open the battle with charges, unaware most attacks will be hurled back by the Pict spearmen
We took our first turn to begin consolidating, using the "Maneuver" to bring the reserve units up towards the front. I began pushing forward on both the left and right with my spearmen, as well. Mike advanced all across his front except for the unit of shield maiden warriors opposite my Levy, who lurked out of range. On my next turn, I advanced my bowmen to the edge of the woods, but did not shoot them, figuring I could wait till next turn. The large spear unit on the right edge closer to the bowmen to protect them.
Nechtan Mac Fergus orders a spear block forward to protect his levy in the woods
Mike immediately proved his Jomsvikings were going to be aggressive. He not only charged with a warrior unit in the center, he also advanced twice to charge his shield maidens against my levy. Not only was this my first time playing against a Jomsviking warband, it was his first game against the Scots. He'd heard about our great defensive abilities, but had not experienced them, yet. In the warrior on warrior matchup, my spearmen lost only one man but devastated his unit, killing six of the eight figures. Mike had poor luck in the woods, too, as he killed only four bowmen at the cost of three warriors, though. First blood definitely went to the Picts, as the combination of the "Long Spears" and "Counter-Attack" abilities on our battleboard meant we took few hits while inflicting grievous losses on the Jomsvikings.
Hulking huscarles hurl themselves on the center spear block, who will lose half its number and be driven backwards
I followed up, edging my spear closer to his shield maidens, but declining to do a second move because of the fatigue it would take. Mike took advantage of that to ignore the larger spear unit and chase down the levy for another attack. He scored enough hits to reduce it to five figures (no longer generating a Saga die), but suffered more losses leaving the maidens vulnerable to my much larger warrior unit. On the far left, Mike brought another warrior unit within spitting distance of my warrior unit in the woods on the left. I took the bait on my next turn and charged them, killing five of eight, while losing only one figure. In the other woods, the spearmen charged in and killed the last of the shield maidens.
Hoofbeats herald the arrival of the Pictish riders who will trample the huscarles who threatened to break the center
At this stage, Mike's four units of warriors had been devastated. One was completely destroyed, while the other three were down to three or fewer figures. He brought up his second line of two hearthguard, however my spear units were still near full strength. We used "Reach" in an attempt to soften them up, destroying the remainder of one warrior unit and causing only a single casualty on one of the hearthguard.
The vicious bloodbath on the other battlefield between Jenny's Jomsvikings and Thomas' Crusaders
All along, I had been declining to give him the "Wrath" tokens that Jomsvikings can get when a player decides to cancel the Saga abilities he is attempting to play. I simply let him play what he wanted, preferring the danger of the his chosen action over the unknown danger of what he'd do with the Wrath tokens later! On my end, I often sacrifice dice to move my own units to make sure that I have the appropriate defensive/offensive abilities on my board ready to be used. In fact, I try to limit the engagement tactically to no more than two melees per turn. One of those will normally use the Long Spears and Counter-Attack combination, while the other will be mostly defensive with "Hold at Bay" and closing ranks when charged.
Although they did not secure outright victory, Jenny's Jomsvikings fared better today than Mike's
Like a good Viking, Mike was undeterred and hurled on of his hearthguard units at my center long spear unit, whittling it down to four figures and shoving it backwards. Now was the time for the warriors to get some assistance. Once again, I used Reach to soften up the enemy and then charged my small unit of mounted hearthguard into the depleted enemy hearthguard. They were destroyed at the cost of one of my mounted troopers. Mike was quickly running out of offensive units. When his next hearthguard unit was beaten, he had little left except for his warlord. After one of my warrior units destroyed one of his remnant units (you receive bonus victory points for completely destroying enemy units), he conceded the game. We counted up the points, and Nechtan Mac Fergus' Picts had triumphed over the Jomsviking invaders 26-10.
My Pictish warriors have won the day with their doughty melee abilities -- they look good and fight well in Saga!
In the other three games, Jason's Last Romans had pin-cushioned the Norse-Gaels to death with their missile fire. Daniel had suffered a similar fate earlier that week when the two had played a game. The rematch went no better for him, and the Last Romans triumphed 22-5. On the other battlefield, Thomas and Jenny were having another knock-down, drag-them-out fight between Crusaders and Jomsvikings. Two weeks earlier, they had fought to a bloody draw. History repeated itself, and this match ended in a draw, as well, with Thomas scoring 23 points and Jenny 21.
Pictish noble troopers ride in to save the day with a devastating charge
The new players had a blast, they said, and really enjoyed Saga. Sally had defeated her significant other, Keith, earning bragging rights in the household. Once again, Adrian and Jim proved they were the most generous hosts ever, buying five $20 gift cards for the players. I snagged one of them for beating Mike, while Jason, Keith, Sally, and Jenny won the others. I immediately used it to purchase more Pegasus hobbies terrain -- this time a modern bridge for my 28mm urban city.
What I bought with my gift certificate (courtesy of the immense generosity of Adrian and Jim!)
As the six of us retired to Cassano's for celebratory pizza, Adrian and Jim were setting up a game for themselves. Adrian's Saracens would face Jim's Eastern Princes, though we left before the battle got underway. So, with 10 players in attendance, the second Dragon Guildhall Saga Game Day was a success! If you're interested in attending, mark the third Sunday down in your calendar and join Adrian and Jim and the rest of the crew at noon. It was a fun day, and I'm glad Jenny and I decided to drive over for it. Thanks to all the players, and especially Adrian and Jim for their generosity!

Thursday, February 13, 2020

St. Jennifers - a Catholic Church for my City

St. Jennifers Church, along with its garden, being staked out by the Hilltop Highlanders -- one of my 28mm gangs
Last month, I attended the Dragon Guildhall's Saga Game Day in Beavercreek, Ohio (Dayton area). The hosts (thanks, Adrian and Jim!) were very generous and gave Jenny and I each a store gift card for making the trip. I decided to buy a Pegasus Hobbies building kit (Gothic City Building Small Set 2) for a church for my 28mm city I'm building. I'm really happy with how it turned out, though I did modify it a bit from "out of the box."
The Pegasus Hobbies boxed set that I constructed St. Jennifers from
The first thing I noticed is that there were few to no instructions on how to put it together. When I opened up the box, there were a bewildering array of hard, gray plastic pieces. Just looking at did not tell me how to construct it. There was one small sheet with three diagrams for specific portions, but no general, overall directions. So, I did what every 21st century gamer does when confronted by something they don't know how to do -- I Googled it! I found a couple videos on YouTube which were useful. One thing I would not have figured out how to do without the videos was to attach the doors to the entrances. Once attached, it is VERY cool how they built it so you can swing them open and closed even after painted.
This is a TALL building, as you can see from the 28mm figures, but detaches in an upper and lower section
The video was fairly thorough, though when it said there are plenty of extra pieces it was dead wrong. You are given j-u-s-t enough pieces for all the various details, like gargoyles and such. One decision I made was to NOT use the flying buttresses. Those are simply too medieval for a 20th century building in downtown America. There are plenty of old, Gothic, neo-Gothic, Romanesque -- whatever -- church is the U.S., but I've yet to see one that has flying buttresses (a term which makes my 7th graders giggle every year when I teach them about Gothic cathedrals!).
My scratch-built roof with its lovely shade of tiles -- the Pegasus kit does NOT come with a roof
Another thing I discovered that the Pegasus set doesn't have is a roof. Really. It is open to the sky. Yes, you can configure it in different ways, so that you could argue that you'd have to include multiple roofs, but that reason falls short a bit for me. I would say that, besides no instructions, that was the biggest shortcoming of the set. Luckily, I am fairly adept at scratch-building. So, using textured styrene, bass wood, and craft sticks, I was able to make a fairly nice looking roof for St. Jennifers -- as I decided to call the church. I have been naming my city buildings lately in honor of my gaming friends, so the church was obviously named after Jenny.
I really like the color and the details on this building -- and apparently, so do the Hilltop Highlanders!
The first step was putting it all together. It snaps together fairly well, but some joins aren't as good as the others. So, I decided to epoxy all the pieces in place permanently. The video suggested disassembling it and reassembling it every time, which was clearly an indication that the video blogger has succumbed to madness. I assemble each of the two levels, and immediately noticed the top story does NOT "easily snap" onto the bottom, as claimed. So, what to do? I decided to saw off the square "tongues" of the tongue and notch construction. Instead, I would put rare earth magnets on the top of each pillar of the bottom level. Where the top level would rest on the pillars, I cut flexible steel bases I'd ordered by mistake from Litko (thinking I was ordering magnetic bottoms for my figure bases). These were glued to the bottom of the pillars on the second level and the magnet and steel join is strong enough that the top level won't slide or move if bumped, but not so strong that you have to pry them apart.
A side view showing all the cool gargoyles and eagles that you can attach onto slots in the pillars
Next, I attached all the trim, which included gargolyes, eagles, knights, and flat blank pieces. There are numerous rectangular holes or slots on the exterior of each pillar. Since I wasn't using the flying buttresses (they also attach to the slots), it meant I actually didn't have enough trim pieces to cover all the holes. I improvised and used some tiny crosses that I'd bought at craft stores to cover the holes on the front and back. My first thought was to put the flat pieces on the bottom level and the gargoyles on the upper level. However, each level looks very much alike and I lost track of what I was doing. So, their are gargoyles and eagles on both the upper and lower levels. I really like the way Pegasus designed this aspect of the model. I just wished they'd given extras of each type, so you could go with all gargoyles, or all eagles, or all flat pieces, etc.
A gang member going in for confession? The doors are richly decorated and swing open and closed after painting
For the church's color, I decided not to go with a gray stone look like the box shows. There is an old church in downtown Columbus (Trinity Epsicopal, I believe) which is done in a beautiful tan-colored stone. I wanted that look for my church, so I knew I would have to paint the interior and walls -- I couldn't use the gray color the plastic was cast in as a base coat. I began by spray painting the interior and exterior of the walls with a medium brown acrylic spray paint I had. Once dry, I brushed on medium brown craft paint that I use for most of my bases. Next, I dry brushed it with a "Fawn" craft paint color. I am actually out of my Howard Hues Khaki that I normally use, and probably won't get a restock till next month.
The stained glass rose windows are simply Google Images printed in color at the local print shop & trimmed to size
But what to use as a wash? I think that a wash over dry brushing softens the look, and kind of "blends" it. I haven't had the best luck simply mixing paint up and watering it down. Normally, I premix Vallejo matte clear with some brown (or black) for a final wash of my figures. It would take ll of my pre-mixed bottle and more if I chose that method, though. So, I decided to purchase and try one of Vallejo's pre-mixed washes, choosing a Dark Brown one. It worked great, I thought. It softens the hard brush strokes of dry brushing, and seeps into the crevices and low spots nicely. Good find! I'm glad I decided to take the plunge and try out their premixed washes, finally!
A look at the magnets I placed on the pillars of the lower level
Next, I built the roof. For the base of the roof I cut two pieces of bass wood to be the main sloping roof sections. However, due to the way the upper level is constructed, simply running them along the triangular eaves and resting them on the stone didn't work -- the angle was slightly off. I had to cut and attach another piece of bass wood to the bottom so it reached the roof and rested on it. Kind of two-tiered roof. To make sure my triangular angle matched the model exactly I attached the two pieces together with duct tape "hinge." That way, they simply fit onto the stone slope perfectly. I set this on the roof, and then cut two pieces of textured styrene for the actual roof surface, epoxying them to the upper sections of the bass wood roof. There was about an 1/8th inch gap between the styrene and lower tier of the roof, which I filled with craft sticks or other pieces of bass wood. I capped it off, literally, with a triangular piece of styrene from the local model train shop. An unexpected bonus was it fit onto the upper story so tightly I would not even need to glue it. I pulled it off again, and spray painted the upper section black. The roof tiles were dry brushed dark red, then Howard Hues Middle East flesh. I loved the color of the roof and am very happy with not only how it looks, but I especially like how well I was able to make it fit!
A look at the interior and textured styrene floor -- note the lamp you can glue onto slots in the interior
Next, I used another piece of textured styrene I'd picked up long ago for the interior floor of the church. I spray painted it black with Krylon arcylic mate, then dry brushed it medium gray and light gray. I epoxied it to the bottom level of the church. Next, I cut a thicker styrene base for the model to sit on and epoxied it to that, too. I flocked the stryene with blended gray fine ballast to appear like concrete, and I was done! Well, of course, I did a coat or two of clear matte arcylic spray for protection, but St. Jennifers was complete. It is a very tall building, but fortunately fits in the snap-together boxes I carry my terrain around in. I'm very happy with how St. Jennifers turned out, and think it will make an excellent addition to my 28mm cityscape!
I built the little church garden using Hirst Arts plaster blocks, Halloween decorations, a spare 28mm girl figure, and plastic fencing from the local train shop