 |
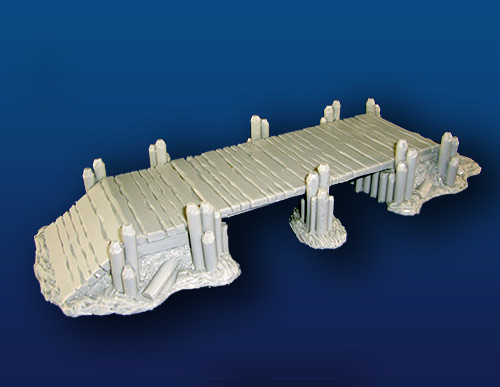
| My Acheson Creations Wooden Plank Bridge painted and flocked, with
two extra plank sections and four stanchion piers per section for
stability |
I have had this Acheson Creations 25mm Wooden Plank Bridge for about a year and a half, now. Since I have a huge batch of their stuff on the way, I figured I'd better get it painted up before it got buried behind the incoming French & Indian War fort, blockhouses, and log cabins. The thing I like best about this set is you can adjust the length to make it as long as you want by simply adding more plank sections, and that you can make it a pier by simply leaving off the other end of the bridge. I ordered additional "Wooden Bridge Sections" so I could make it up to 16" long if I desired. I also ordered more "Wooden Bridge Piers" -- which are the supports underneath the plank sections -- so that I could have four per section (two on each side).
 |
| The image on Acheson's website. Not that it has only one plank section and one set of pier stanchions. I expanded that to three sections, each with four pier stanchions apiece. |
I was really surprised by how quickly this painted up. Had I know how little time it would take, I may have gotten around to it sooner! The only real construction or modification I did to this was to epoxy tiny metal bases to the underside of the bridge. I then epoxied one rare earth magnet to each pier stanchion. It holds together like a charm, and seems really stable. Originally, I thought I'd make it even more stable by basing up each group of four stanchions on clear plastic. However, once I put it all together, the rare earth magnets held it strongly and securely.
 |
| At the bottom is the underside of the bridge planks with four
1/2"x1/2" metal bases epoxied on. At top, are the pier stanchions -- the
dark black circle is the rare earth magnet. |
One of the things I like about Acheson Creations products is how easy they are to prepare for the tabletop. I did my usual routine of running the pieces through the dishwasher, and then spray priming them black with Krylon Fusion primer. I follow that up by brushing on a heavily watered down coat of black acrylic paint. Once dry, I wet brush the pieces a medium brown -- I use Howard Hues Camo Brown. I follow that up with a dry brush of Howard Hues Colonial Khaki. I wanted this piece to look sun bleached, so I did an additional light gray dry brush over the surface to make it look more like wood that has been out in the sun for awhile. A final black wash finished out the wood surfaces of the bridge.
 |
| The bridge as a pier. Simply take off one of the ends, and voila -- you have a wooden pier! |
For the water effect on the bases, I painted them a very, very light blue -- I use Ceramcoat Coastal Blue. I then took a dark blue with a slight greenish tint and watered it down heavily into a wash. This I slopped on heavily onto the parts of the bases that had been molded to look like water. The wash sunk into the deep grooves, leaving the lighter blue visible in the tops of the waves. I did a straight white dry brush over the very tips of waves to look like whitecaps and sea foam. A little ground flocking on the very edge of the bridge ends and I was done.
 |
| "Now, where's that confounded boat? Looking down the length of the pier/bridge. |
And it was really amazing how quickly I was done. Despite all the stages where I have to let the pieces sit and dry, I was done in just a few days. So, now I have a bridge for my Dark Age troops to skirmish over, and a pier for my Pulp games. This is definitely one of those models that -- when you finish it -- you like to sit back and soak in how nice it really looks on the tableop. Highly recommended!


No comments:
Post a Comment