 |
| A car drives quickly past my new concrete medians, hoping to avoid an encounter with the menacing looking street gang |
After setting out all of the terrain at Cincycon the other weekend, one thing bothered me a bit as I tried to admire my setup. I had left about eight inches between the city blocks for the main roads. Although I do like my charcoal gray wool felt, and think the fibers in it do a good job of replicating the multiple colors in asphalt, something left me unsettled. That was simply
too big of an expanse of featureless asphalt. It needed something 3-dimensional on the road to complete the picture of a city street.
 |
| These medians are placed too close to the sidewalk for the photo -- my main streets at Cincycon were 8" wide |
I had dismissed the idea of yellow lines on the asphalt -- partly because I hadn't come up with a way that I thought would look good and was practical. Then the idea struck me. What about concrete medians going down the center of the road? And why not fill those medians with decorations -- like trees or flower beds? Fortunately, a vendor selling flower tufts was there at Cincycon, so I picked up three colors (orange, pink, and white with pink) to supplement the purple and yellow flower tufts I had already at home. I had lots of leftover MDF board from my concrete city blocks to cut up into strips for the medians.
 |
| Strips of MDF with a flower box created from square concrete dowel sections |
Once again, I leaned on handywoman Jenny to cut a section of MDF into 1"x6" strips. I took one of those to Hobby Lobby and picked out square bass wood dowels that I could use to construct "flower box" atop the concrete median. I cut the bass wood up with a craft saw and X-acto knife, using Tacky Glue to arrange them into rectangular boxes atop the MDF. I decided to do a batch of eight first to make sure it all worked out. Doing a lone test one seemed to much of a time waster, and I had a feeling that I would like how they turned out.
 |
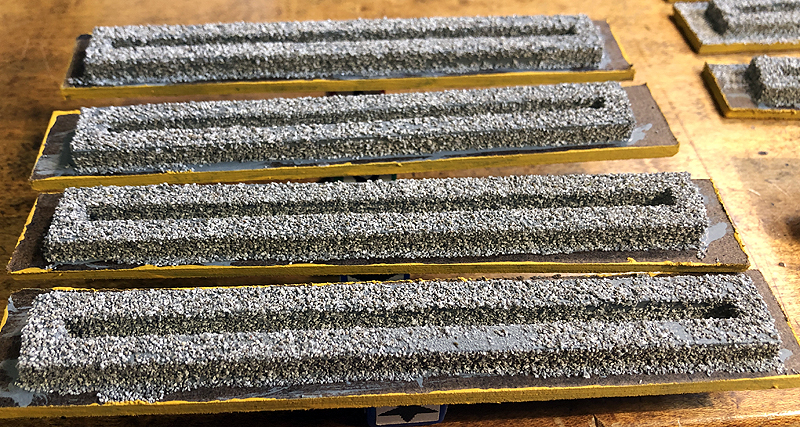
| Fine blended gray ballast is my go-to for a 3-dimensional concrete effect - as seen in the now-concrete flower boxes |
My concrete is made from Woodland Scenics Fine Blended Gray Ballast. I decided to flock the flower box first, and seal it up good so that I would have something to hold onto when I did the flat, top surface of the median. I painted it a light, concrete-looking gray first, then when dry, brushed on full strength Elmers Glue-All white glue. I then poured the ballast over it trying to cover the surface thoroughly. Some places ended up patchy, so I went back and reapplied more later. Once dry, I sprayed it with Krylon clear matte. Next up, I brushed on a 50/50 mixture of white glue and water to fully seal the ballast onto the surface.
 |
| Last-minute idea of painting the sides of the medians "traffic yellow" so motorists in my Mean Streets see them better |
At this stage, I got the idea of painting the side edges of the MDF the standard "traffic yellow" you see here in America. I am glad I thought of this touch, as you do occasionally see the sides of medians painted yellow for visibility. Plus, it is a splash of realistic color against the asphalt. Next, I painted the top surface of the medians gray, and then followed it up when dry with full strength white glue. More ballast was poured onto this surface. Once again, I sprayed it with matte sealer, then added 50/50 white glue and water.
 |
| A line of white glue is squeezed into the flower box, followed up by fine brown ballast as base layer of my "dirt" |
At this stage, I realized that for such a simple terrain piece, it was a fairly laborious process to create them. The next-to-last step was to squeeze in full strength white glue into the flower box itself and pour in Woodland Scenics Fine Brown Ballast that I used as my earth mixture on figure bases. Once dry, this is followed up with a Brown Turf flocking from Woodland Scenics to give it the dirt color I use. FINALLY, it was time for the last step. I once again squeezed white glue into the flower box and placed my flower tufts in there. I did two colors per median piece to make it more bright and sunny looking (I know, not exactly what you think of when gang warfare comes to mind!).
 |
| The finished medians - each having two colors of flowers planted in the concrete box -- to brighten my city streets |
Speaking of gangs, in my rush to get ready for Cincycon I had completed my eighth gang -- the Franklinton Flippos. Named after a Columbus TV clown star, Flippo the Clown, this West-side gang uses figures from the Assault Group. They have two packs with masks, one with clown masks and the other with "anonymous masks." I painted both styles up as clowns, though. To go along with Flippo's costume, I gave them dark blue shirts with white polka dots. I also gave them jeans, shorts -- whatever the figure appeared to be wearing.
 |
| Creepy Franklinton Flippos (figs from The Assault Group) hang out next to the median, creating a nuisance |
I really like how this gang looks on the tabletop. Some of my favorite photos I took of the two games of Mean Streets that I ran at Cincycon have the Flippos in them. They definitely look creepy. So, when I wanted to pose some miniatures with my new concrete medians, the Flippos were the ones I picked! Now that I have my first batch of eight done, I will probably follow it up with the remaining MDF bases Jenny cut for me (six? eight?). I have the process down, and I have my head wrapped around how long it will take. I'm fairly happy with how they turned out. I think they look better on a tabletop than they do close up in photos -- and certainly better than the plain asphalt street!


Nice work they look really effective.
ReplyDelete