|
| My scratch-built 28mm Celtic monastery with finished beehive
huts and church |
Knowing that one day my original Lead Legionaries website will disappear, I'm reposting some of the better content onto this blog. Hopefully, it will not go the way of the dinosaur, too -- or at least, anytime soon! Here is part one of the scratch-build of my 28mm Celtic Monastery.
 |
| Work
in progress shot of my 28mm Celtic Monastery for my Dark Age
skirmish games |
My next big scratch-built terrain piece for my
28mm Dark Ages skirmish games is a Celtic monastery. Although I
drew inspiration from the UNESCO World Heritage site of Skellig
Michael, this is a much, much scaled down version. In fact, after
starting it, I scaled it back even further from my original plans.
I like to fit my terrain pieces on wooden plaques that are no more
than 12" wide or so. Once I started sketching this one out on the
plaque, I realized what I would be creating would be way too big
and unwieldy.
 |
| Soft wooden plaque from the local craft store as a base for
the monastery |
So, as I often do, I began with a soft, wooden plaque
from the local craft store. This one is about 9" wide by 12" long.
I used a box cutter knife to carve a slope all around the edges. I
like to use these because not only are they cheap (about $1), but
they also are sturdy enough for a heavy piece of scenery. Plus,
many important buildings during the Dark Ages would be built on
rises or small hills. The plaque gives it some visual heft above
the battlefield.
 |
| Insulation foam carved to create the upper tier of the
monastery |
I wanted the monastery to be divided into an upper
section and a lower section. So, I grabbed a section of insulation
foam and measured it out to fit. Then I used a sharp Xacto knife
to carve a slope all around it, like I did with the plaque. I also
carved out a gradual slope as a kind of ramp where it will join up
with the lower level. Yes, I know a wire cutter would be
much easier, provide a cleaner cut, and look nicer. However, I am
very leery about starting down the road of using toxic tools. The
chemicals given off in the air when cutting foam frankly scare me.
I know I could use a mask and all, but I'm going to flock it
extensively anyway. So, my rough and ragged cuts will be covered
up in the final product.
 |
| Holes drilled into the wooden plaque to help hold the foam
upper level in place |
To secure the foam to the plaque I drilled a half dozen
holes with my pin vice. I then tacky glued in straight pins. I
trimmed off the tops when dry and liberally coated the surface of
the plaque where the foam would go with tacky glue. The foam piece
was pushed onto the pins, which help hold it in place not only
while it is drying, but make the bond stronger.
 |
| Hirts Arts rocks line the ledge between the upper and lower
levels. Also thin "craft foam" was glued down as a surface for
both levels |
Next, I took some leftover rocks from the Hirst Arts
molds I used to build my Saxon church and Pictish broch. My friend
Zeke cast these up for me years ago, and I have found many uses
for them. I trimmed up the foam to insert the rock pieces into the
edge of it so there looks to be a rocky ledge between the upper
and lower sections. I am also hoping this makes the monastery look
like it is in a more wild and rocky location. Once that was done,
I took a section of craft foam, sometimes called "fun foam," and
measured out the flat surface of the upper and lower level. A
piece was cut for each and tacky glued down. This enables the
buildings and other architectural elements to be "sunk in" beneath
the surface. I will cut the shape of the building away from the
foam surface and glue it to either the board or foam core beneath.
 |
| Hirts Arts rocks line the ledge between the upper and lower
levels. Also thin "craft foam" was glued down as a surface for
both levels |
I wanted a church and a collection of "beehive" huts in
my monastery. So, I figured I'd put the church on the upper level
and the huts on the lower. Once again, I dug out my leftover Hirst
Arts block to form the foundations and front and back walls of the
church. The long side walls would be made to look like "dry stone"
-- a common type of architecture in Celtic monasteries. I used
some of the window pieces to create the doorway and tiny windows
in the rear wall. More Hirst Arts blocks were used to create a
well in front of the church, which was sunk into the foam base of
the upper level so only the top lip of the well projected above
the surface. I also peeled away the craft foam surface to tacky
glue the resin Celtic cross to the foam surface of the upper
level. I'm hoping that the glue, lip of the craft foam and the
flocking that will be added later will keep it in place. I'll have
to be careful to remind players not to pick the monastery up by
the cross, though! At this stage, the monastery is starting to
come together nicely.
 |
| Work in progress shot of my 28mm Celtic Monastery for
my Dark Age skirmish games |
While all this was drying, I cut out a couple pieces of
foam core for the long, dry stone walls for the church. I simply
covered one side with glue and then poured on Woodland Scenics
Coarse Ballast (gray blend) onto it. I'd picked it out as looking
a lot like dry stone, and the multiple colors in it will keep me
from having to dry brush it different shades. I will put on a
black wash and it should look great. I also began to work on the
roof for the church. Its base was a rectangle of black styrene
plastic, with succeeding levels of craft foam built upon it. I
capped it with a triangular piece of balsa wood. The entire thing
will then be painted with white glue and covered in the gray blend
ballast to look like a dry stone roof. The picture shows the
bright orange craft foam I used when I ran out of black.
 |
| Close up of the church interior -- note the printed off
"frescoes" on the walls, the jewelry cross, and the tile floor |
I decided to keep focusing on the upper
tier of my Celtic monastery. The above shot shows it about
halfway done. The stone block foundation and front and back wall
are painted. I got smart and am did the interior (see picture
below) before I glued in the side walls. The side walls are not
complete. I have to add more blended gravel to the front and
back edges of them, and then do a black wash over the stones to
make it look more shaded. The roof is ready for its coating of
blended gravel, but is not in the picture. I really like how the
resin cross I bought at Cincycon turned out. I'll have to take a
better shot of it to show the nice detail. The church door is
done, as well. It is corrugated balsa wood with jewelry rings
and pin heads for the door handles. You can see the interior a bit better in this shot. The
frescoes of Celtic saints are simply images taken from the
internet and printed off and glued onto the wall. I gave the
interior of the foamcore walls texture by gluing sand to it, then
painting it black and drybrushing it two shades of gray (not 50).
The tile floor is styrene from a local craft store. The cross is a
jewelry piece from the local craft store, too. You can also see
better here how I have to add gravel to the facing edges of the
foamcore long walls.
 |
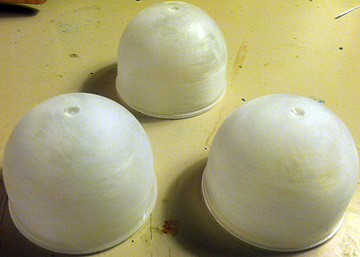
| Plastic domes from vending machines that will be used for
the beehive monk huts |
With the upper tier mostly finished, it
was time to begin working on the beehive huts that the monks
would live in. First, a word about them. They were constructed
of "dry stone" -- which means no mortar is used. The stone was
apparently angled out and downwards to shed rain because, well,
it rains a lot in Scotland and Ireland! What I've read about
them describes them as quite dry and cozy. Anyway, they most
often had strong, wooden doors. That actually surprised me. I
was thinking monks, with their taste for self-denial and
mortification of the flesh, would have just a cloth or fur
covering for a door. Apparently not.
 |
| The domes after roughing up their surface, inside and out,
with fine sandpaper |
Anyway, I went through three separate ideas on what to use for
them. My first thought was those plastic half spheres which
assemble into a ball that you can buy in craft stores. I picked
up a few only to discover they were too big once I started
laying out the surface of my monastery. Then I went to the
dollar store and picked up a pack of those little one-serving
cups of apple sauce. Still too big. Finally, I settled on those
dome and cap containers that you find in vending machines with
little toys or prizes inside. The first step is to use fine sandpaper to rough up the surface
so that the paint will adhere better. I roughed up the interior,
too, because I planned on painting the interior black.
 |
| The cardboard ring that each dome is affixed to |
Next, I set them down on a piece of cardboard and traced their
outline. I then cut a hollow ring from the cardboard for the
domes to be "based" on. I figured this would give them a more
solid fit onto the clay rings I would set them on (more on these
next). It would also cut down on wear and tear on the edges of
the domes themselves.
 |
The domes after painting them black and then affixing the
doors and coarse gravel to their surface. The doors still
needed painted, of course!
|
I should have glued on the doors next, but got in a rush and
spray painted them black first. The paint would have helped keep
the doors attached, but oh well. I wanted them black so that any
gaps that showed through the dry stone would look like shadow.
The doors themselves were made from corrugated balsa wood. About
half of the door projects downward from the dome. This will fit
in the notch of the doorway of the clay ring. I wanted the huts
to be removable so that things could be placed inside -- they're
going to be used for skirmish games, after all! Once the tacky
glue was dry, I painted each dome with white glue. I then poured
Woodland Scenics coarse gravel blended gray over them to look
like the dry stone. I made sure to cover the join of the door
and the dome thoroughly in glue so the doors appear to be set
into the stone. After the glue dried, I sprayed the stone with a
clearcoat. Finally, I brushed on a heavy black wash to darken
the stones and blend it all together.
 |
| Air drying clay available at the local craft store |
I mentioned the rings, above. I thought I would give each hut a
foundation of solid, cut stone. Since I don't like firing sculpy
in my oven, I purchased a bag of air drying clay instead. I
roughed out each ring, trying to give it a more square and
somewhat irregular look. I immediately made impressions with a
dull Xacto knife to represent the outlines of the stone. I
wasn't 100% thrilled with how they came out, but then again, I
never claimed to be a potter or sculptor! They should be
functional on the tabletop and look nice once the monastery is
all painted and flocked.
 |
| A clay ring to represent a stone base for the huts |
Once the clay was dry, I traced each ring's outline on the
lower tier of the monastery. Remember how I had put a surface of
craft foam over the top of the wooden plaque's flat surface?
Well, this was part of my reason why. I cut each outline with a
sharp Xacto knife and then peeled back the craft foam, exposing
the wood beneath. Then I used tacky glue to attach the rings to
the surface. This gives it more of a snug fit and will serve to
blend the stones into the surface of the ground. At least that
is the plan! Next up, I will paint the rings like stone and begin flocking
the entire monastery grounds.
 |
| Carving out the outline of each clay ring onto the craft
foam skin that was glued to the plaque. You can also see the
finished roof and dry stone long walls of the church in this
picture. |