Sunday, December 3, 2017

SE Asian Jungle Ruins

Splintered Light Miniatures with Hirst Arts ruins pieces flocked to represent overgrown jungle terrain
Earlier this year, a friend of mine, Tim Peaslee, very generously handed me a box of Hirst Arts plaster pieces of ruins, caverns, boxes, barrels, etc. I quickly painted up the boxes for this year's "That's My USAid!" scenario using my Wars of Insurgency modern skirmish rules. When I decided to begin my Frostgrave: Ghost Archipelago campaign, I pulled the box back out and sorted through the pieces. I organized them by size and the full scale of Tim's generosity finally sunk in. There were a LOT of pieces, here!
A couple merged photos showing what I called the "Single Pieces" -- roughly 1 inch square
I decided to paint up some of them as broken down and overgrown ruins of various temples, palaces, or other stone buildings. There were three basic sizes, and at least two different styles within each size. There were what I called the "Single Pieces" -- small, square ruins pieces about one inch (25mm) square. First, I glued them to a square of styrene or bass wood. Then, I spray painted them flat black. Once dry, I went over the black thoroughly in a 50/50 mixture of glue and water -- my typical method for painting resin terrain. A dark gray then dark dry brush followed. After flocking the bases, I added Woodland Scenic clump foliage to show the ruins beginning to be overrun by the jungle.
The Double Pieces measuring roughly 1"x2"
The Double Pieces were about 1"x2" rectangular sections of crumbled ruins. One of the styles included the stump of a tree growing out of the wall. This was particularly appropriate since you see that time and again in SE Asian ruined temples such as Angkor Wat, in Cambodia.
The Large, roughly 1.5"x3" pieces
Finally, there were the Large Ruins pieces, which measured roughly 1.5"x3". There were two main styles, both of which had a tree stump growing out of them. I suppose I could have hunted and found a tree to fit on the stump and have it be a live tree, but I wanted to keep these pieces quick and simple. They did paint up very quickly. Just as much time was spent flocking the bases as was on prepping, priming, and dry brushing them. They did not take long to paint up, and felt they looked great. The clump foliage glued onto the stones themselves really give them an overgrown look.

Next up is another batch of ruins created with Tim's Hirts Arts. Here I will be assembling pieces to recreate a crumbled down staircase, gallery of statues, and section of columns with statues atop them. Stay tuned!

Tuesday, November 28, 2017

SE Asian Temples: Two Smaller Temples & a Stupa

Originally built for my 28mm Pulp campaign, these temples will find use in my upcoming Frostgrave one, as well!
This will finish out my SE Asian temples built earlier for my Pulp campaign. For the full thread on how I built them, please check out Southeast Asian Temples (actually, eight separate blog entries -- here's a link to the first): http://leadlegionaries.blogspot.com/2013/10/southeast-asian-temple-part-1-materials.html
I like how these scratch-built temples are mostly made from various bits and pieces that I picked up at the craft store.
These two temples are a great size. I can really see them coming in handy for my Frostgrave: Ghost Archipelago campaign. Expect treasure counters to be located in them regularly!
The second temple, a twin of the first, with Pulp explorers posing in front of it for a photo op
Printed interiors look the part, I felt, and add that extra bit over an all black or blank inside


Round Stupa
A common feature of SE Asian archeological sites are these round stupas, that look for all the world like a giant, stone tea bell sitting on a platform. They are usually solid state with a relic of the Buddha inside. However, being a fantasy/Pulp piece of terrain they HAVE to feature a hidden entrance into the interior (where doubtless great treasure is secreted away!).
A round paper mache box, a craft food finial, some beads, stone spray and voila! A SE Asian stupa!
The upper portion pulls off of its base to reveal a hidden chamber!

SE Asian Temples: The Forbidden Temple

Scratch-built SE Asian temple (warrior statue is from a pet store "lizard aquarium" section)
Here are pictures of what I call the Forbidden Temple. This is also a big temple -- the biggest part being the statue from the "lizard terrain" section of a pet store. To read the blog entries about how it was constructed, go to my blog post on it ("The Forbidden Temple"): http://leadlegionaries.blogspot.com/2014/07/the-forbidden-temple.html
The friezes on the sides are actually are downloaded and printed out on a color laser printer from an Architectural website, and depict Angkor Wat
I called it the Forbidden Temple because it was the one I used in my series of Pulp games in which adventurers were looking for the Eye of the Buddha (found inside). It will see new action on the tabletop when I begin my Frostgrave: Ghost Archipelago campaign soon.
Another shot of the paper friezes glued onto the temple's sides
The interior of the Forbidden Temple - also printed patterns

Monday, November 27, 2017

SE Asian Temples: The Big Temple

Three quarter view showing the entire temple
 Here it is, the grand-daddy of all my SE Asian temples that I have built (so far...?). I call it simply, The Big Temple. Creative, isn't it?
Detailed shot of the roof of The Big Temple
Photo of the interior of the temple with the printed architectural patterns

View of the entrance to the temple and the styrene brick pattern sheet and Hirst Arts blocks entranceway
Anyway, to read how I created it, you'll have to go back to the original thread from 2014: "Snowed In? Build a Temple!" It may seem strange that I am duplicating the finished photos here, but...sigh...there is a reason. My previous image hosting site, Photobucket, has decided to charge more than $400 for "third party hosting" -- in other words, "hot-linking." That's when you upload a photo to their site and link back to it on another, such as a blog. Why Photobucket is essentially committing business suicide, I don't know. No one that I know of will pay that ridiculous amount when there are perfectly sensible free options. Such as a Google blog!


New Warband for Frostgrave: Pine Martens

The Pine Marten warband using Splintered Light Miniatures
I am continuing my preparation to begin running Frostgrave: Ghost Archipelago for the Sunday night gaming group. I am painting up warbands for the players using Splintered Light Miniatures' line of 28mm animals. This warband uses figures from their Pine Marten line. I have to admit, I had never heard of a pine marten before I bought the figures a number of years ago. Apparently, they are a type of weasel more common in Europe.

Each warband will consist of 5 figures, but I will usually be painting up a sixth one for some variety and player choice. This is half the size of a standard Frostgrave player force, but we have a pretty big crew on Sunday nights, so I am worried about games taking too long. Another local group ran a Frostgrave campaign with smaller warbands, as well, and everyone seemed to have a good time, I hear.
The Pine Marten's Heritor, left, and Warden.
The leader of each force is called a Heritor in Ghost Archipelago. He has magical powers, but is often a skilled warrior, as well. His family bloodline has remained pure tracing ancestry back to those that drank at the magical Crystal Pool, which explains his greater powers. The figure above on the left is the one I plan on being the Heritor (although the player who uses them is free to choose a different one, I guess). I gave his chain and plate armor bronze with gold highlights. The fur pattern is probably the one I think turned out best of the group. Meanwhile, the Heritor's assistant is a spellcaster called a Warden. These wizards learn elemental type magic -- based off of water, air, earth, etc. They are not allowed to wear armor or carry shields (but are free to use whatever weapons they choose). So, this figure with a halberd and billowing cloak worked great, I thought. It his hard to tell in the photo, but the cloak is painted in four bands of colors -- pink, burnt orange, red-brown, and dark brown. A wizard has to have a fancy cloak, right?
Two Pine Marten warriors -- one with a morning star and the other with an axe and bow strapped to his back
Next up is a group of ordinary soldier types. The SLM Pine Martens do not come with any archers or missile troops. I decided that I would modify a figure in this case as an archer in case players want missile troops. I thought about cutting off the axe, drilling out the hand, and then inserting a box. However, I am not very good at converting figures. So, I decided to simply glue a bow to the figures back. It is much more noticeable if I turn the right-hand figure around to see the backside, but I was happy with how it came out. The left-hand figure with the morning star turned out well, too, I thought. I especially liked how the pattern on his tunic looks.
Two more SLM Pine Marten warriors
There is not a lot of variety in the SLM Pine Marten figures, so you'll notice duplication here. The left-hand figure is a repeat of the axeman above, while the swordsman is the same pose as the Heritor. Although I love the SLM line of animals, that is one drawback of some of the creature types. Some have only a few poses, some more, some even less. So, it's probably a good thing that I went with the smaller warbands! I would have had to do a LOT more figure modification otherwise.


Sunday, November 19, 2017

Going on a Paleo Diet

The highlight of the evening was Allen's spirited, but ultimately unsuccessful, battle with a sabretooth tiger
Keith has always has a penchant for the prehistoric, staging dinosaur hunt games for us over the years. With the release of Ganesha Games Paleo Diet: Eat or Be Eaten rules, he set up a game where we take on the role of cavemen from the same tribe on a hunt, trying to bring home the bacon. Each of us had 3 hunters and a hound, and we were dispersed around the table. Various giant and herd grazers were scattered across the table, along with 3 predators -- a pack of wolves, a giant weasel, and a sabretooth tiger.
My hunters -- two with spear and one with bow -- set out with our trusty hound to hunt some really big game
As it turned out, only the sabretooth got into the game. Keith's hunters fled from the wolves, and the weasel took one look at the firebrand that Joel's hunters were carrying and ducked off the table. Allen, who loves to see how things work in a game and will do things that are unwise on the face of it -- just to see what happens, moved his band to attack the sabretooth. I decided to go for easier kills, and climbed a steep hill to stalk a family of Macrauchenias -- which looked to me like a cross between a giraffe and a tapir. There were six of us players, and we all set out after the animals once the game began.
My hunters close in on a family of Macrauchenias, targeting the young one in the center
Paleo Diet has a clever game mechanism in which the animals activate either when players do certain triggers (such as moving within a certain distance, pelting them with arrows or spears, bringing fire within a Long distance, etc.). They also react on activation failures by the players figures. I proved my dominance at bad die rolling, once again. Deep into the game, I had managed to roll more "1's" than the other five numbers on the dice combined!
First kill! Our hound brings down the young one (don't be sad -- no actual animals were harmed in the staging of this game)
This led to a somewhat frustrating part of the game of closing with animals only to have them amble away. Luckily, we had surrounded the board, and pushing a herd away from you meant that they were coming closer to another one of us. I managed to close in on the Macrawhatevers and my dog brought down a baby one. Meat for the campfire tonight! This panicked the parents who fled further up the forested slope. With my horrible movement rolls, I knew I'd never catch them. So, I turned around to go for a herd of giant tapirs who had fled from other hunters to a position within range of my hunters.
Stampeding animals create a traffic jam as our hunters spooked them, making herds run back and forth across the board
Meanwhile, Allen bravely closed in on the sabretooth and engaged it in melee. He caused one wound on it, but had a hunter wounded, too, in the exchange. The sabretooth roared (causing morale checks) which caused most of his hunters -- except for the wounded one, oops -- back off. That unfortunate act of bravery doomed him and there was one less mouth to feed in our tribe. At this point, Allen decided the herbivores tasted better, anyway, and switched targets.
Six hunter bands meant for a slower-moving game than would probably be normal
It was a fun game, and could EASILY be played solo. The animals react entirely by rolling a table and triggers by the players. The game did move a little slow with six players (and each of us having 3 hunters and a hound). However, smaller groups or fewer players would solve that. Of course, a little less poor rolling (fewer activation failures) might make it go faster, too! Still, we killed a tapir, a couple macarenas, and one other beastie that I forget about. A fun evening, channeling our distant ancestors and their attempts to hunt enough to keep from starving, all the while eluding those that would eat us!
Another herd of animals flees towards us, providing my band with fresh targets

Wednesday, November 15, 2017

Frostgrave: A New Project

The rules
Well, I enjoyed my game of Frostgrave: Ghost Archipelago enough to rush out and buy the rules. I pitched the idea to the Sunday Night gaming crew and received an enthusiastic enough response. They even gave a thumbs up to using the Splintered Light Miniatures anthropomorphic Woodland creatures as warbands. You never know -- some gamers may not want the characters they're controlling to be bears, badgers, wolverines, raccoons, and so on! I dug through my SLM unpainted lead (and there's a LOT of it), and picked out about 30 miniatures to paint up.
Some of my previously-painted Splintered Light Miniatures animals -- two bears and two wolverines
Readers of my blog know I've been painting SLM figs for awhile. Originally, I used the for armies for Hordes of the Things (HOTT) rules. However, HOTT has petered out here, dying alongside DBA Ancients -- which we played for more than two decades. Lately, I've been painting more of the animals up for my own set of big battle fantasy miniatures rules. However, all along, the leader figures for these armies I'd decided to base up individually. In the back of my mind was another project using these individually based figures.
SLM frogs -- not sure whether to keep these guys as opposition forces for the players, or offer them up as a force
Well, along comes Frostgrave: Ghost Archipelago and now I have a definite need for these individually based figs! Since my Sunday night crew is rather large (we have 5-8 players regularly), I worry that a normal 10-figures Frostgrave force might lead to really long games. My plan is to shrink down the size of the forces, though I may paint them up initially as 10-figure just in case.
Jungle Rats - my first force that will be offered up to my players
Anyway, here's my first force from my previously-painted figures: The Jungle Rats. The dark rat in the front left will be the Heritor, or magically powered leader of the force. The white rat in the middle is his Warden -- you can tell he's a shaman by the skull on the end of his staff, of course! The remaining five will be choices for the player to field. The blowgun armed rats will likely count as "Bows" -- I know, I know. Shouldn't have as much range as a bow, but this IS a fantasy world, isn't it?

Other warbands coming up include the Pine Martens, Badgers, Satyrs, and more...!

Saturday, November 11, 2017

Trying Out Frostgrave: Ghost Archipelago

The board -- which feature my temples and Jeff's plants, along with Steve's Saga Dark Ages figs
I had been seeing lots of posts on the Lead Adventure Forum, as well as on Facebook, about the Frostgrave rules. From what I could gather, it was a set of fantasy skirmish rules with a strong campaign and a bit of role-playing element. Each player controlled a wizard and his band of hirelings searching for magical treasures in a frozen city. It sounded interesting, and I had been wanting to try the rules out to see if the game was fun.
My Heritor in the bear-skin cloak, leads some of his followers towards the temple ring in the distance
So, when Steve P invited me over to his house to play a game, I jumped at the chance. Steve had played in my Beaver Wars playtest, and I had known his friend Jeff for a long time. When he emailed requesting we bring jungle terrain and dinosaurs and other assorted, appropriate monsters, I scratched my head a bit. I thought that, well, maybe he doesn't have any winter or ice terrain and was going to set it in a jungle. When I arrived, I discovered that there is a spin-off edition called Frostgrave: Ghost Archipelago, and that was what he was running.
Jeff and Steve spent much of the game attacking each other, which made things easier on my group
I expected Steve to have our wizard and bands of hired fighters chosen up beforehand. He didn't, though, saying he wanted us to experience that aspect of the game, too -- choosing your wizard's band. It also turned out that the game itself has changed in this edition. Your leader is called a Heritor (not a wizard), and has developed innate abilities. We could choose any 5 abilities from a list of 40. So, no longer does your leader choose one of the 10 schools of magic as in the original Frostgrave rules. Everyone also has a Warden -- the equivalent, I guess -- of the Apprentices in the original. However, I found my Warden to be every bit as tough as my Heritor. With these, you do have to choose from among five types of Wardens. You select 3 spells from that type, and any one from another type's list. I chose a Beastmaster, of sorts.
Two archers of my force, guarded by an infatntryman, line up shots against the enemy in the distance
Next, you finish out your force of 10 figures by purchasing 8 fighters to round out your band. You get 250 gold pieces to hire them. I choose 3 archers, 2 infantrymen, and rounded out my force with 3 "free" standard fighters. I did not pick any of the more expensive types, such as Hunters or Guides, wanting to minimize the learning curve.
The central ring of raptor eggs quickly became a hotbed of action
Steve had selected a scenario from the book where we blunder upon a circle of dinosaur eggs. We placed the 6 treasures -- half of which had to be within the ring of dino eggs. Every turn, there was a 25% chance 3 of the eggs would open up, releasing baby T-Rexes (raptors, in this game). We entered from three of the board edges and quickly advanced towards the middle of the board where the eggs were. I split my force up to go around a small temple in front of my force. I immediately used my Heritor to "Wraith Walk" through the back wall and inside where he picked up the first treasure of the game. Jeff and Steve's forces began exchanging bowfire quickly, and began to draw blood.
My Beastmaster Warden took control of the raptors mentally, and sent them after Jeff's force, where they began to chew up his hirelings
I caught on quickly with how combat worked. Each player essentially adds the roll of a  d20 to their Fighting bonus, along with some tactical factors. Shooters add their shooting bonus, with the targets adding for cover. This opposed die roll mechanic becomes deadly when you consider you are using d20s. A swing of opposed rolls of 20 vs. 1 is probably going to kill all but the Helitor and Warden, who will be grievously wounded. This is mitigated by the fact that most characters have an armor rating of 10-12 or so, which is then subtracted from the winners total roll in the opposed die roll. Nothing happens to the winner -- only the loser takes damage.
Two more of my hirelings investigate a brick temple for treasure
When the first raptor eggs began hatching, I used my Beastmaster Warden to take control of the vicious saurians and move them into contact with Jeff and Steve's figures. Earlier, I'd summoned an animal, but rolled only a Mountain Goat. Since none of us had brought goat figures, I pulled out a Komodo Dragon figure, who bravely pranced into battle alongside my hirelings. When raptors hatched next to my figures and things began to look grim, the goat/dragon charged into them, and over the course of several turns, killed both raptors menacing my figures. Go, go goats!
The dice eventually fell against me, and two more raptors woke up next to my troops. The Komodo dragon bravely charged and killed one, then followed up on the other
In addition to snatching the first treasure token, I did fairly well in picking up other ones. I even snatched the Major Treasure token from the middle of the Dino Egg circle and was able to get it to my side. When we called the game, my force had four of the six tokens under control or off our board edge. It was a smashing victory for my guys. Having never played the game before, I do not claim to be a savant or anything. I know I had very fortunate die rolls at times, and Steve and Jeff attacked each other mercilessly. Whether it was my use of cover or their blood-grudges against each other, my troops took little fire or attacks from my enemies.
The chaos of the late game phase of the battle
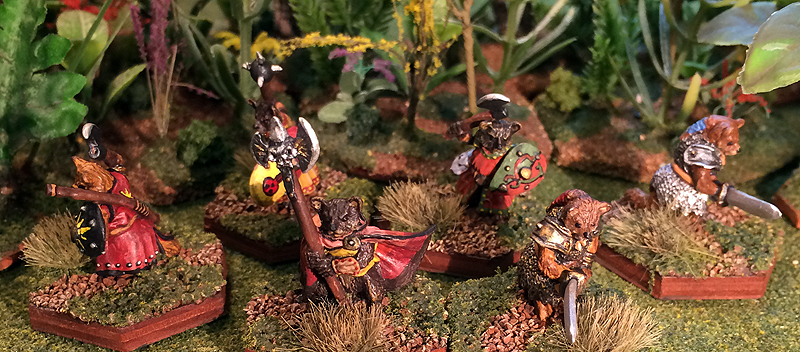
All in all, I like the game and think it will make a nice addition to our regular Sunday night gaming. However, I think 10 figures per side will simply be too much for a game involved six-plus players. I read up on it some, but likely whittle down the forces. Speaking of which, I was thinking that this could be a place I could use my individually-based, Splintered Light Miniatures anthropomorphic animals. They're pretty much 20mm, and fit with the whole forest-jungle world. I could call it "Furgrave," for the heck of it!  They have wizard figures and a big variety of fighters. I already have a number of factions painted up (savage jungle rats, frog-men, giant bears and wolverines, and more).  I was excited enough by the idea to go out and buy the rulebook at a local gamestore that same evening. So, look for me to be painting and posting pictures of more Splinted Light animales I'm painting!


Wednesday, November 8, 2017

Blast from the Past: Celtic Monastery (Part 2)

My scratch-built 28mm Celtic monastery with finished beehive huts and church
So, I wasn't quite done with the beehive monks huts on the last update. I still had to paint the doors, and then I found one other things I felt needed to be accomplished. The doors were easy, though. I did a base coat of black, then two dry brushes -- one of Camo Brown and the other Colonial Khaki. I used Howard Hues acrylics for my drybrushing because they are such thick paints. I followed that up with painting the clay rings that would be the cut stone base. I coated them black, did a dark gray wet brush and a final Rebel Gray dry brush. I wasn't sure if I'd made deep enough grooves in the air dry clay to be picked up with dry brushing, but I'm pretty happy with how they turned out.
The finished beehive monk huts for my Celtic monastery
However, when I set the huts on top of the rings, something just didn't look right. Sure, they fit like a glove -- better than I was hoping, actually. I'd thought I was going to have to do some kind of magnet inset into the clay ring or similar to hold them down. The door as the notch and the clay ring doorway as the groove worked perfect. What didn't look right was the two different tones between the cut stone foundations (Hirst Arts block and the air dry clay ring) and the dry stone walls and roofs (Woodland Scenics coarse gravel blended gray). Even though I'd added a dark wash to "blend" it all together, I still thought the differences in tone were too noticeable.

So, I decided to use the same Rebel Gray dry brush highlighting that I did on the cut stone work on the dry stone. I really liked how it tied the look all together. It was the final touch that made it appear like it all belonged together.
The flocking begins...the first layer of medium ballast
The last step will be the flocking. In the above picture, you can see stage one of my flocking. I painted the entire surface with a mix of white glue, water, and earth red paint. While it was still wet, I poured Woodland Scenics medium ballast over it. This smooths out the different levels a bit and roughs up the ground texture. Next up, I paint the ballast with the same water, glue, paint mixture and sprinkle on sand.
My scratch-built 28mm Celtic monastery with finished beehive huts and church
I'm thinking I need to come up with a new method to flock large terrain pieces. My "new" method of applying ballast, sand, and then grass and shrubs is fine when I do something small. However, it takes a l-o-n-g time for 9"x12" areas. The bigger the piece, the more unwieldy it is when you're pouring the various flocking onto the base and not trying to spill it all over the desk. I have a large plastic tub I keep beneath the piece while I do this, but it is still a pain. Maybe I need to go back to trying Liquitex modeling paste for bigger pieces. We'll see.
View from above of the sand and turf flocking
As you can tell from the above soul-searching, stage two of the flocking of the Celtic monastery was frustrating. I think the end result looks okay, but it took more than an hour to do this. Maybe I just need a bigger brush or a new technique or two, but I am not looking forward to stage three! I also noticed that the sand appeared lighter colored because I did not have a solid earth red color on the base. I should have added in this step and hand-painted the ground that color. My mix of glue, paint and water was obviously not opaque and dark enough to provide the customary darker, earth-reddish color that it does on my miniature bases. To fix the lighter tone, I sprinkled quite a bit of Woodland Scenics brown "turf" over it to darken it down. That, mixed with stage three's grass should do the trick. I guess I just have to realize that doing things like this is a learning process. All the more reason to be doing a tutorial, eh? Maybe my missteps will help others doing similar projects.

Anyway, I'll let stage two dry for awhile, then spray it with dullcoate. After it dries, I'll add the grass either later tonight or tomorrow.
Close up of the upper area of the monastery
So, did I screw up the end game? Look at the photos, and you be the judge. I was actually happy (if not giddy) with how the monastery came out until I saw the photos. I think I really messed up the flocking. At the last minute, I decided it would look cool to have gravel or stones peeking through on the dirt path leading amongst the beehive huts and up the slope to the church. I put them on top of the flocking, and then didn't bother toning them down with a wash. I thought I could fix it by simply sprinkling a layer of Woodland Scenics "Turf" over it. When the gravel was still was too glaringly bright, I put another layer. And then when I dullcoated the whole thing, that flocking blew up and dusted the door of the church. It doesn't show up as much in person, but it sure does in the close ups of these photos.
The interior of the church of my scratch-built 28mm Celtic monastery
No, I'm not going to hurl it against the wall. However, I am rating this build beneath the graveyard and well below the Saxon church. A disappointing end to something I invested craploads of time on. I've learned my lesson to not rush things, and most of all, not be lazy and skip steps.
Another view of the Celtic monastery
The beehive huts of my Celtic monastery

The images of the saints I used for the walls (downloaded from various images on the internet and resized)
 Author's Note: Okay, here I am, years later, thinking I have no idea why I considered this a disappointing end to the build. I think it looks nice. My apologies for whatever snit I was in as I finished it that caused me to leave out description of the painting the interior of the chapel. I hope you enjoyed the step-by-step description of how I built this...!